In this tutorial we’ll create a super easy and nice guitar illustration.
Tutorial Details
- Program: Adobe Photoshop
- Version: CS5
- Difficulty: Beginner
- Estimated Completion Time: 2-3 hours
Tutorial Assets
Wood Texture by ResurgidaResources
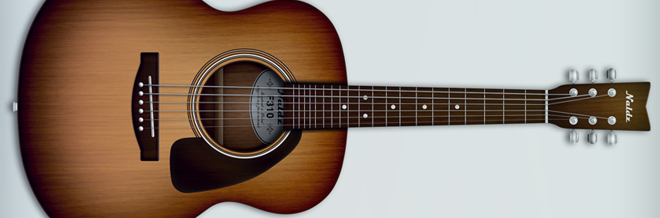
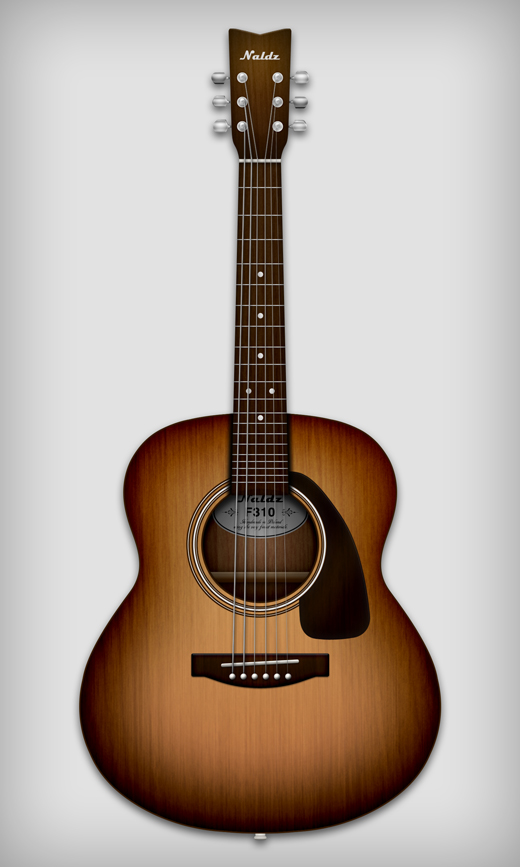
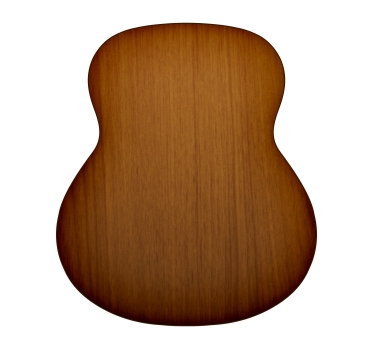
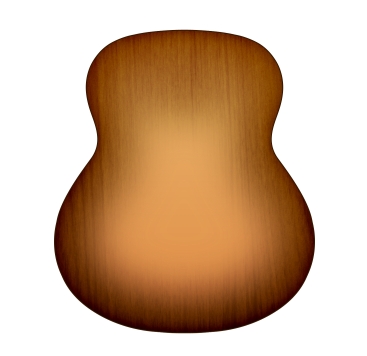
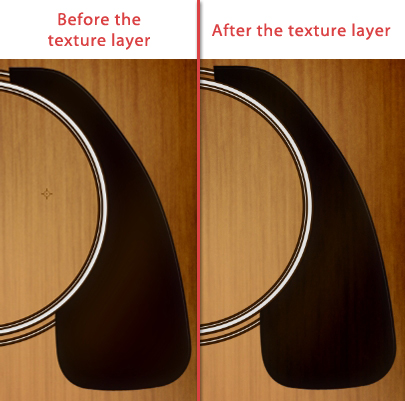
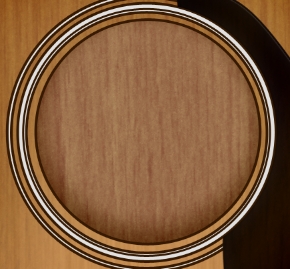
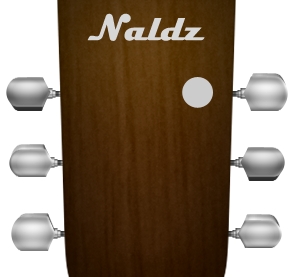
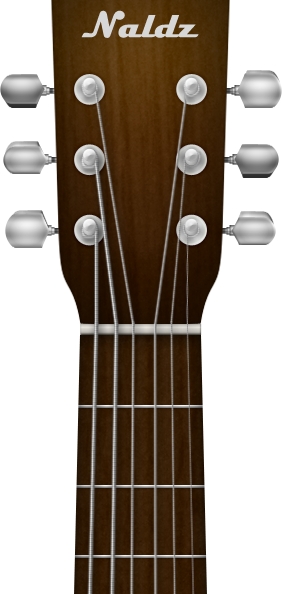
Final Result
Step 1
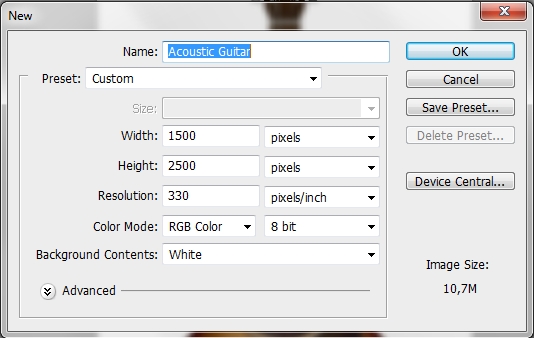
Create a new document in Photoshop. I chose to make the guitar kinda big but the size of the canvas is up to you.
Step 2
Create a new layer and using the Pen Tool (P) draw the shape of a guitar (remember that you need to draw only the one half, as you can the duplicate the layer and flip it horizontally). Use the image below as a guide (you can always use the Ellipse Tool (U) to create the shape but you’ll end up spending a lot more time than with the Pen Tool).

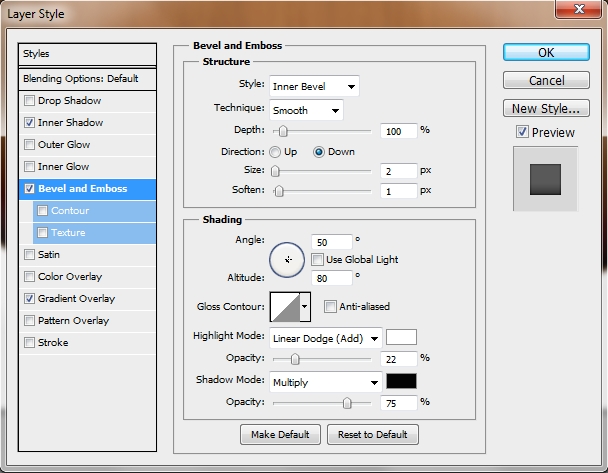
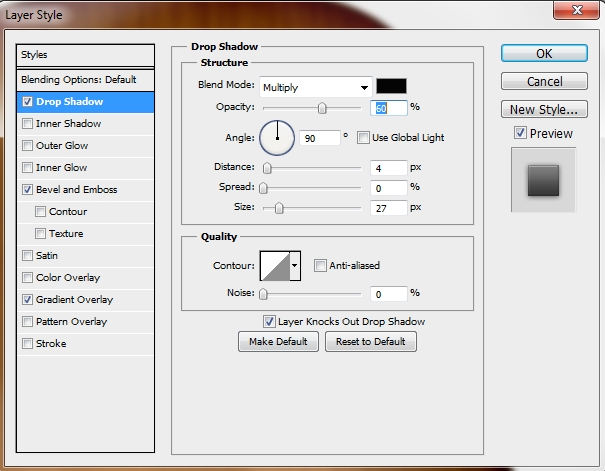
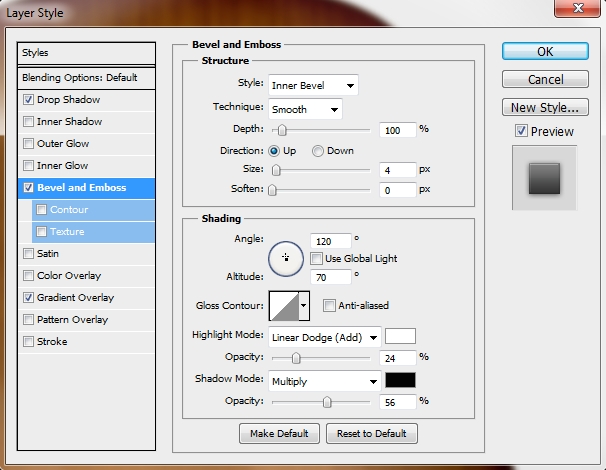
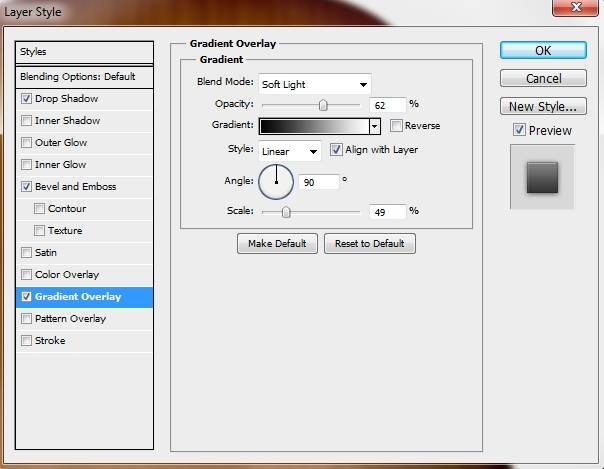
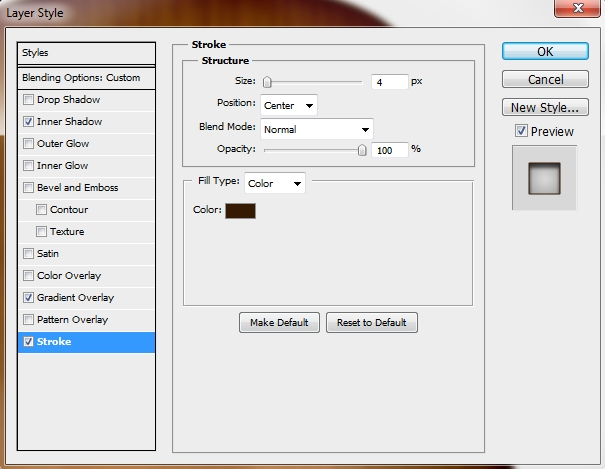
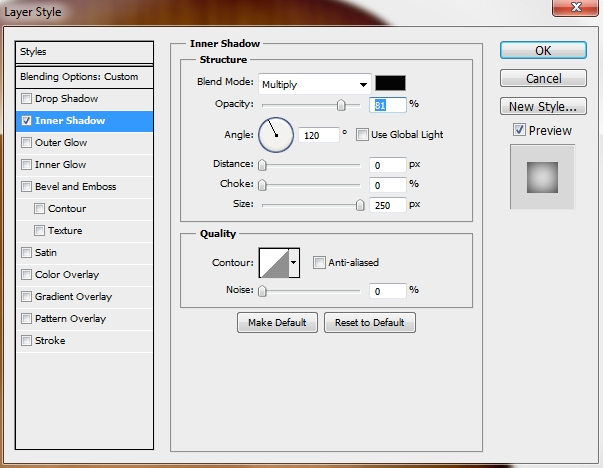
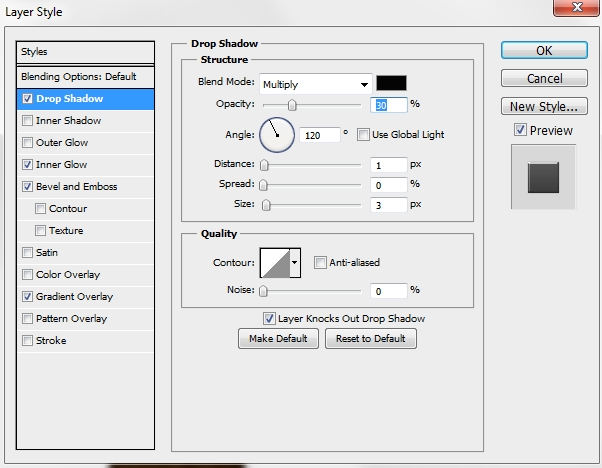
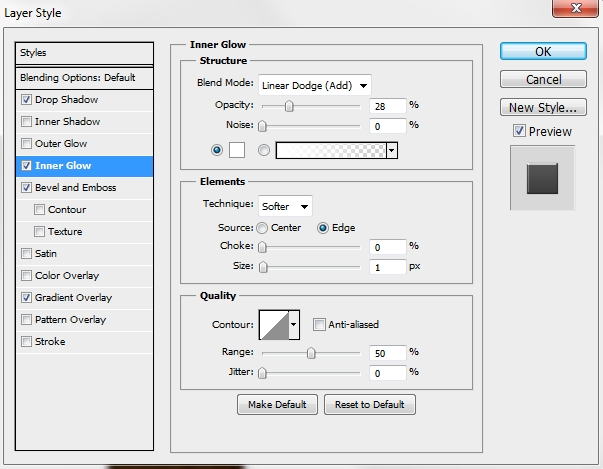
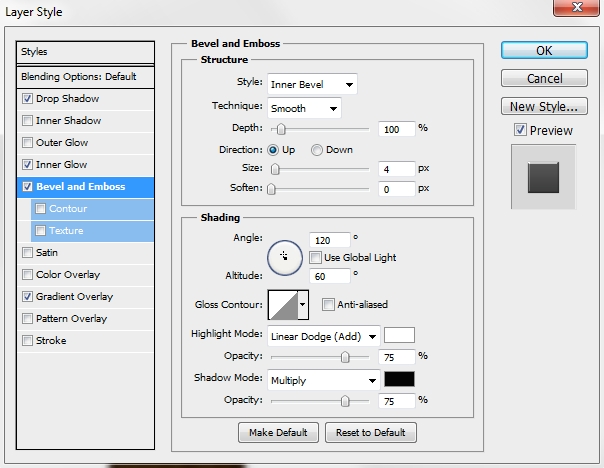
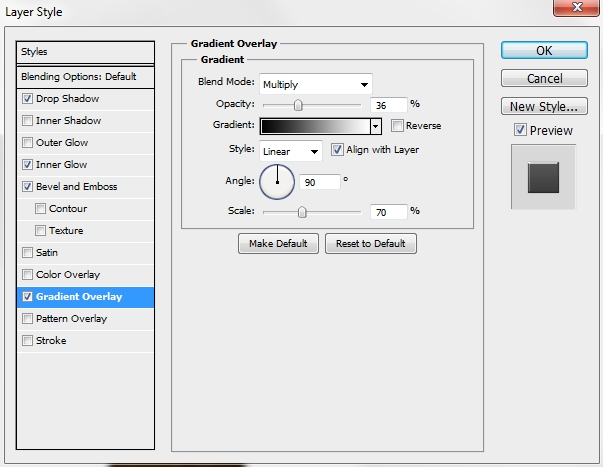
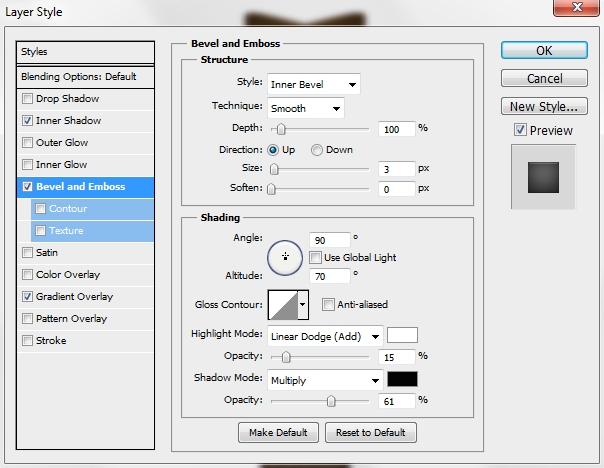
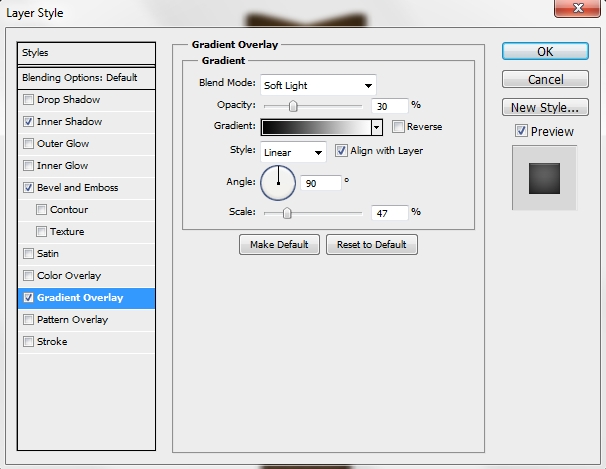
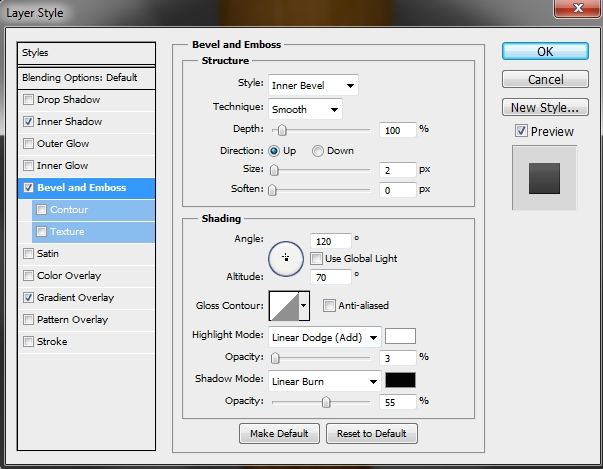
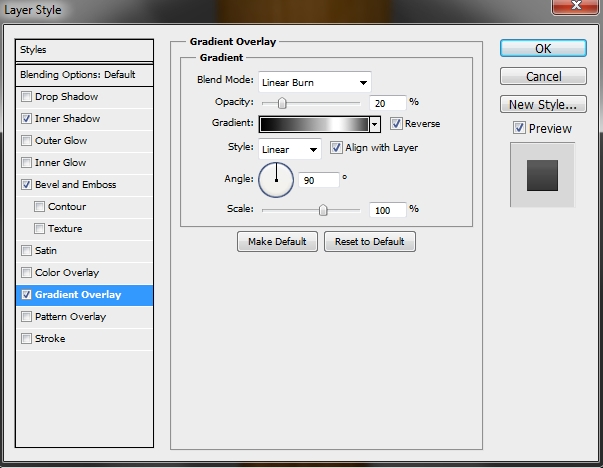
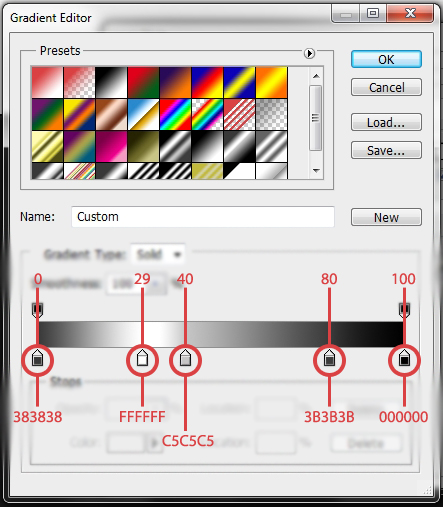
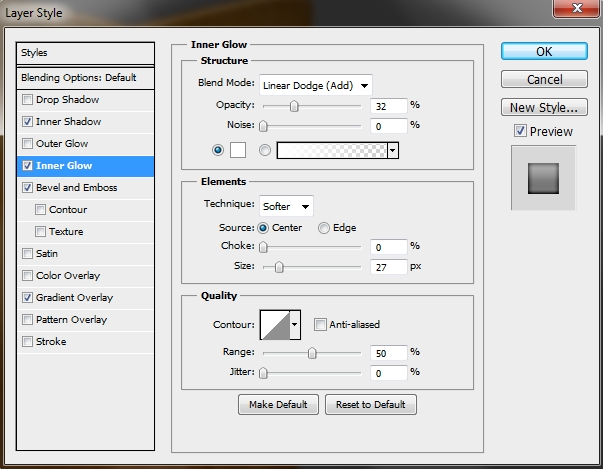
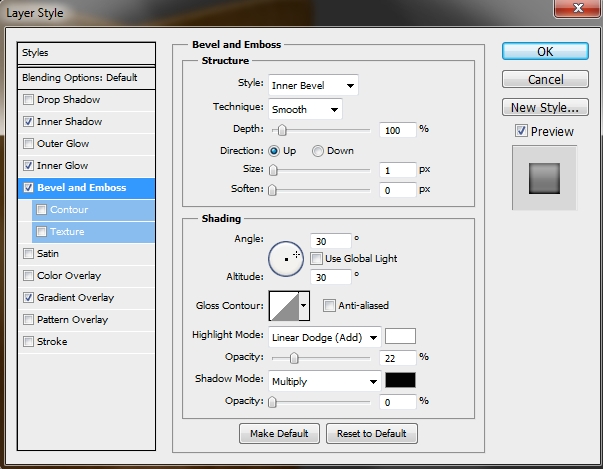
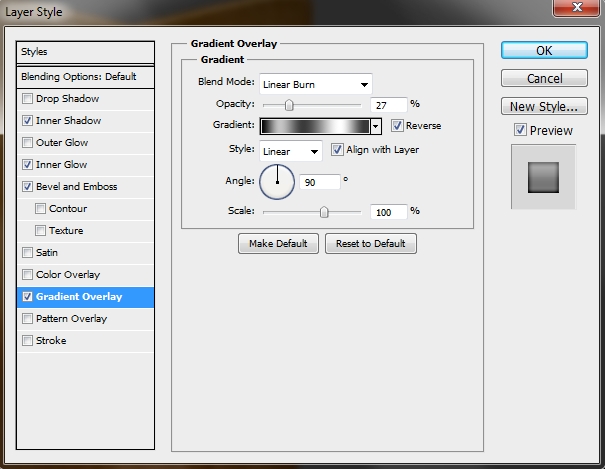
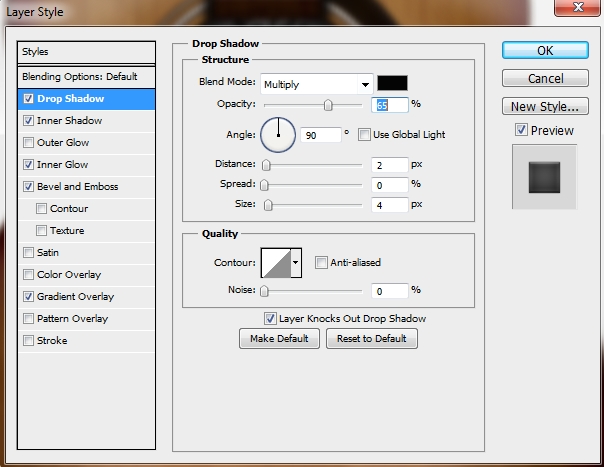
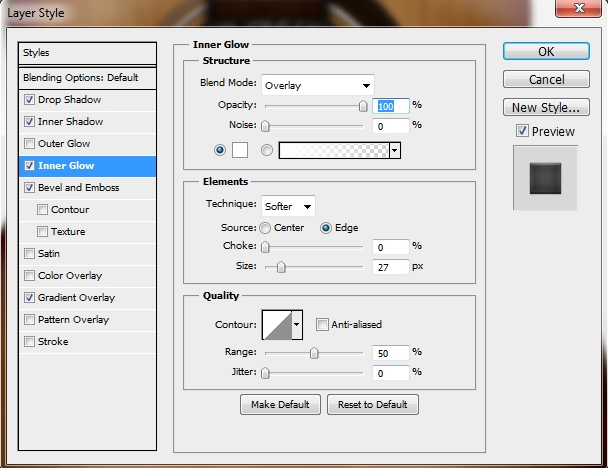
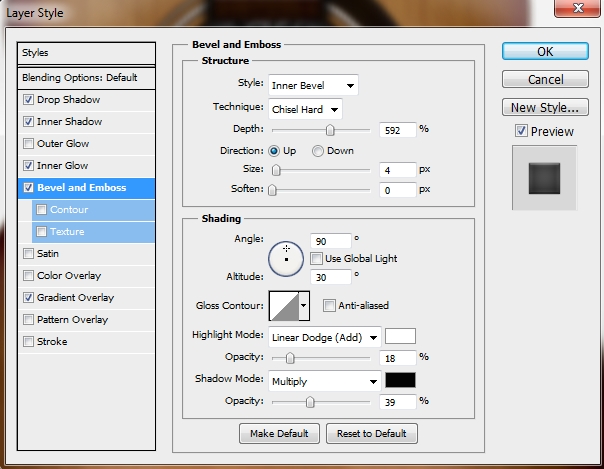
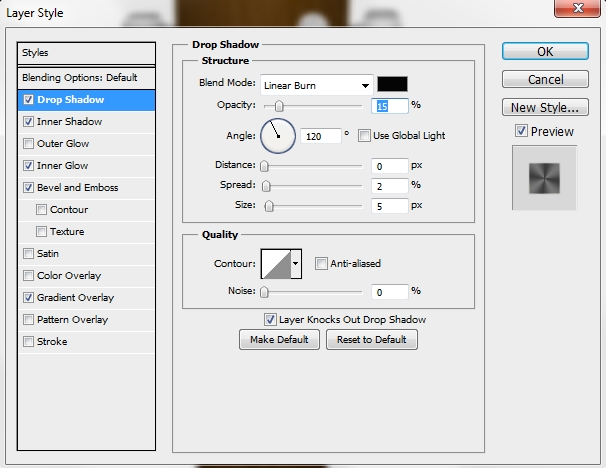
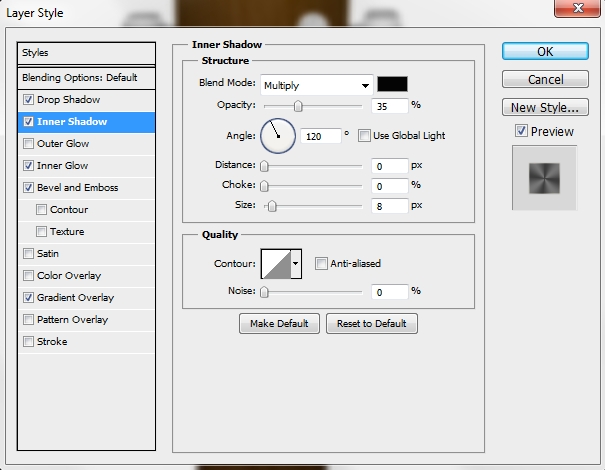
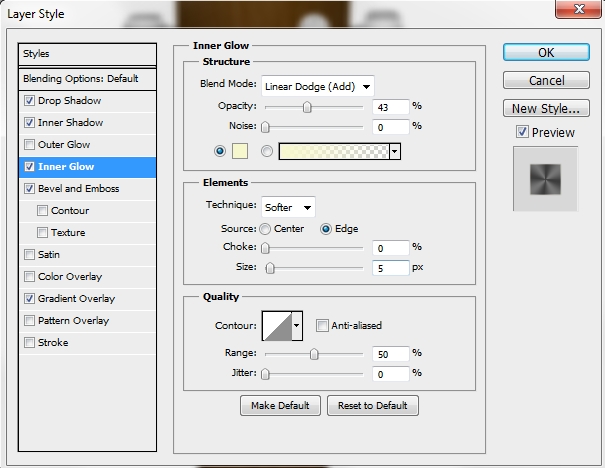
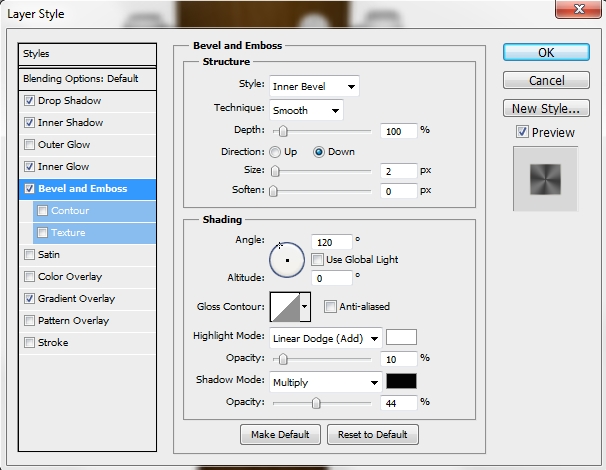
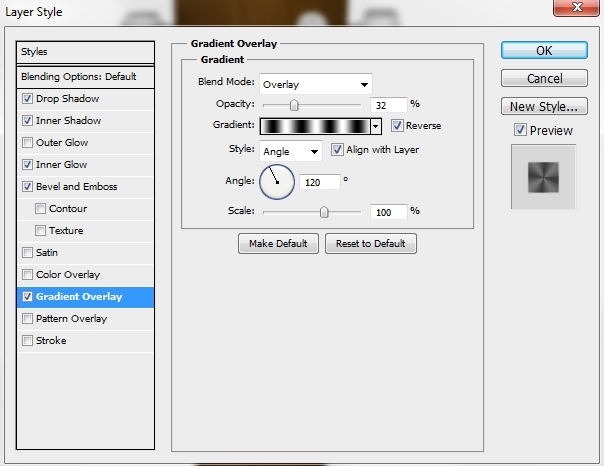
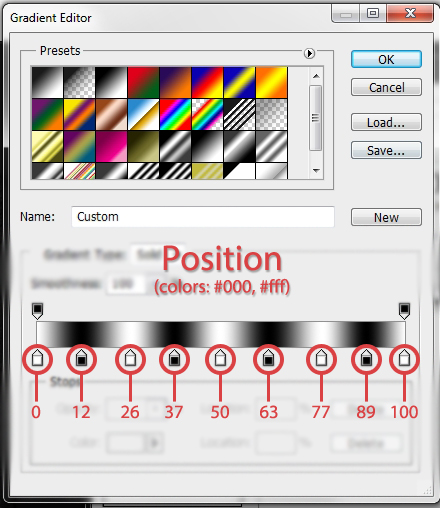
After drawing the shape, fill it with #995f22 and then duplicate it. Having selected one the layers go Edit>Transform Path>Flip Horizontal. You shall now have your basic shape. Merge the two layers and rename the new one to “Basic Body”. Then simply apply these styles.
Step 3
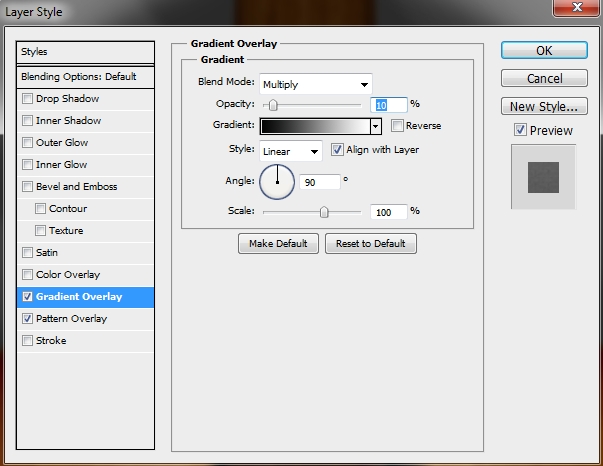
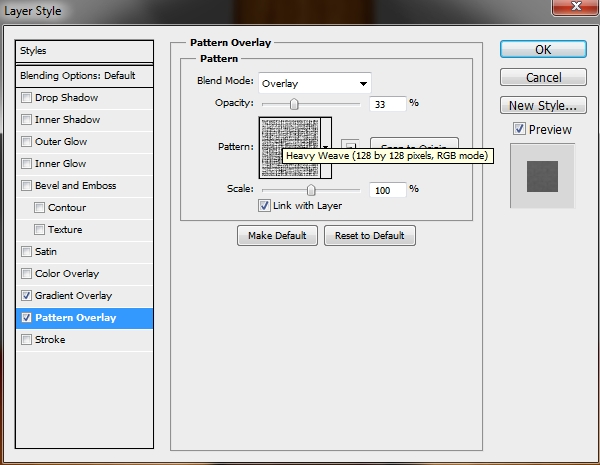
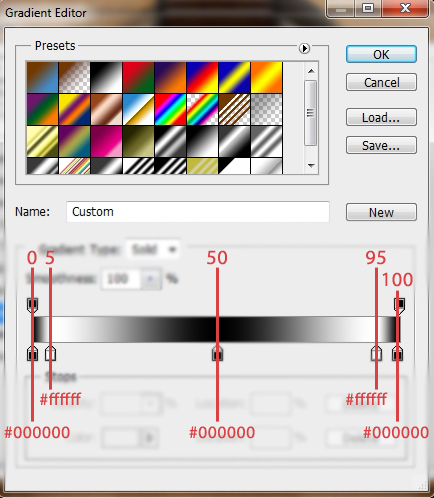
Create a new layer and place the Wood texture I from the tutorial assets. Rasterize the layer (Right click on the layer>Rasterize) and hit Ctrl+U (Hue/Saturation panel). Desaturate the texture (Saturation -100) and turn up the Lightness a bit (about +20). Then make it a clipping mask to the “basic body” layer (hold Alt and left click on the line separating the two layers in the layers stack). Change the Blend Mode to Overlay.
Step 4
Create a new layer (it should automatically make it a clipping mask) select “basic body’s” pixels (Ctrl+Left Click on the layer’s thumbnail) and go Select>Modify>Contract. Select 100 px (this depends on the size of the body) and press ok. Fill the selection with #e4a057 and apply a relatively big Gaussian Blur (Filter>Blur>Gaussian Blur); something around 20-30 px. Finally lower the Opacity to 60-65%.
Step 5
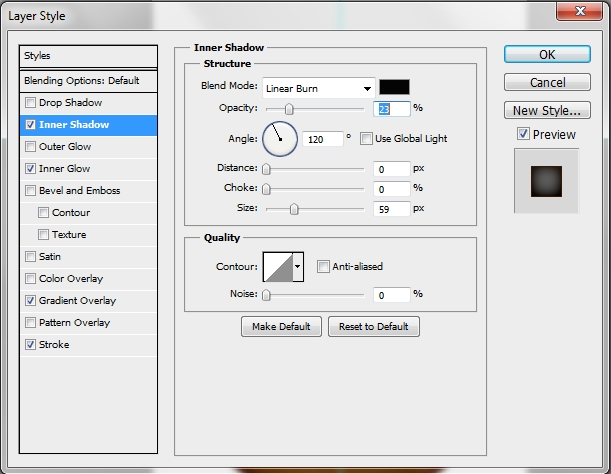
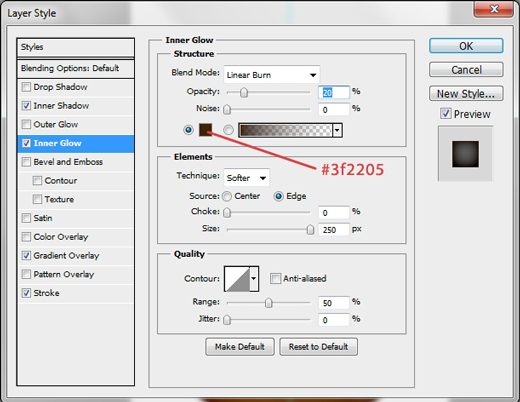
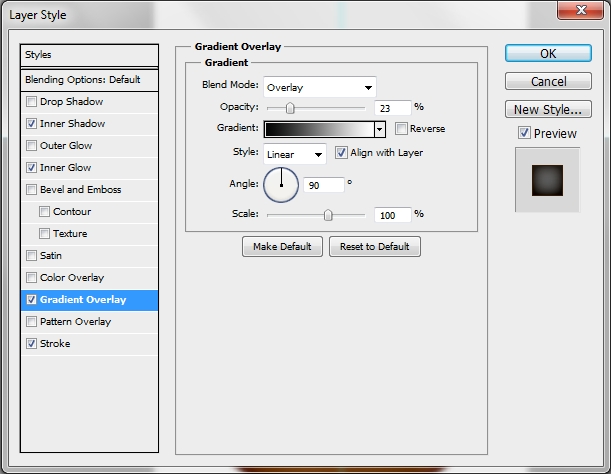
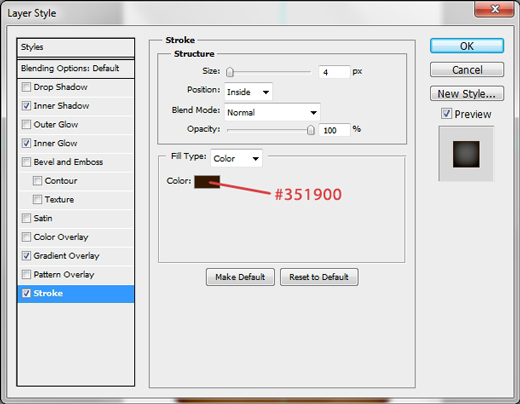
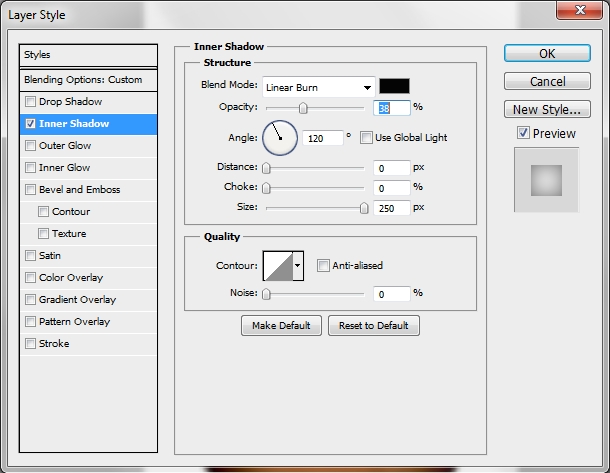
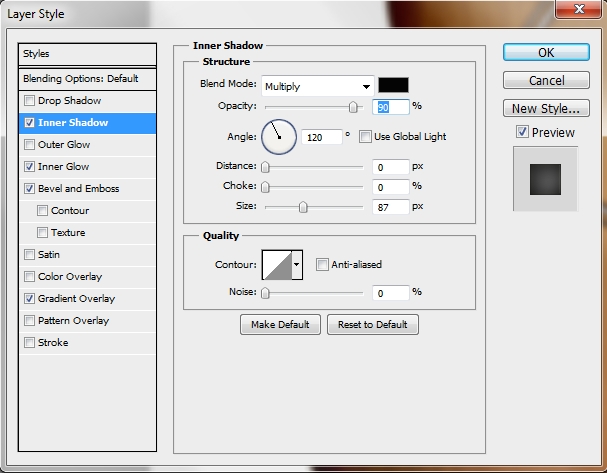
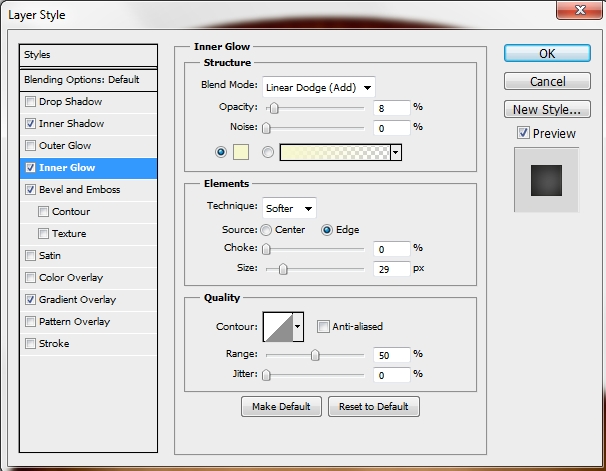
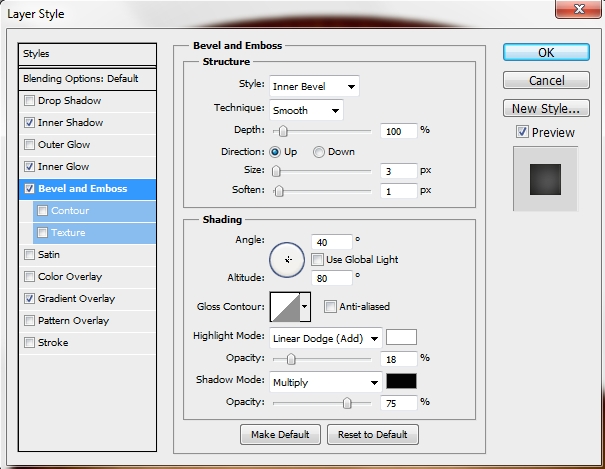
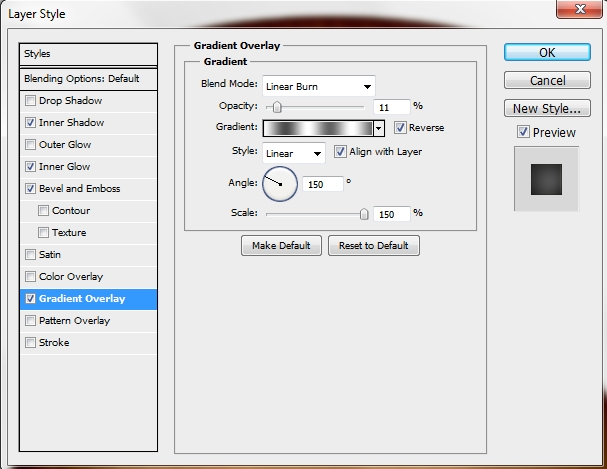
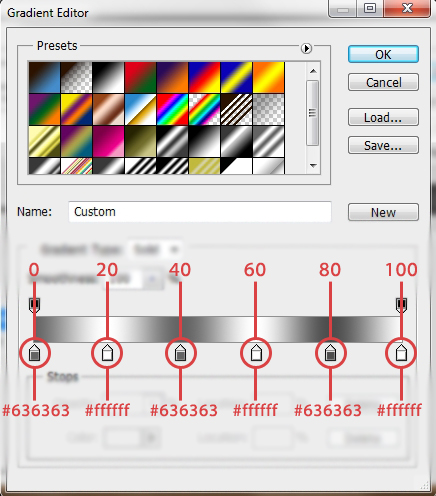
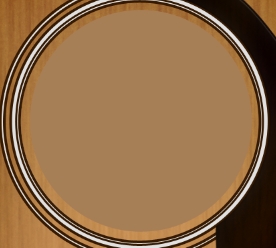
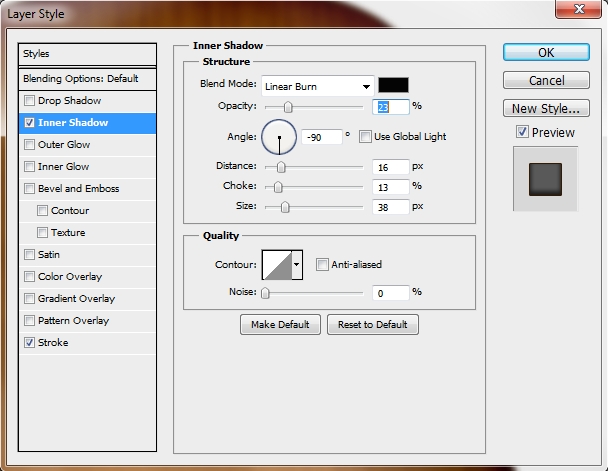
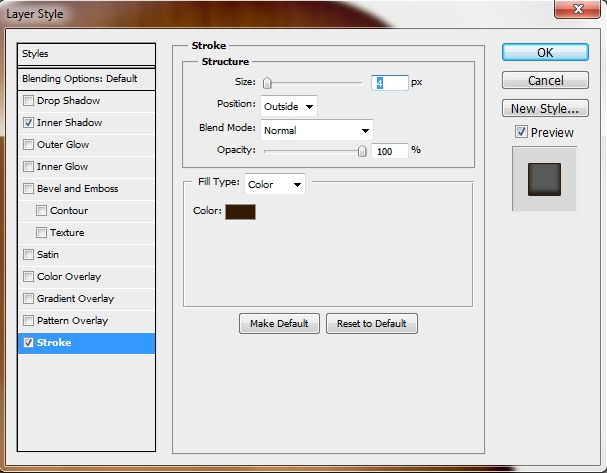
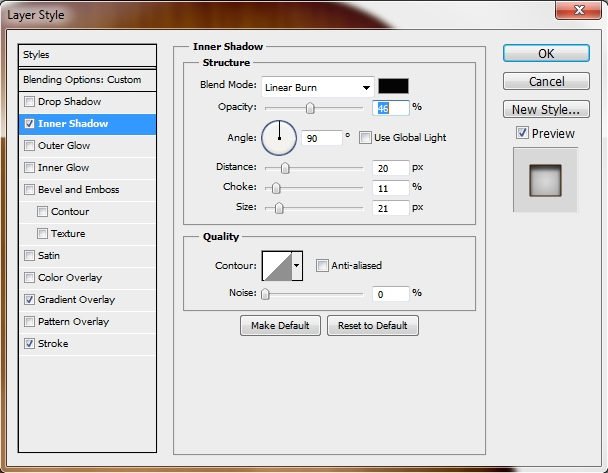
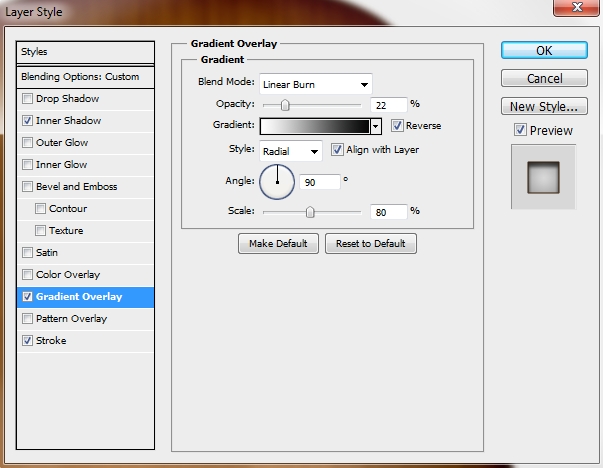
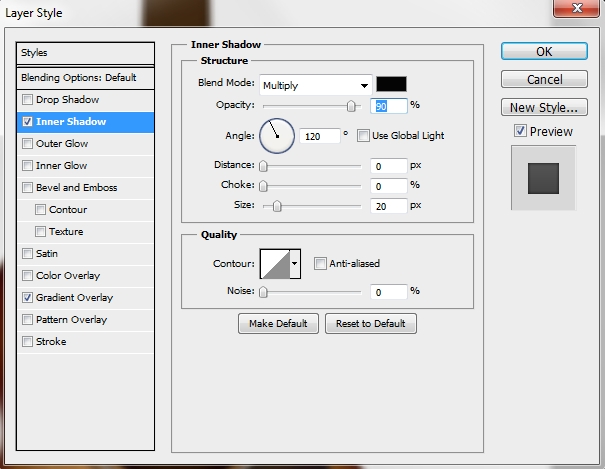
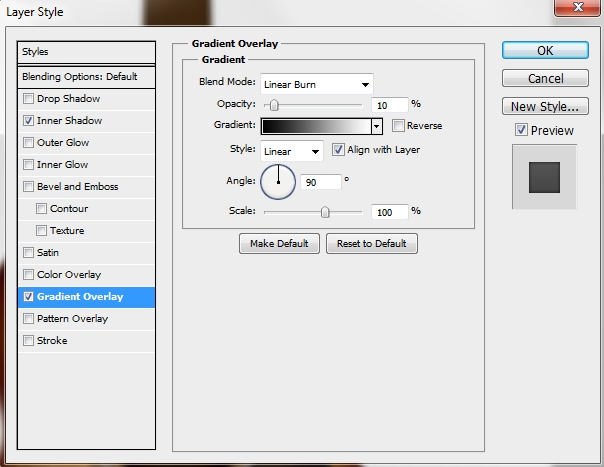
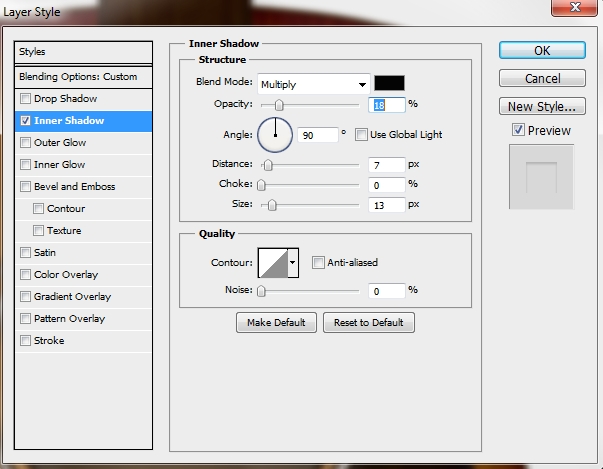
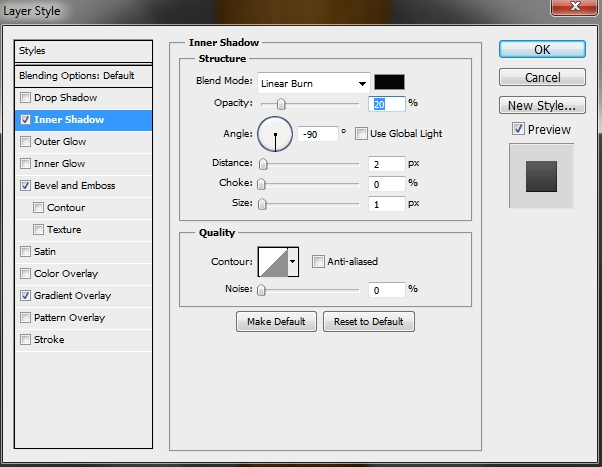
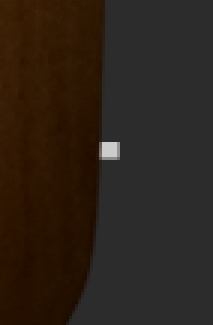
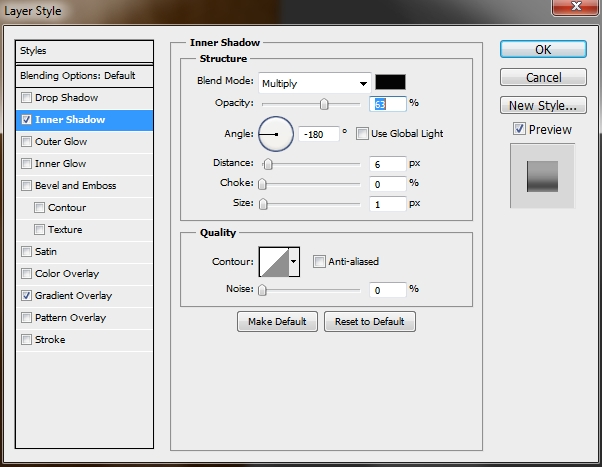
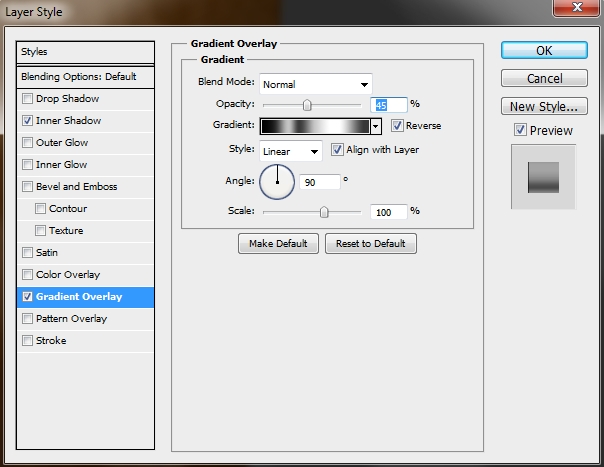
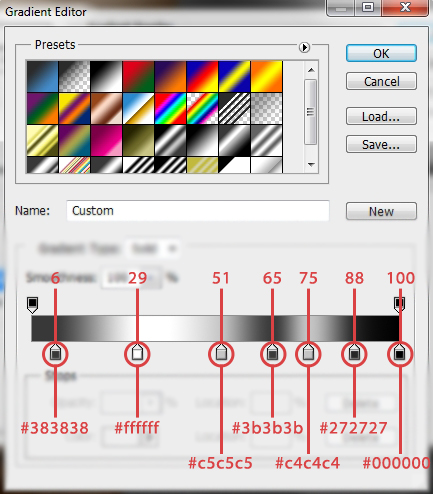
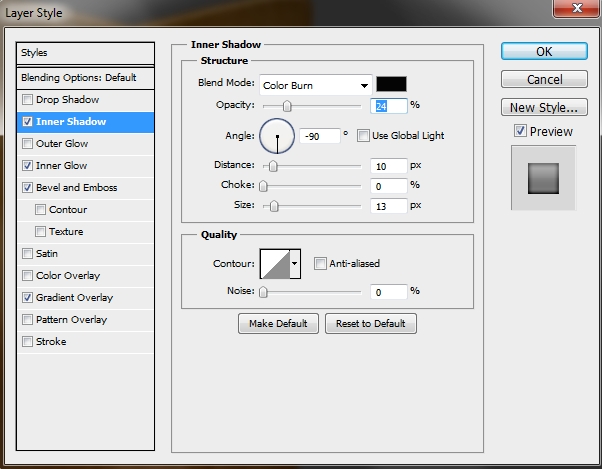
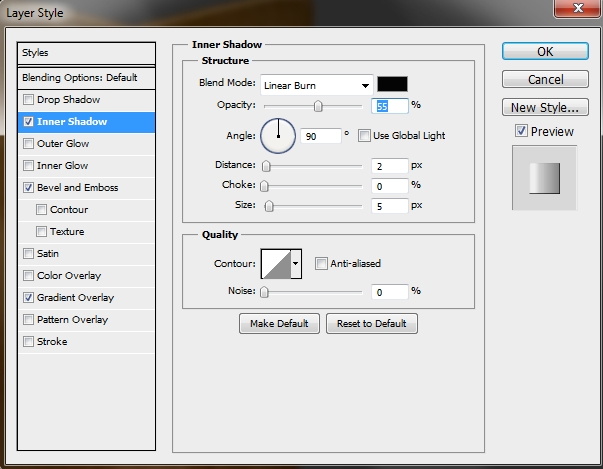
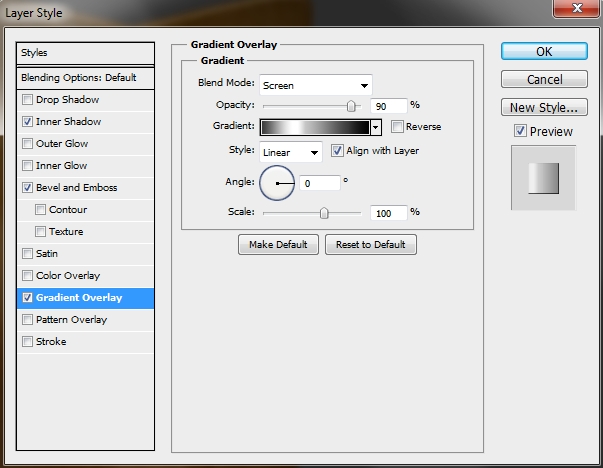
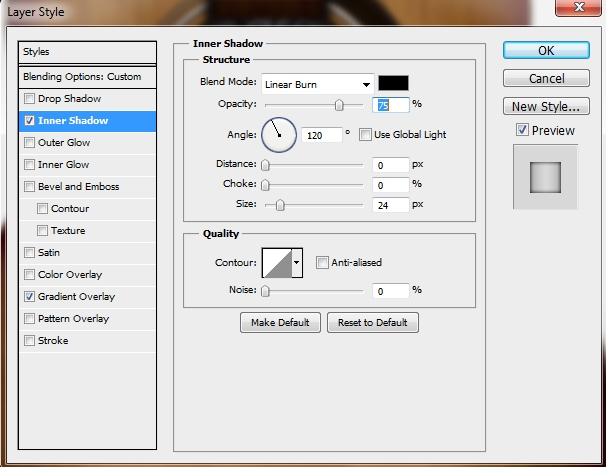
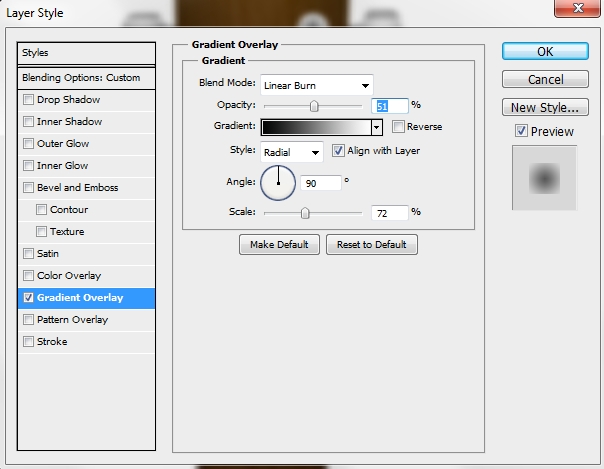
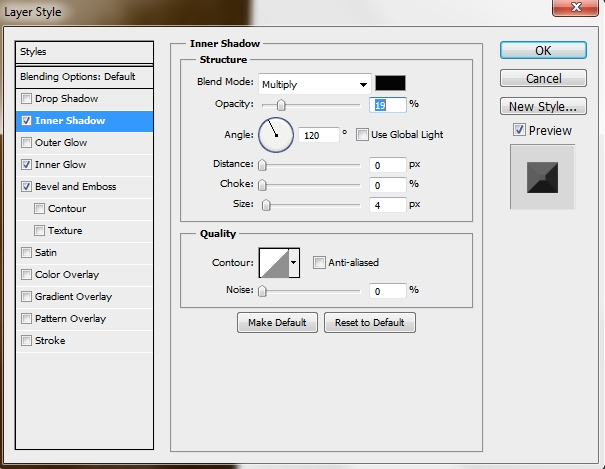
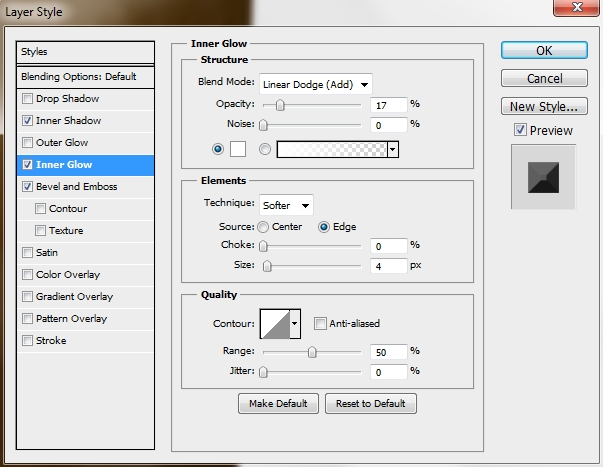
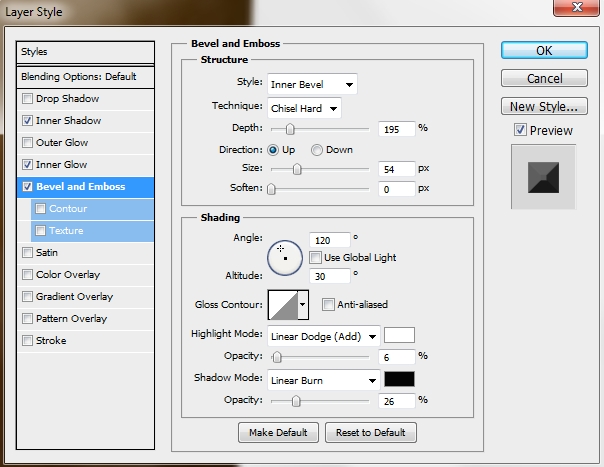
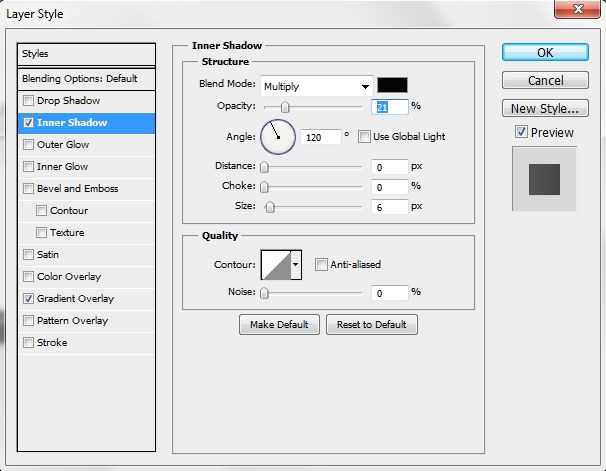
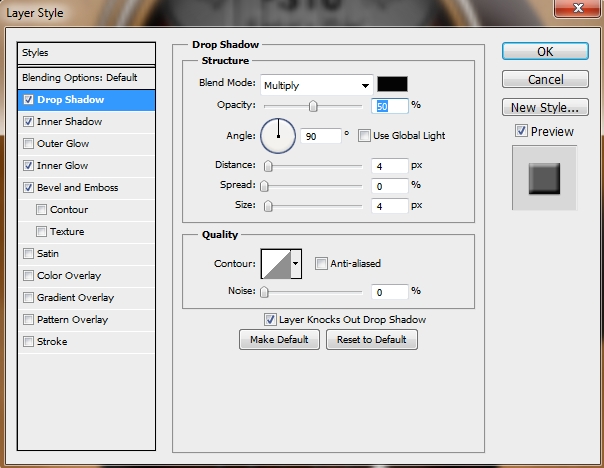
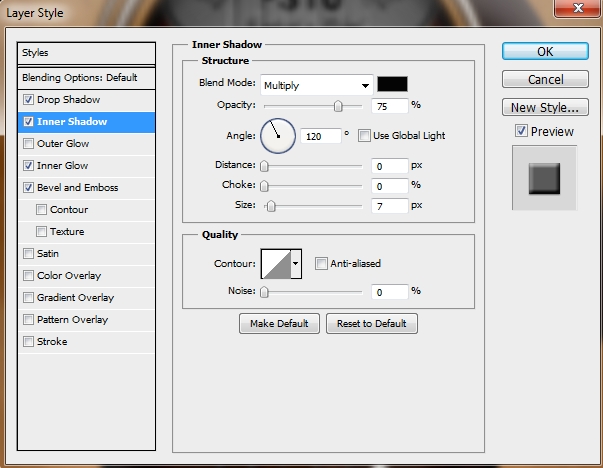
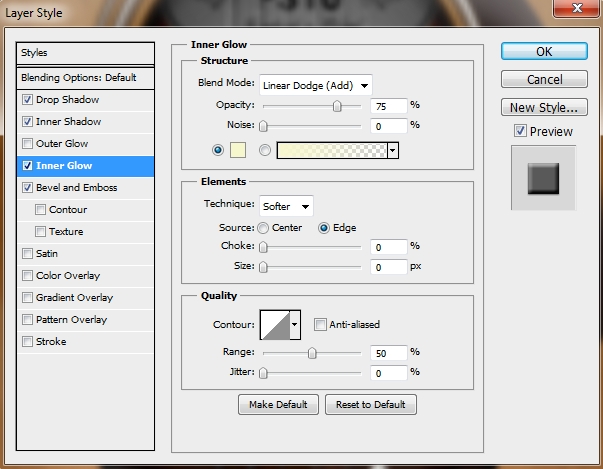
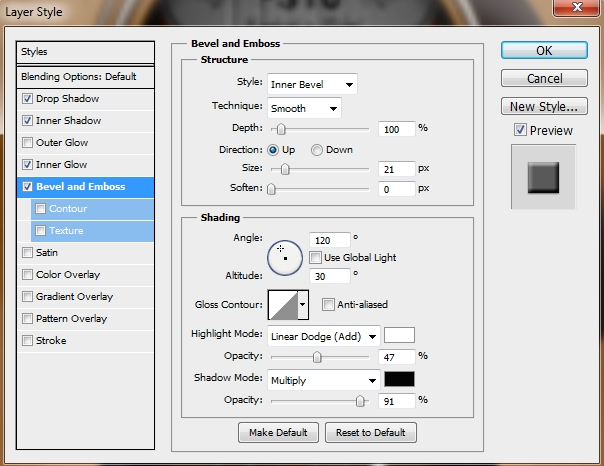
Create a new layer and once again make it a clipping mask (if it won’t do it automatically). Select “basic body’s” pixels and fill the selection with a random color. Turn Fill down to 0% and apply this inner shadow.
Step 6
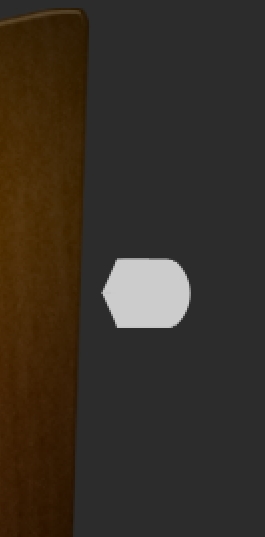
Create a new layer and using the Rectangle Tool (U) draw a shape like this one (color: #b7b7b7).

Then go Filter>Noise>Add Noise and set the amount to something around 18-20% (Uniform, Monochromatic). Then simply distort the shape by draging its upper and lower edges so that it covers the whole canvas.
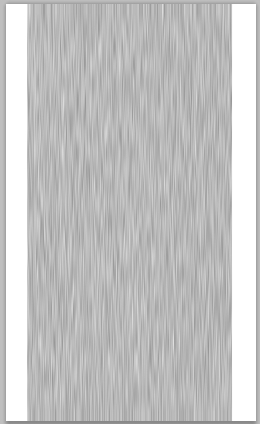
Add a Gaussian Blur effect (1 px) and make it a clipping mask. Turn the Opacity to something around 8-15%.
Group all the layers created in steps 2-6 and name the group “Body”.
Step 7
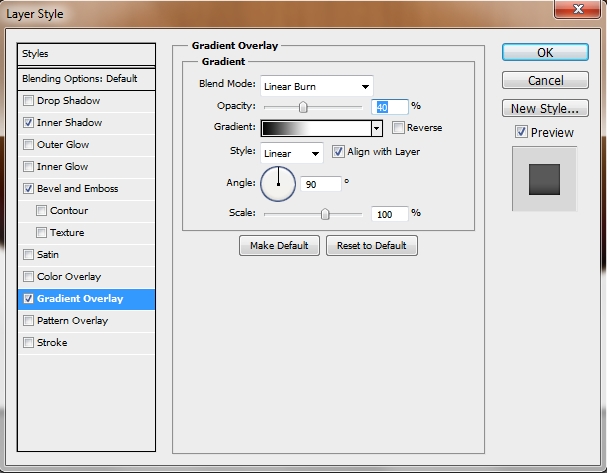
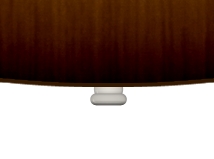
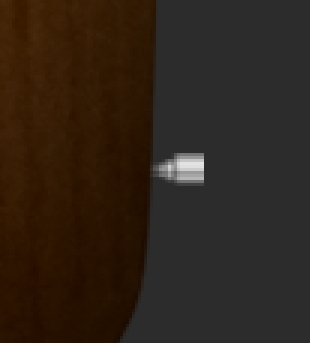
Create a new layer and place it under the “Body” group in the layers stack. Grab the Ellipse Tool (U) and draw a small circle like this. Change its color to #e5e2dc.

Then add these styles.

Step 8
Create a new layer and draw a small Rounded Rectangle (U) (radius: 10px). Use the same color and styles as in the previous step.
Group these two layers and name the group “Strap Button”.
Step 9
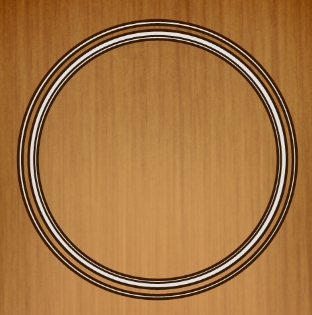
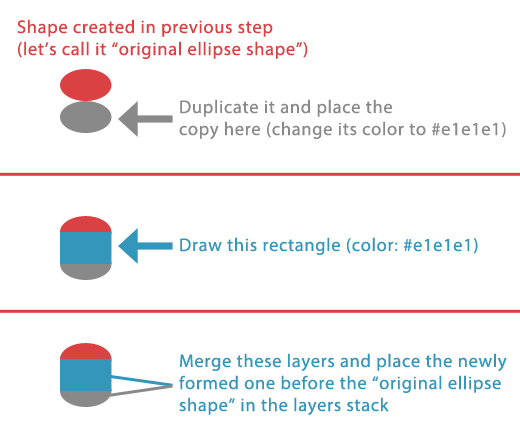
Create a new layer and draw a circl using the Ellipse Tool (U). Turn Fill to 0% and apply a simple stroke (color: #e1e1e1). Repeat this until you achieve something like this (the other color that I used is #351900).
Group all these layers and name the group “Sound Hole Deco”.
Step 10
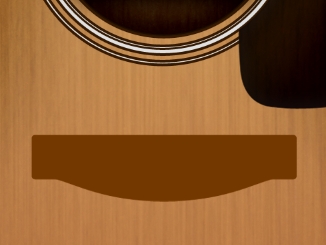
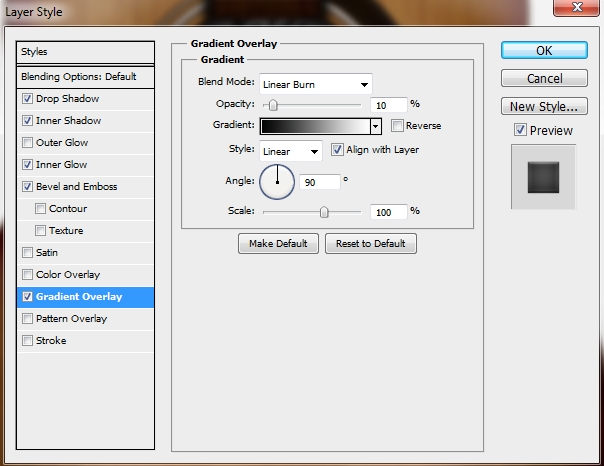
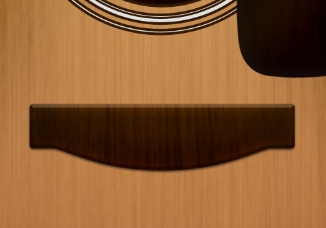
Create a new layer and grab the Pen Tool (P). Draw a shape like this one. Fill it with #2b1300.

Then apply these styles.
Step 11
Create a new layer and place the wood texture again. Rasterize it, desaturate it and make it a clipping mask. Change the Blend Mode to Overlay. Group these two layers and name the group “Pick Guard”.
Step 12
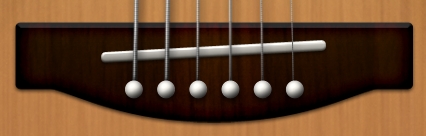
Create a new layer and pick the Ellipse Tool (U). Draw a circle inside the “Sound Hole Deco”. Change the color to #a77f57 and apply the following styles (the color of the stroke is #351900). Rename the layer to “Sound Hole Base”.
Step 13
Create a new layer and repeat Step 11.
Step 14
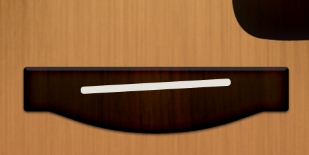
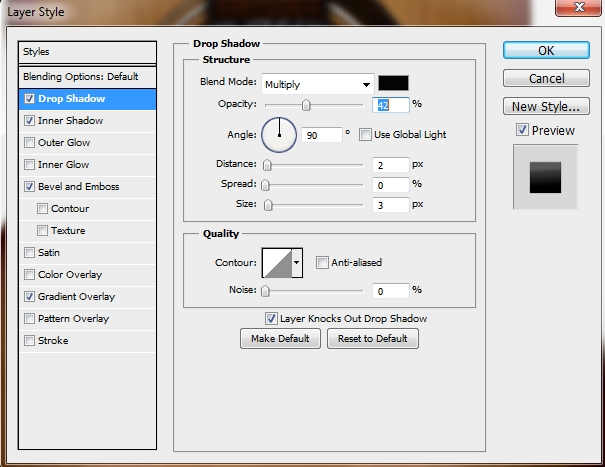
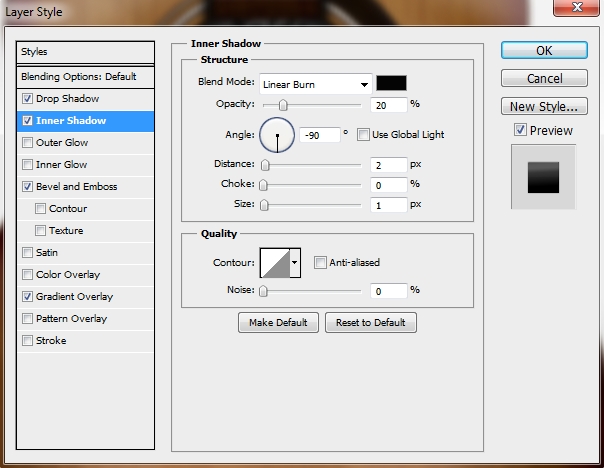
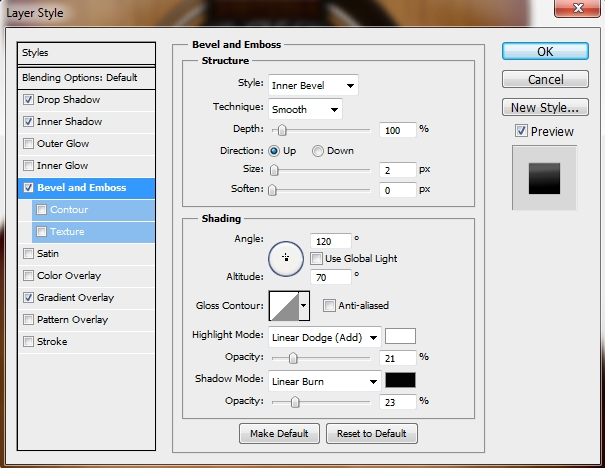
Create a new layer and pick the Rectangle Tool (U) and draw a rectangle like the one on the image below (color:#a77f57). Then apply the following styles.

Finally add a mask and hide the parts outside the sound hole.
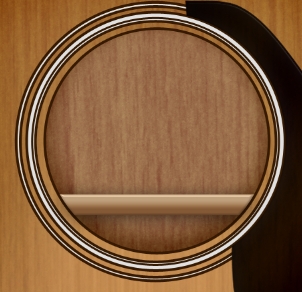
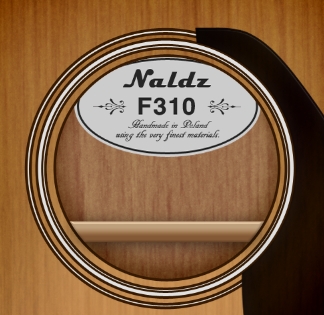
Step 15
Create a new layer and add your logo sticker.
Step 16
Create a new layer, select “sound hole base’s” pixels and fill it with a random color. Turn Fill down to 0% and apply these styles (stroke’s color: #351900).
Step 17
Duplicate this layer and clear its styles (right click on layer>clear layer style). Add this Inner Shadow. Group all the layers created in Steps 12-18 and name the group “Sound Hole”.
Step 18
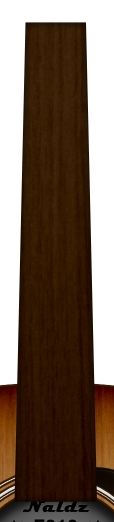
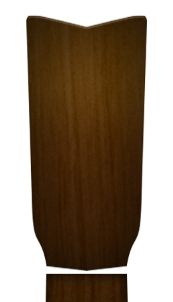
It’s time to create the fretboard. Draw a rectangle like this and change its color to #4a2f15.

Distort the shape to turn it into a trapeze (Edit>Transform Path>Perspective) and add these styles.

Step 19
Repeat Step 13 (apply wooden texture). Change the texture’s Blend Mode to Linear Light and turn the Fill down to 25-30%.
Step 20
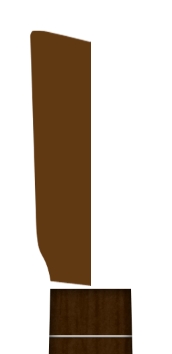
Create a new layer and using the Pen Tool (P) draw a shape like this one.
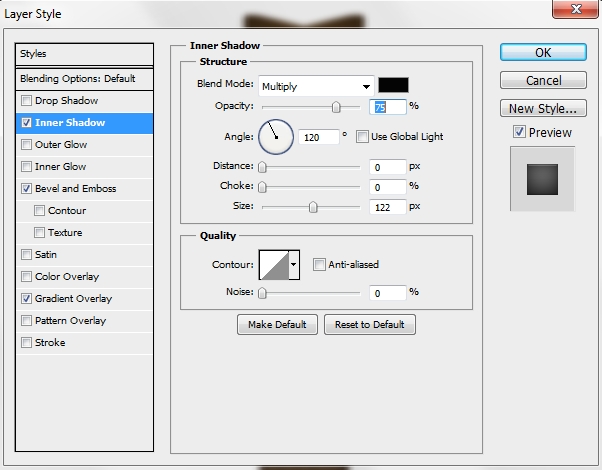
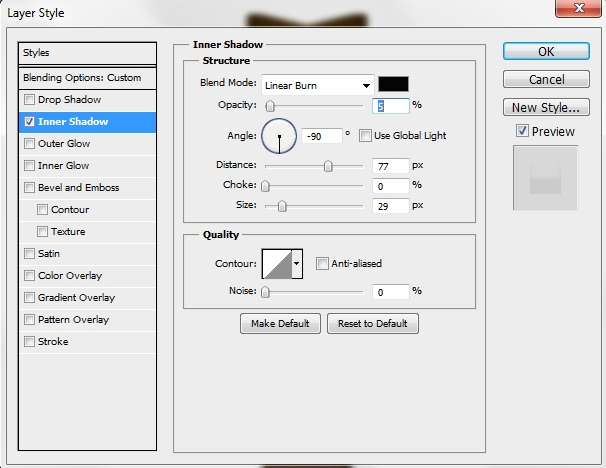
Fill it with a random color and turn Fill to 0%. Then add this Inner Shadow. Make this layer a clipping mask.
Step 21
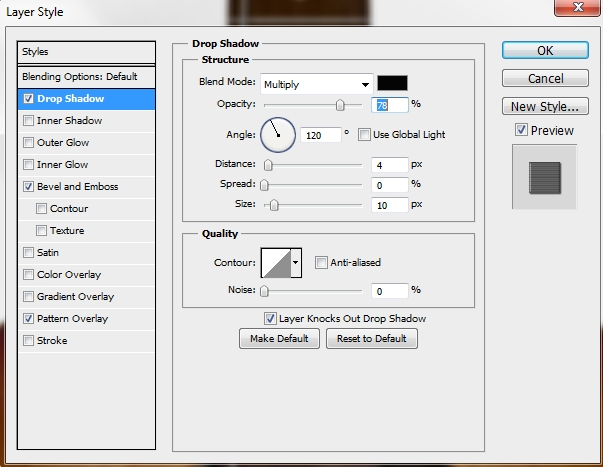
For the frets simply draw a rectangle, fill it with #e1e1e1 and apply the following styles.
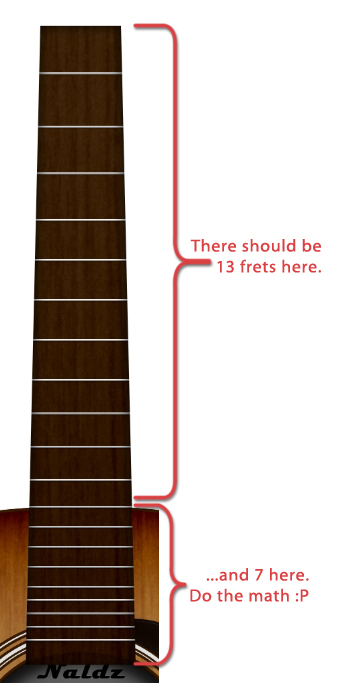
Make it a clipping mask and duplicate this layer 19 times. Place the copies all over the fretboard.Group all the layers created in steps 18-21 and name the group “Fretboard / Frets”.
Step 22
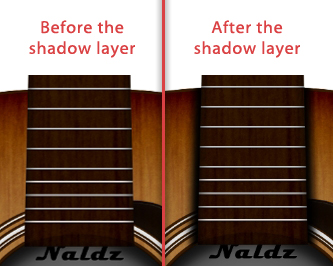
Now create a new layer and place it before the “Fretboard / Frets” group in the layers stack. Pick a Soft Round brush (B) and draw some shadows. Erase any parts outside the guitar’s body.
Step 23
Create a new layer and using the Pen Tool (P) draw a shape like this one. Fill it with #603913 and duplicate it. Then go Edit>Transform Path>Flip Horizontal.
Step 24
Now add again the wood texture (repeat Step 11).
Step 25
Duplicate the layer created in Step 23 and make it a clipping mask. Turn Fill to 0% and add this Inner Shadow.
Step 26
Create a new layer and pick the Rectangle Tool (U) and draw a rectangle on top of the fretboard. Fill it with #e5e2dc and apply the following styles.
Group the layers created in Steps 23-26 and name the group “Head Stock / Nut”.

Step 27
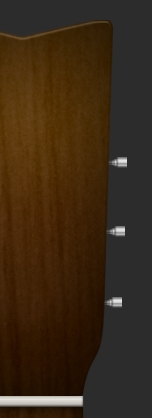
Create a new layer and grab the Ellipse Tool (U). Draw a small circle and fill it with #e1e1e1. Then apply these styles.
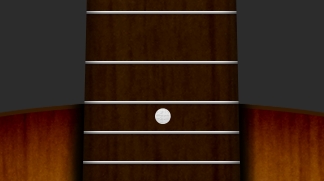
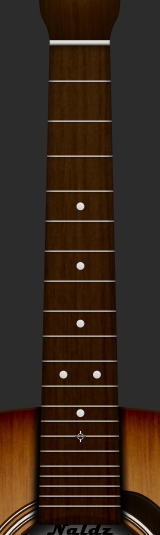
Duplicate the shape five times and place the copies accordingly to the image below. Group these layers and name the group “Position Markers”.
Step 28
Create a new layer. Select the Rectangle Tool (U) and draw a tiny rectangle. Fill it with #e1e1e1 and apply these styles.
Duplicate this layer and move the copy a bit to the right. Then repeat this process once again.
Step 29
Duplicate these three layers twice and place the copies accordingly to the image below.
Step 30
Create a new layer and draw a shape like this one using the Pen Tool (P). Then apply the following styles.
Step 31
Duplicate this layer and place the copy before the original shape in the layers stack. Then move it a bit upwards; 4-5 px (hit “up” 4-5 times) and “squeeze” a little bit its edges. Then apply these styles.
The idea is to give a 3d effect. Your first peg should now look something like this.

Step 32
Duplicate twice the two layers created in steps 30-31. Feel free to play around with the 3d effect. Use the image as a guide. After doing this, group all the layers created in steps 28-32 and name the group “Tuning Pegs Right”.

Step 33
Duplicate this group and place the layers on the other side of the head stock. Move these two groups before the “Head Stock / Nut” group in the layers stack.
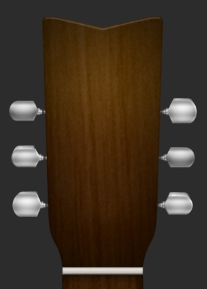
Step 34
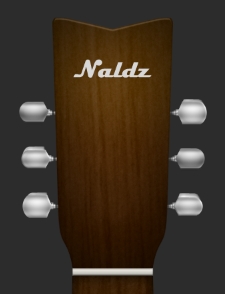
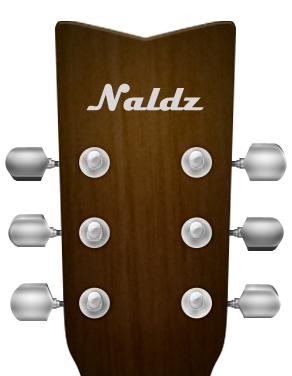
Decorate the head stock with your logo or simply add some text (the font I used is called Magneto).
Step 35
Create a new layer and combining a rectangle and an ellipse draw a shape like this. Fill it with #733800 and apply the following styles. Rename the layer to “Bridge”.

Step 36
Add once the wooden texture (repeat step 11).
Step 37
Select “Bridge’s” pixels and create a new layer. Fill it with a random color and turn Fill to 0%. Then apply these styles. Finally, make it a clipping mask.

Step 38
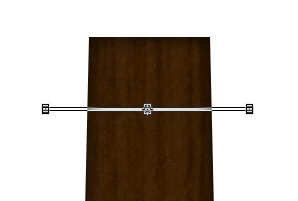
Grab the Rounded Rectangle Tool (U); radius 10 px, and draw a shape like the one shown on the image below (color: #e5e2dc). Rotate it a bit and then add these styles.

Once you’re done, group the layers created in steps 35-38 and name the group “Bridge / Saddle”.
Step 39
Create a new layer and select the Ellipse Tool (U). Draw a circle, fill it with #cccccc and apply these styles.
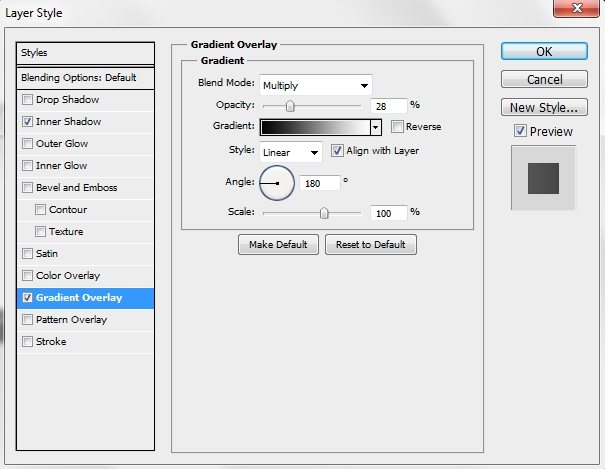
Duplicate this layer and clear its styles. Turn Fill to 0% and add this gradient.
Step 40
Draw an ellipse using the Ellipse Tool (U). Fill it with #e1e1e1 and then apply the following styles.

Step 41
Follow these instructions and then add these styles.
Step 42
Group the layers created in steps 39-41 and duplicate the group five times. Place the copies in accordance with the image below.
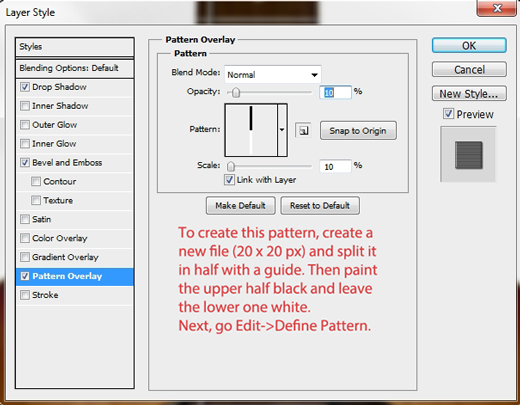
• Note: As you can see I’ve added some details. These little wrapped strings were drawn with a simple brush and some styles. The same styles that you’ll use in the next step to create the chords
Step 43
It’s time to create the chords. Pick the Pen Tool (P) and draw a path from the bridge up to the head stock. Select the Brush Tool (B) and pick a hard round brush; size: 5px. Switch back to the Pen Tool (P) and right click on the path>Stroke Path (make sure the “Simulate pressure” box is unchecked). Then apply the following styles.


There are six strings and each one is thinner than the others, which means that you have to downsize the brush by 1px each time you create a new chord (brush sizes: 5-4-3-2-2-1).
Use the image below as a guide when placing the chords.
Step 44
Once you’re done with the chords, group them all and name the group “Chords”. You can create a layer and add some shadows on the lower part of the chords, but it’s optional (select the chords’ pixels and paint with a soft round pressure brush).

Step 45
There’s one last thing to create. The bridge pins. So, pick the Ellipse Tool (U) and draw a small circle. Fill it with #e5e2dc and add these styles.
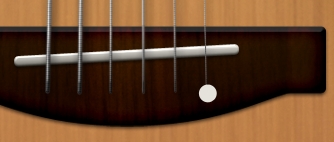
Duplicate this layer five times and place the copies accordingly to this image.
Finally, group all the layers created in Steps 35-45 and name the group “Bridge pins / chords / bridge”.
Conclusion
That’s it. You’ve just created a nice realistic guitar illustration. I hope you enjoyed the tutorial and learnt something from it.


You’ve always been a help to me, thanks!
Perfect!! was great to learn and a treat to eyes 🙂
Best of the Photoshop tutorial.. great job PAL.
Thanks and cheers.
Nice work, Alan. The guitar looks really cool. Thanks for sharing this