Glossy button is a great eye catching for people to look at. Few sites are using shiny buttons also commonly known as Web 2.0 button style to enhance the quality of their site. Making shiny buttons in Photoshop is very easy. In this tutorial, you will learn How to Make a Glossy Buttons in Photoshop. Throughout this tutorial, you will be using more on Marquee Tool, Gradient Tool, Ellipse Tool and more standard tools. Here is a step by step procedure on how to make one.
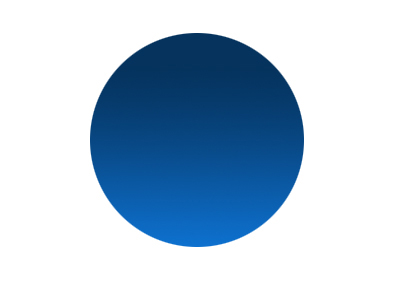
1.Create a New Layer (CRTL+N). Name the layer “Button1“.Using Elliptical Marquee Tool (M) create a circle.Hold SHIFT while dragging so you can form a perfect circle. Once you have a circle choose Gradient Tool (G). Use color #1081ed on Set Background Color and #05335e on Set Foreground Color then drag your mouse inside the circle.once your done it will look like this.
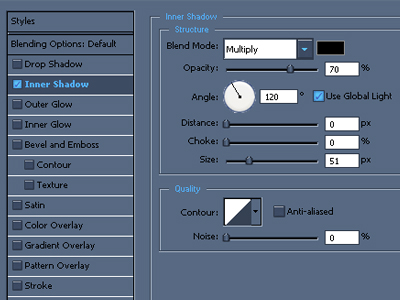
2.Now Right click the Button1 layer then choose Blending Options. Then select Inner Shadow and follow the format on the image below.
3. Choose Ellipse Tool (U).and make an ellipse shape on the upper part of the circle. Name the Layer “Ellipse1“. Right click the Layer Mask on the Ellipse Layer and choose Razterize Vector Mask. After that you’ll come up with something like this

4.Click on Add Vector Maskand choose Gradient Tool (G) then set it in Foreground to Transparent. (I showed that already to you on my past tutorial so lets continue).So after you set it in Foreground to Transparent, drag your mouse down to up.

5.Create a New Layer between Button1 Layer and Ellipse1 Layer. Use color #00c6ff.Choose the Ellipse Tool (U) again and make an ellipse shape this time on the lower part of the circle. Name the Layer Ellipse2 then Right click on the Ellipse2 Layer Vector Mask then choose Rasterize Vector Mask.it will go like this.

6. Now go to Filter>Blur>Gaussian Blur.Then Set Radius into 12.Then it will look like this.

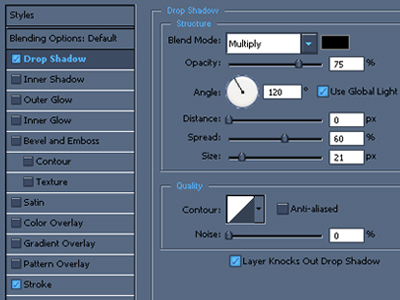
6.Now set your Set Foreground Color in #f2f2f2 and Set Background Color in #716e6a. Then right click on Button1 Layer then go to Blending Options.Now Choose Stroke and follow the format on the image below.
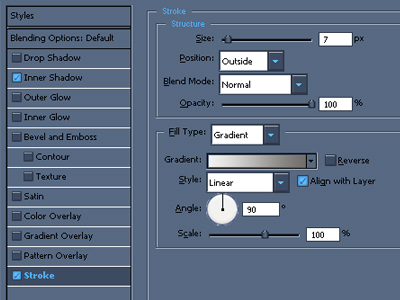
Then when you click OK it will look like this

7.We need to use stoke again on the Button1 Layer.Now Heres a trick. In order to use the Stroke again on Button1Layer create a new Layer then select the two Layer which is Button1Layer and the New Layer by holding SHIFT. Then right click on the 2 selected Layers then choose Merge Layers.Then Name it again in Button1.
8.Now we already merge the 2 Layers.Set the Foreground Color in #b7b9c5 and in Background color in #f5f6f6. Then right click Button1Layer and go to Blending Options again.Follow the image below for the setting.
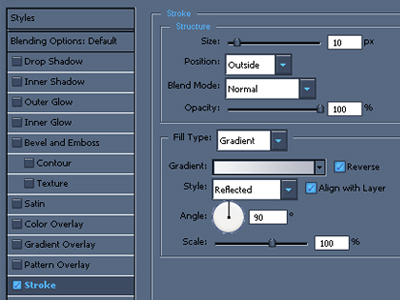
After that your button will look something like this.
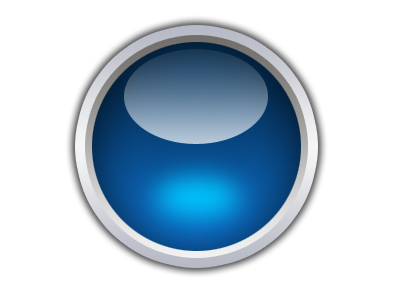
Now you can put whatever shape you want on the center of the button. You can also play whatever color you want.
heres what i made.

If this post is helpful to you,Make sure to Subscribe my RSS feed.


Wow nice tutorials, thanks man
Hi there, a good blog indeed, keep writing and posting new tips for designer community worldwide. I work as a tech leader so more on programming side…
good work…:)
hey man keep writing and posting us, this one is awesome too, tho i knew some steps of this, but always ended up with a jagged design.
will try your tut exactly
I have found it here what i am searching for man u rock thank u very nice collection.
thanks.im glad most of you like it
gracias por el tutorial, me fue de mucha utilidad
10pts
I dont really get, it where is photoshop…i pressed the button and it just redirects me to a different page? i am soppose to do it in adobe?????
help
Hi Shane,
Once you click the word Photoshop here in our post you’ll be directed to the Photoshop section articles. I apologize if this was not clear to you 🙂 Yes to get the Photoshop application you need to purchase it on adobe.com=) Have a nice day.
link would be helpful in step 4. 4.Click on Add Vector Maskand choose Gradient Tool (G) then set it in Foreground to Transparent. (I showed that already to you on my past tutorial so lets continue).So after you set it in Foreground to Transparent, drag your mouse down to up.
this is very useful to developers
hmmmmmmmmmm..ri8
awsome work..
very nice
Hi,
Great tutorial. Just a couple of questions regarding the 1st ellipse shape section 3:
1. I’m guessing you have changed your foreground colour to #ffffff for this section?
2. How do we rasterize a vector mask before creating one?
And at Step 4:
When doing the gradient tool what foreground colour are you using?
Thanks again for the tutorial.
nice