In this article we’re going to create a text effect inspired by the Thor 2 movie. Since I couldn’t find the font used by the designers, I decided to re-create the letters that I needed in Illustrator. It’s very easy and all you need to do is some research (there are a ton of different Thor posters) to find the letters you want and then simply trace them in Illustrator. Feel free to use a different pattern than the one in the tutorial assets for an even better result.
Tutorial Details
- Program: Adobe Photoshop
- Version: CC
- Difficulty: Intermediate/Advanced
- Estimated Completion Time: 2-3 Hours
Final Result

Step 1
Create a new file in Photoshop and import the traced paths from Illustrator (Ctrl+C in Illustrator -> Ctrl+V in Photoshop -place them as shapes). Rename the black text to Outline and the red one to InText. Change the colour of the Outline to #b3ae71 and the one of the InText to #222722. Scale the shapes down.

Step 2
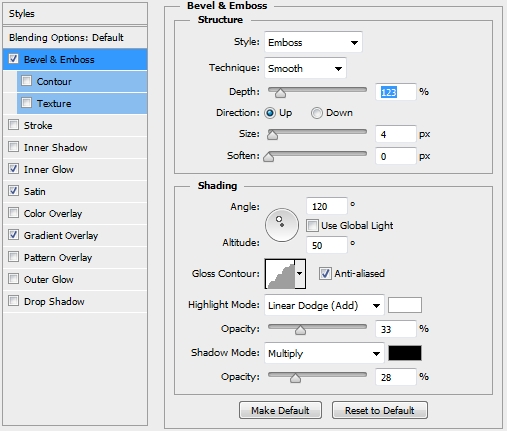
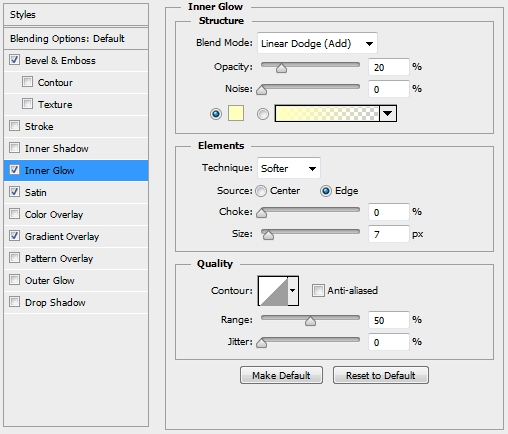
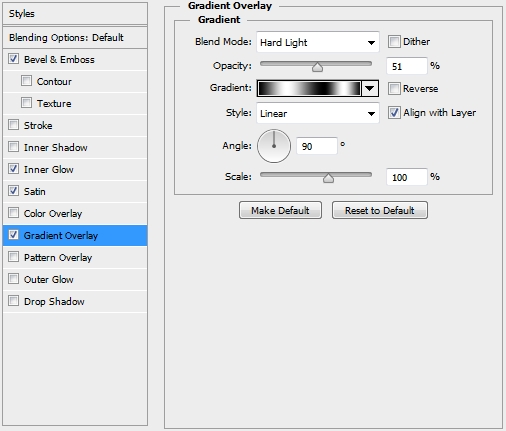
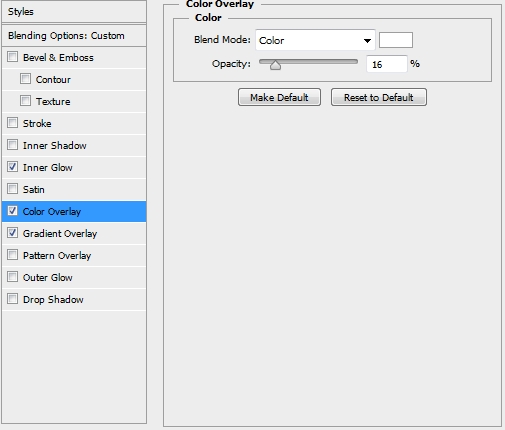
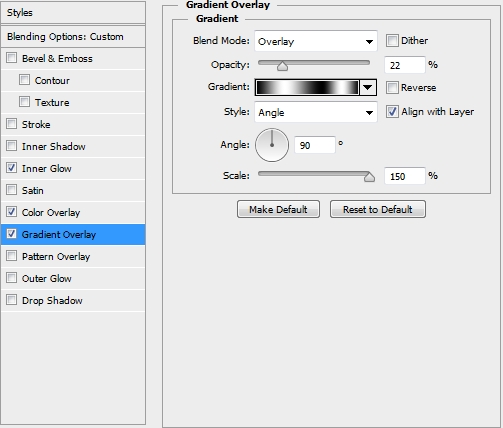
Select the Outline shape and select the pixels of the InText (Ctrl+Left Click on the layer’s thumbnail). Press Shift+Ctrl+I to invert the selection and click on the mask icon. Now start applying the following styles to the Outline shape (the gradient is a random shine effect; just add black and white spots randomly).

Step 3
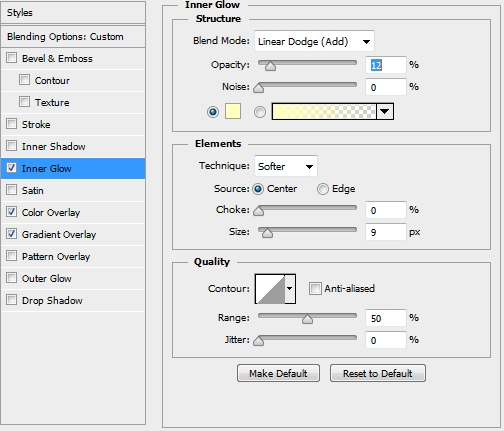
Duplicate the Outline shape and turn the Fill to 0%. Replace the existing styles with these.
Step 4
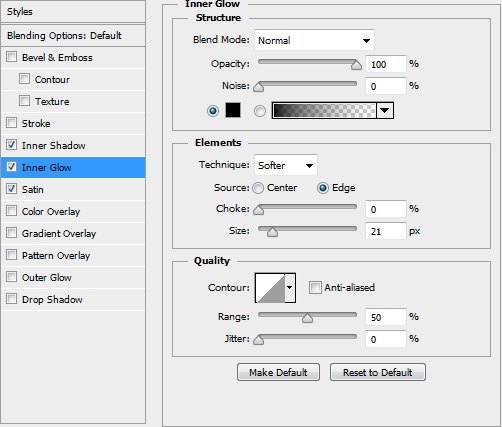
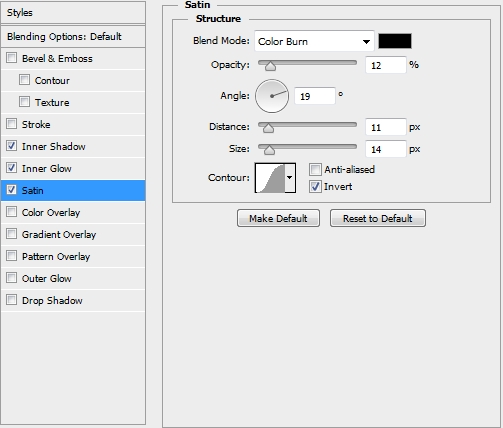
Now select the InText layer and apply the following styles.

Step 5
Create a new layer and clip it to the InText layer. Pick a big soft round brush to add some highlights. Use white as your foreground colour, lower the Opacity and the Flow of the Brush to something around 25-30% and change the Blend Mode to Color Dodge.

Step 6
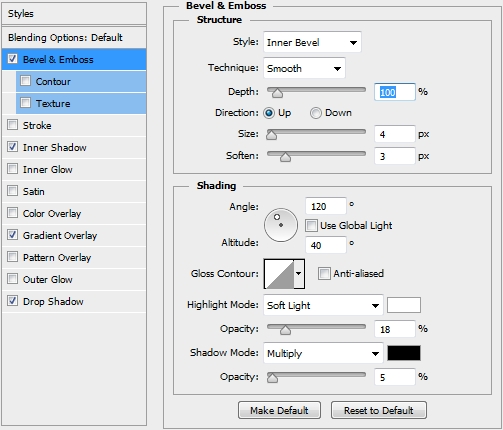
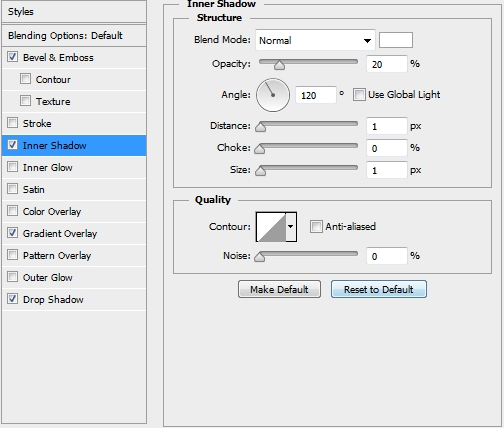
Now import the pattern (copy/paste from Illustrator) and place it on top of the layers stack. Since the pattern is very complex, your computer may slow down extremely. To avoid it, simply rasterize the pattern layer. Then, select the InText’s pixels, contract the selection by 1-2 pixels and click on the mask icon. Add these styles to your pattern.


Step 7
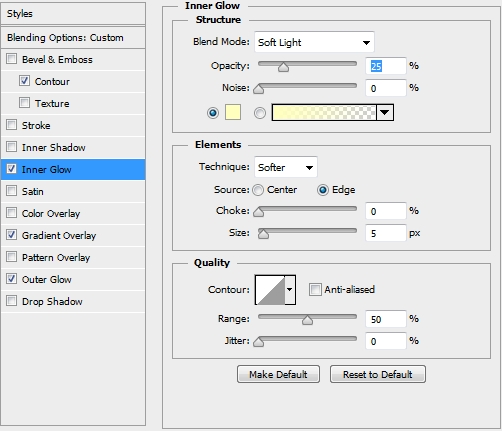
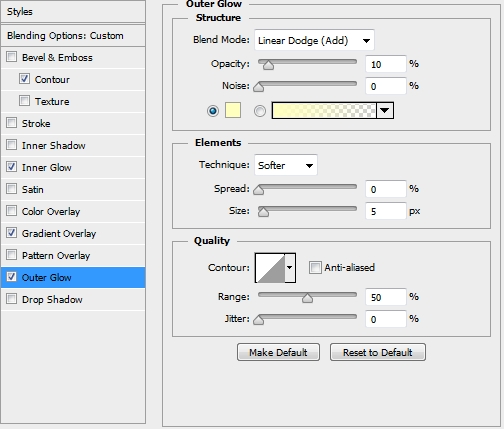
Duplicate the pattern layer, turn the Fill to 0% and replace the existing styles with these.

Step 8
Your design should look by now like this.


Step 9
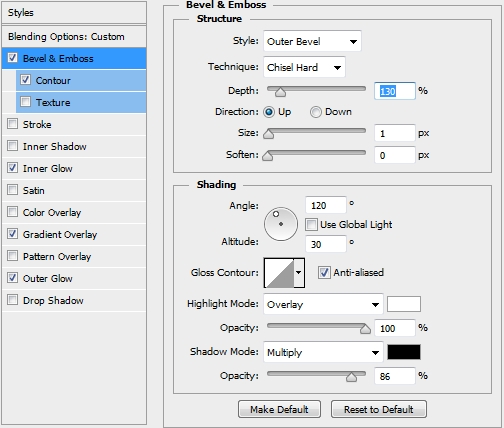
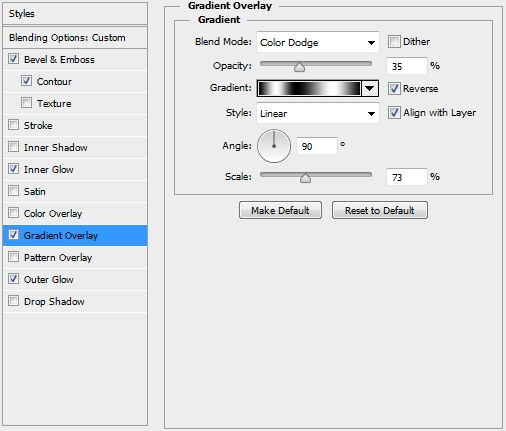
Duplicate this layer and replace its styles with these.



Step 10
Next, add the Metal 006 material to the lock bars.
Step 11
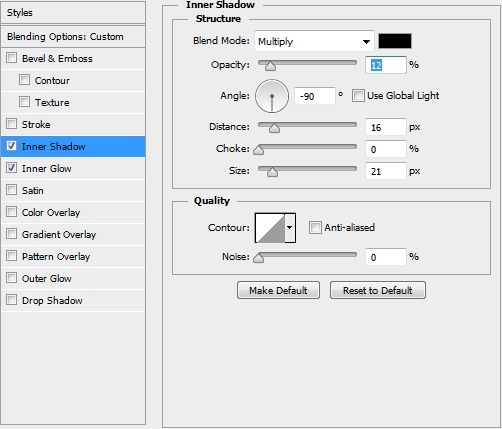
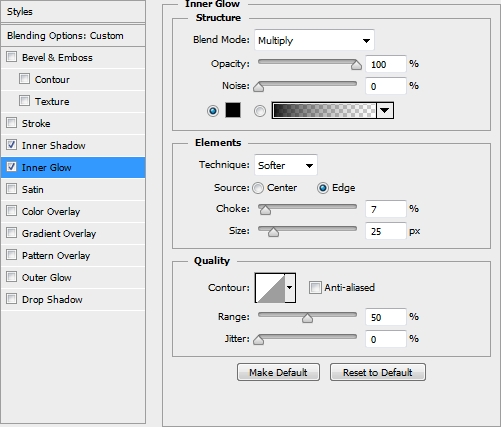
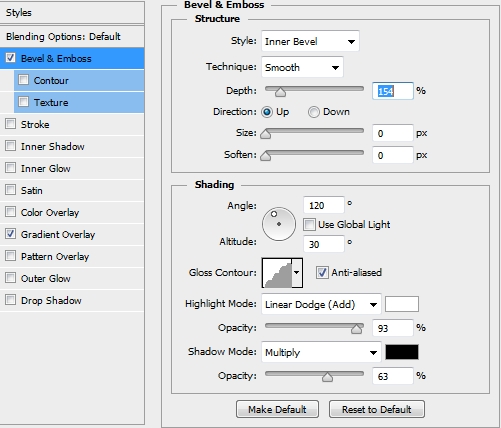
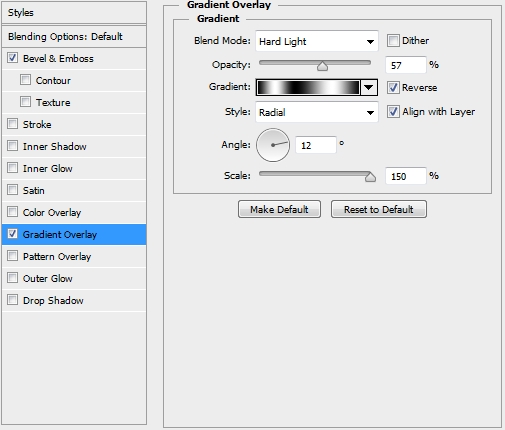
Duplicate the InText layer and place the copy on the bottom of the layers stack. Hide it (click on the eye icon next to the layer) and rename it to InTextBak. Select all the other layers (except the background) and merge them. Rename this new layer to 1. Duplicate it, turn the Fill to 0% and select the pixels of the InTextBak layer. Click on the mask icon (of the 1 copy layer) to add a layer mask (make sure the InText part is painted black). Then add these styles.
Step 12
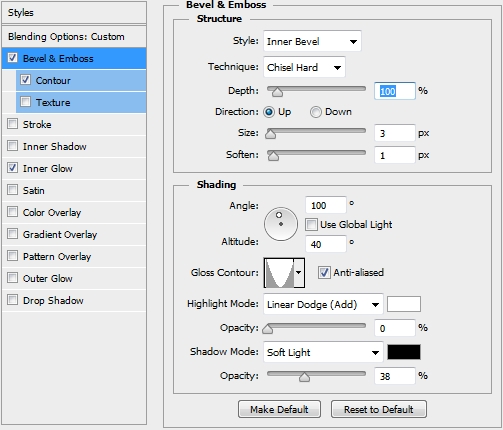
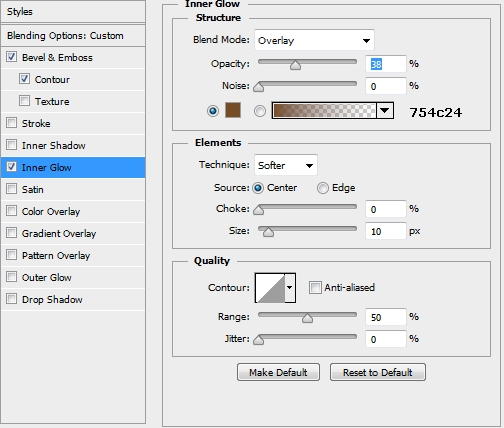
Duplicate this layer (1 copy) and replace its styles with these ones.
Step 13
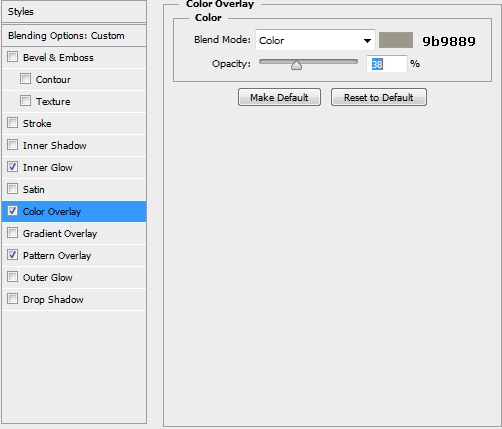
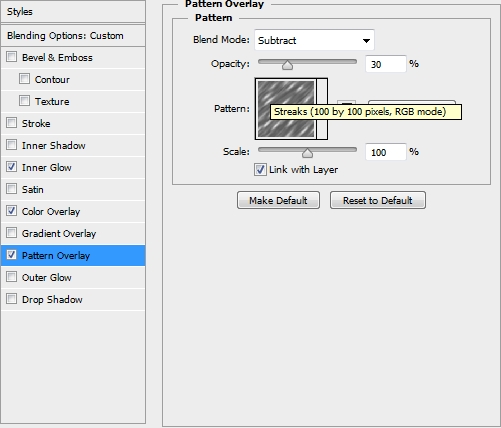
Create a new layer and select the InTextBak’s pixels. Paint the selection white, change its Blend Mode to Color and apply the following styles.

Step 14
Add some highlights using a soft round brush (Blend Mode: Soft Light, Opacity 50%).

Step 15
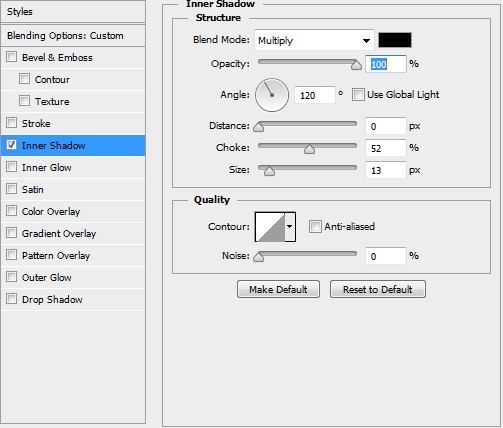
Merge all the layers (except from the background and the InTextBak layers). Create a new layer and select the InTextBak’s pixels. Paint the selection with a random color and turn its Fill to 0%. Apply this Inner Shadow style.
Step 16
Duplicate the merged layer from the previous step, place it on top of the layers stack and select InTextBak’s pixels. Press Shift+Ctrl+I to ivnert the selection and hit Delete. Make sure your foreground colour is black and the background one white and go Filter->Sketch->Bas Relief (Detail: 15, Smoothness: 1). Change the Blend Mode to Soft Light and lower the Opacity to 20%.


Step 17
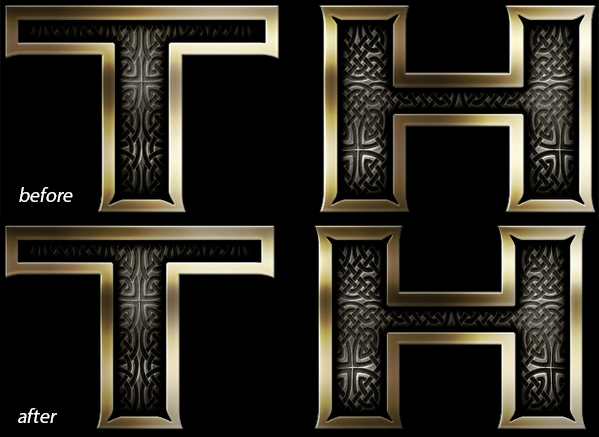
Add some highlights and shadows manually using a soft round brush.
Step 18
Once again merge all the layers (except from the bg and the InTextBak) and apply these styles to this new layer.
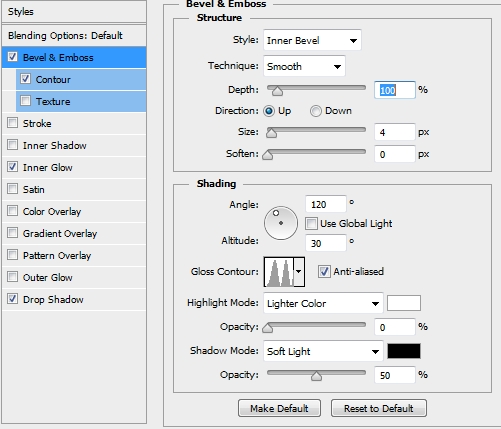

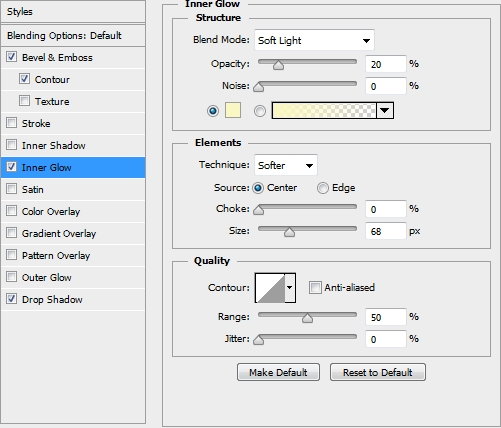
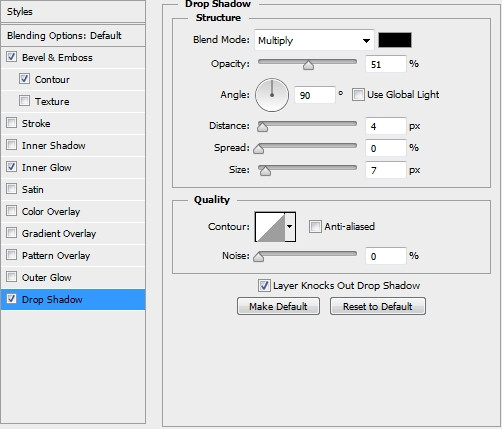
Step 19
Create a new layer and select the step 18 layer’s pixels. Paint the selection white and go Filter->Pixelate->Mezzotint and then Filter->Blur->Motion Blur (45 degrees). Change the Blend Mode to Vivid Light and the Opacity to 15-20%. Finally erase the parts outside your text layer (step 18 layer).

Step 20
Add some final highlights with a soft brush and your Thor-inspired text effect is ready.

Conclusion
That’s the end of this tutorial. We hope you enjoyed it and learnt something new. If you have any questions or tutorial requests feel free to post them in the comments section.


It seems that it is the same from the past tutorial that I have seen here in your site.
The thing is that all these movie text effects look almost the same. However, every tutorial is unique and has differences in the techniques and/or styles used etc.
This is really inspiring,thanks!
A long..long..tutorial!!!!
Naa, it’s not that long 🙂
I am interested to this but can it be done in other version?
Yep, any CS3+ version works well.
Thanks for your post. I love it
I don’t have Illustrator in my computer, so how can I find the patterns I need (I’m not professional in PTS)