
In this tutorial we’ll create a nice photo-realistic text effect in Photoshop inspired by the Christmas balls.
Tutorial Details
- Program: Adobe Photoshop
- Version: CS5
- Difficulty: Intermediate
- Estimated Completion Time: 1,5 hour
Tutorial Assets
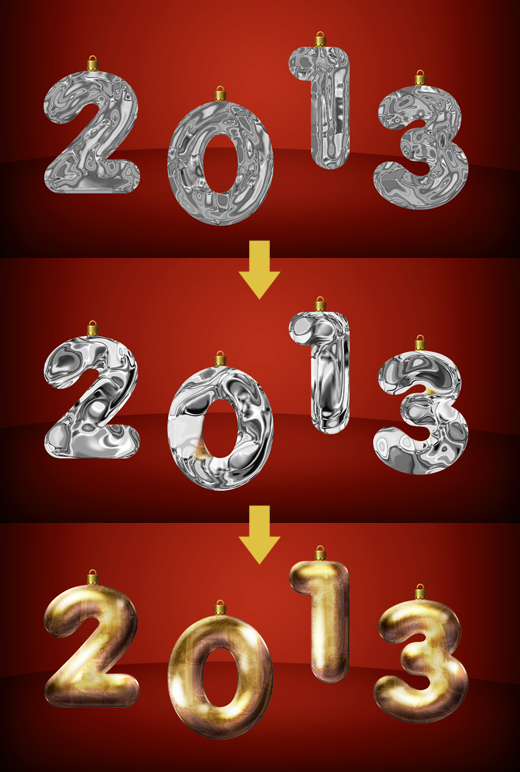
Final Result

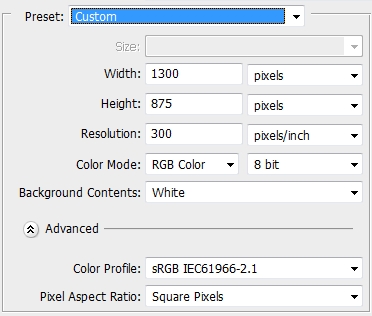
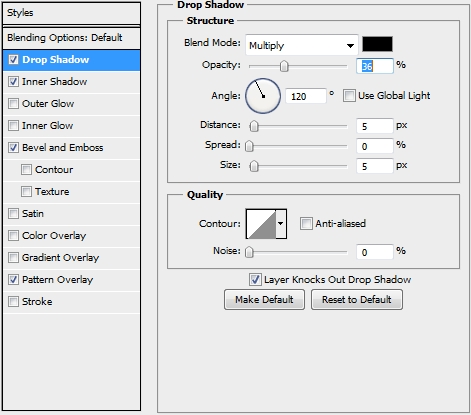
Step 1
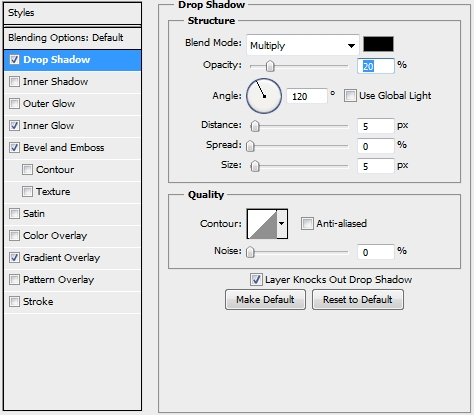
Create a new file in Photoshop. Paint the background layer with #da4143 and apply the following styles.

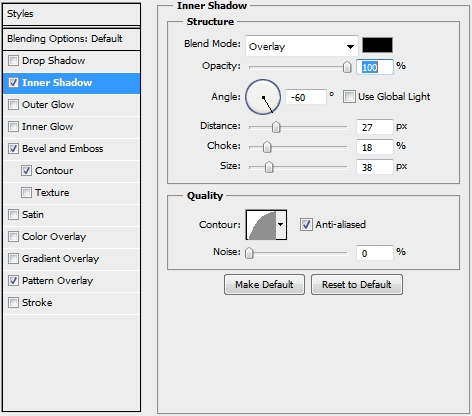
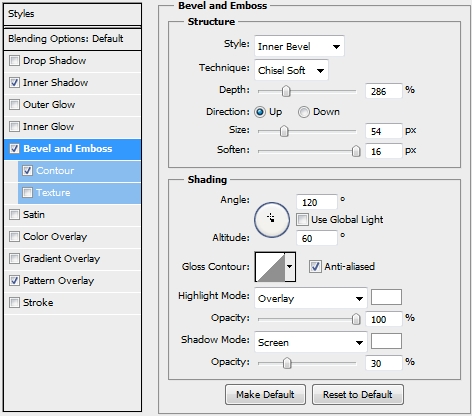
Step 2
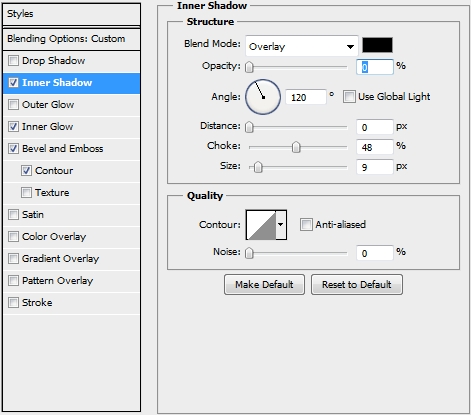
Create a new layer and using the Pen Tool (P) draw a shape like the one on the first image. Turn the Fill to 0% and add the following Inner Shadow style.


Step 3
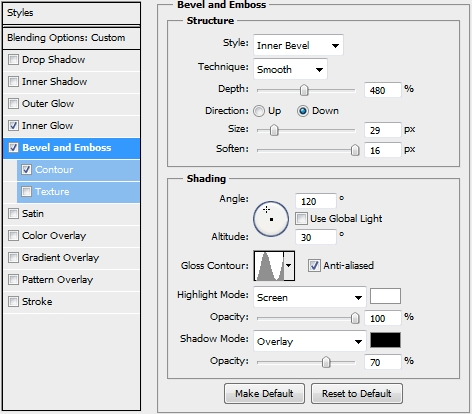
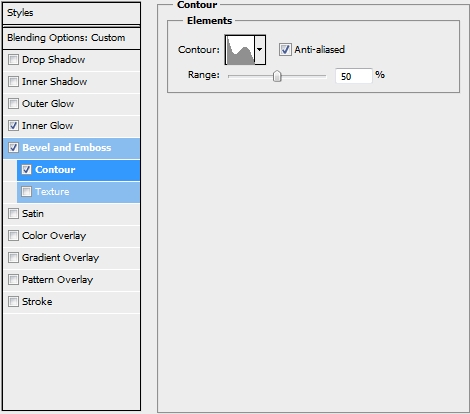
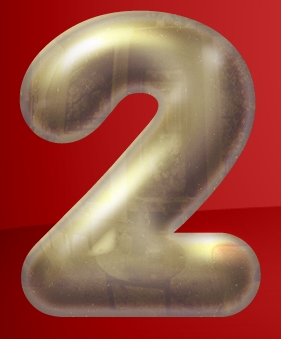
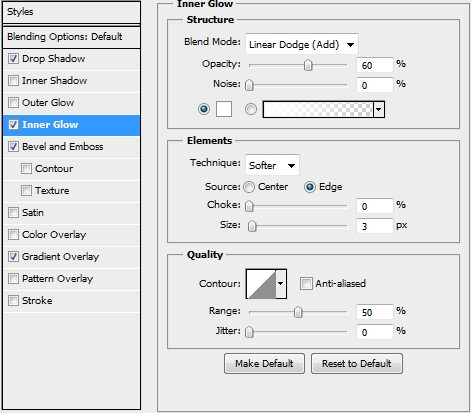
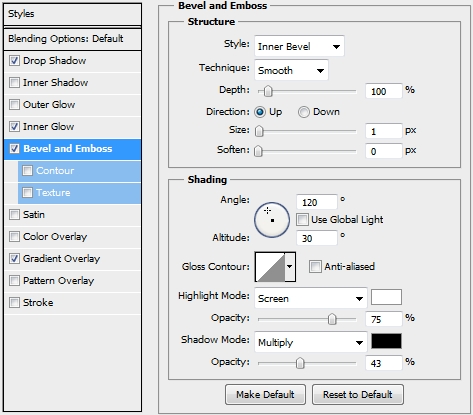
Create a new layer and pick the Type Tool (T) (the font I used is called Anja Eliane; size: 100pt). Write “2” and change the color to #856f32. Apply the following styles.

Step 4
Place the “living room” photo on a new layer and desaturate it. Distort it using the Spherize filter (Filter>Spherize) and make it a clipping mask to the text layer. Change the Blend Mode to Soft Light and lower the Opacity to 40%.
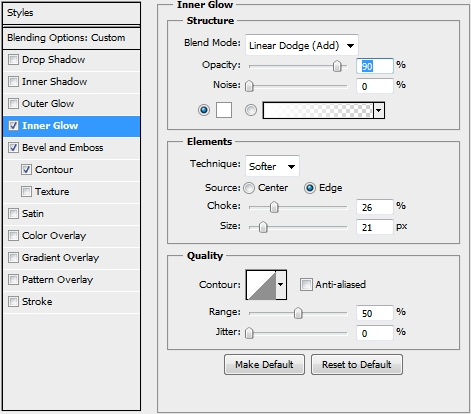
Step 5
Duplicate the text layer three times and turn their Fill to 0%. Clear the existing styles. Select the first copy layer and apply this style.
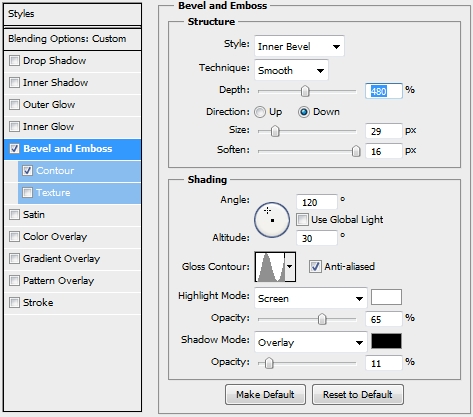

Step 6
Select the second copy layer and add the following styles.
Step 7
Create a new layer between the second and third text copy layers and pick a soft round brush. Draw some highlights (Blend Mode: Color Dodge, Opacity: 50%).
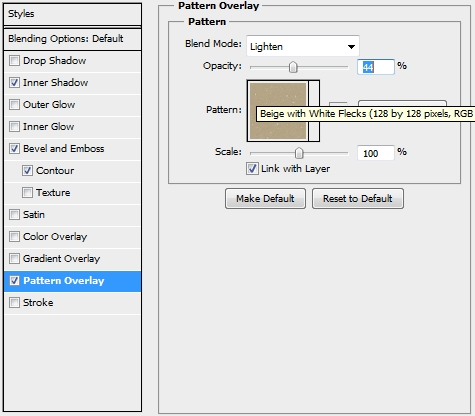
Step 8
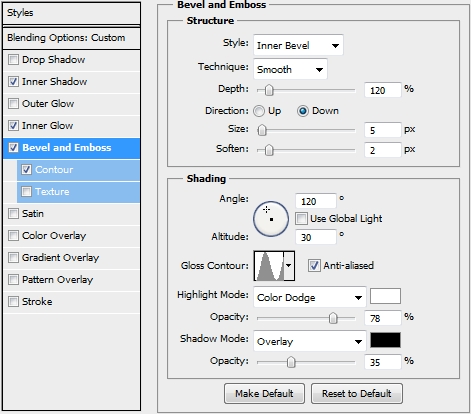
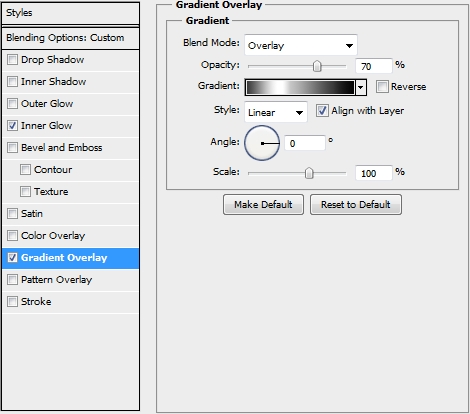
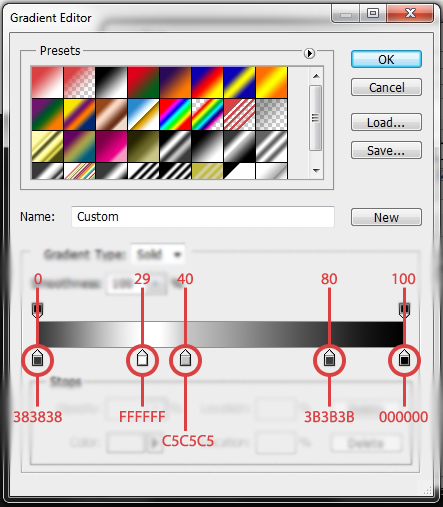
Finally, select the last text copy layer and apply these styles.


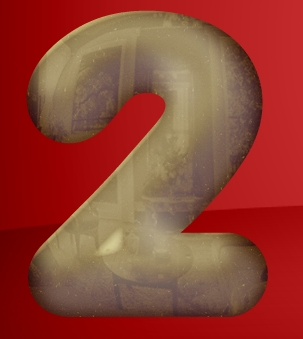
Step 9
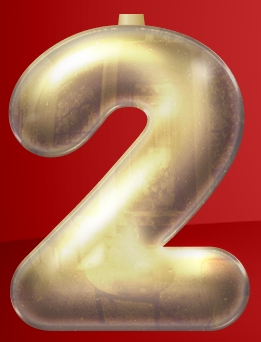
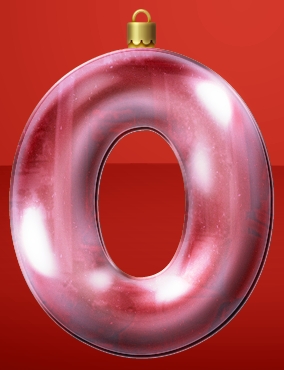
Group all the layers created in Steps 3-9 and name the group “2”. Repeat these steps for the other three numbers. After doing this, your design should look something like this.

Step 10
Create a new layer and place it before the “2”,”0″,”1″ and “3” groups. Pick the Rectangle Tool (U) and draw a small rectangle. Fill it with #d4bf86 and distort it a bit using the Perspective. Add some highlights.
Step 11
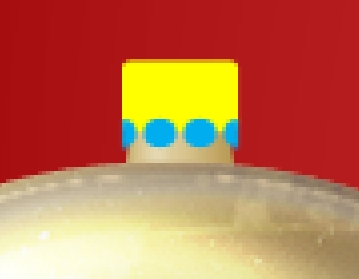
Change the foreground color to #a4915d and pick the Rounded Rectangle (U). Set the Radius to 4-5px and draw a small shape (yellow color). Then change the Radius to 10px and draw some smaller rectangles (blue color). Merge these layers and duplicate this new layer twice.
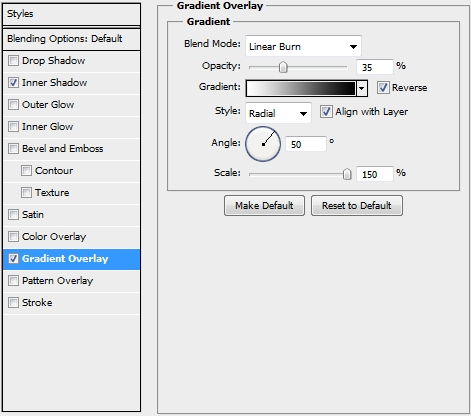
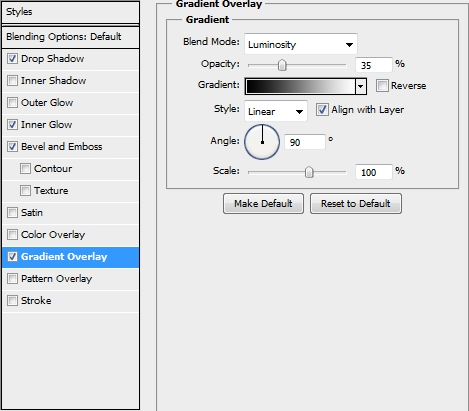
Step 12
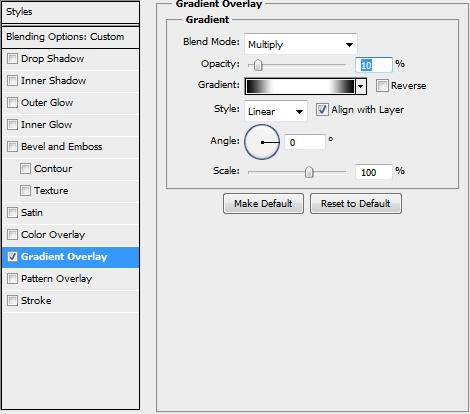
Select the first copy layer and turn its Fill to 0%. Then simply apply this gradient.

Step 13
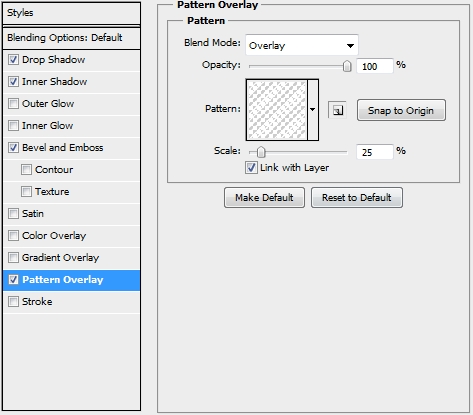
Pick the second copy layer and apply the following styles (don’t forget to turn Fill to 0%).

Step 14
Group all the layers created in Steps 11-13 and name the group “2 deco”. Repeat the process for the rest of the numbers.

Step 15
Create a new layer and place it under the “2 deco” group. Pick the Pen Tool (P) and draw an oval. Select a hard round brush (size 4px, color: #c3a263) and right click anywhere on the canvas. Then go Stroke Path (make sure the Simulate Pressure box is unchecked) and hit OK. After doing this, apply the following styles.


Step 16
Duplicate this layer three times and place the copies above the remaining numbers.

Step 17
Duplicate the 2,0,1 and 3 groups, select the copies and merge them. Rename this new layer to “2013” and duplicate it a couple of times as you’ll need to use it later. Select the first copy and change the foreground color to white (#ffffff) and the background one to black (#000000). Go Filter>Sketch>Photocopy (Detail 7, Darkness 8). Then select the pixels of the 2013 layer and go Filter>Blur>Gaussian Blur (4-5px). Finally change the Blend Mode to Hard Mix and the Opacity to 30%.

Step 18
Create a new layer and select 2013’s pixels. Paint the selection yellow (#fff899), change the Blend Mode to Divide and the Opacity to 35%.

Step 19
Create a new layer and paint the canvas black (#000). Change the Blend Mode to Soft Light and the Opacity to 40%. Then create another layer and paint it yellow (#dfc243). Change its Blend Mode to Color and lower the Opacity to 15%. Finally add a Curves adjustment layer.

Step 20
Duplicate the layer created in Step 17 (Hard Mix) and hit Ctrl+I. Go Image>Adjustments>Hue/Saturation and move the Lightness to something around +10. Change the Blend Mode to Soft Light and the Opacity to 35%.

Step 21
Select one of the 2013 copy layers created in Step 17 and place it on top of the layers stack. Using the Hue/Saturation panel change its color to a a nice red-pink. Then simply change the Blend Mode to Lighten and the Opacity to 40%.

Step 22
Duplicate the two “adjustment layers” created in Step 19 (black and yellow) and place them on top of the layers stack.

Step 23
Select the other 2013 copy layer and place it on top. Go Filter>Sketch>Chrome (Detail 4, Smoothness 7). Then go Filter>Liquify and using the Bloat Tool distort it a bit. Delete the parts outside the 2013 and change the Blend Mode to Soft Light (Opacity 30%).
Step 24
Create a new layer and select the Type Tool (T). Write “Happy New Year”. The font I used is Mission Scipt (size: 51pt). Change its color to white (#fff) and apply these styles.
Step 25
Create a new layer and grab the Pen Tool (P). Draw some strings using the Stroke Path technique (brush size: 3px, color: #835c29). Erase any unwanted parts and apply the following styles.


Step 26
Create a new layer and select the Brush Tool (B). Pick a hard round brush from the list and open the Brush Panel.
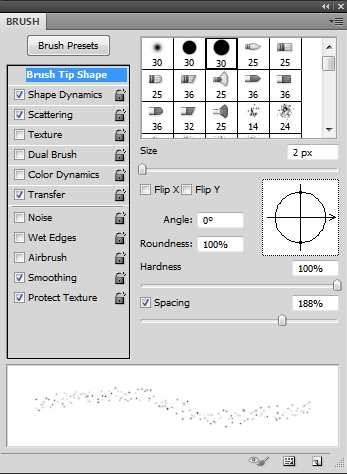
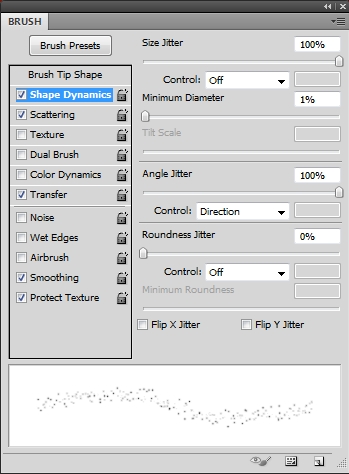
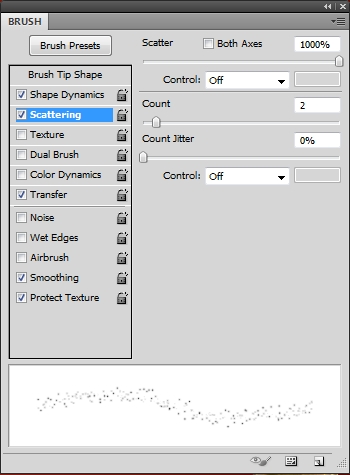
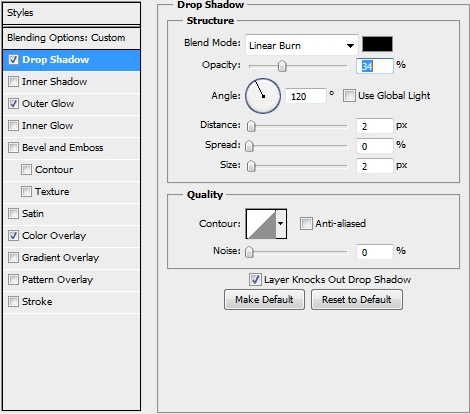
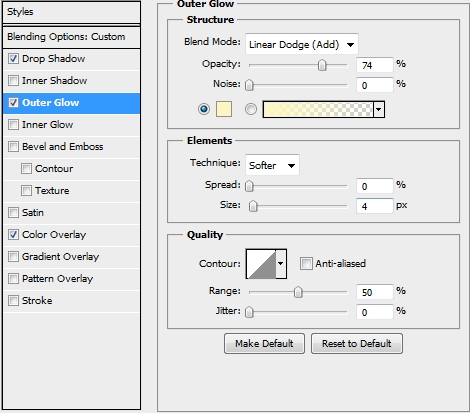
Change your foreground color to #e7c948 and draw some dust all over the 2013. Turn the Fill to 0% and apply these styles.
Step 27
Create a new layer and paint the canvas red (#da4143). Change the Blend Mode to Saturation and the Opacity to 70%. Then create a new layer, paint the canvas black (#000) and change its Blend Mode to Color and the Opacity to 20%. Finally, create a new layer and select the 2013’s pixels. Paint the selection black (#000) and change the Opacity to 30% and the Blend Mode to Color. Your design should look something like this.

Step 28
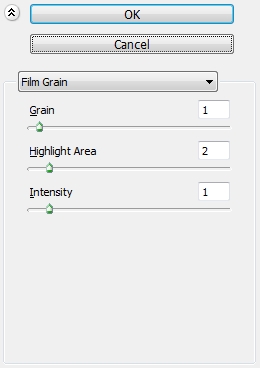
Group all the layers created so far (include the background) and duplicate the group. Merge this new group and duplicate the new layer. Desaturate the copy (Ctrl+Shift+U or Image>Adjustments>Hue/Saturation), change the Blend Mode to Overlay, lower the Opacity to 75% and go Filter>Artistic>Film Grain.
Step 29
Create a new layer and paint the canvas black (#000). Change the Blend Mode to Color and the Opacity to 10%. Then create another layer and paint the canvas blue (#5697af). Change its Blend Mode to Pin Light and lower the Opacity to 15%.

Step 30
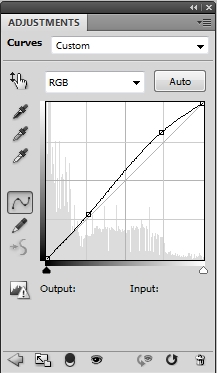
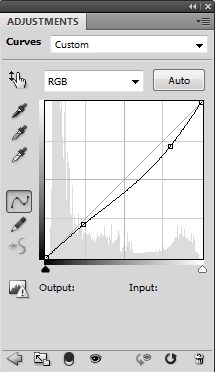
Finally create a Curves adjustment layer.
Conclusion
That’s it. You’ve just created a cool Christmas balls-like text effect. We hope that you enjoyed the tutorial and learnt something new. If you have any questions, feel free to post them in the comments section and we’ll answer asap.


nice tutorial mr. Alan,i hope i could find some time to learn this graphic designing…