
Creating a website has never been easier to everyone – especially to beginners who have small or even zero knowledge about having a website. May it be personal blogs, portfolio, or business websites, you can now build your own niche site without much difficulty.
As you have already decided to build your own portfolio site, the first thing you must consider is picking the right platform. The decision you make will have significant effect on your website’s functionality, overall design, maintenance, etc.
One quality platform that will help you a lot is Wix. This particular platform is very beginner-friendly and will help ease your way into the world of website building through its tools and features, which we will discuss later on in the guide. It currently has 86 million users around the world.
This post is dedicated for beginners who want to learn about building their own website. We will give you a brief introduction of this platform, how it works, plus a step-by-step tutorial on how to create a simple portfolio website from scratch with Wix. Let’s begin!

What is Wix?
Wix is basically a web development platform that enables its users to create their own website. It includes pre-built, well-designed templates that you can use at any given time.
Through its editing tools, you can modify a template depending on your own taste or even begin creating one from scratch. This platform also allows you to use animations in texts and other elements for added flair to your site.
What if I’m not into web designing?
If you’re a bit intimidated or just not into designing your site manually, Wix also has Artificial Design Intelligence (ADI) that will do most of the work for you such as layout design, information placements, etc. All you need to do is put the needed information and it will do the rest. Also, if you want something changed, Wix ADI can guide you every step of the way.
Is It Free?
Yes. If you wish to sign up with Wix, you can do so for free through their starter membership that is completely packed with tools and web elements (images, icons, fonts, etc.). It also gives you access to hundreds of unique templates and free storage and bandwidth space. Their ‘drag and drop’ interface also allows you to hit the ground running without having any coding skills. However,the free membership have Wix advertisements that will be visible on your website.
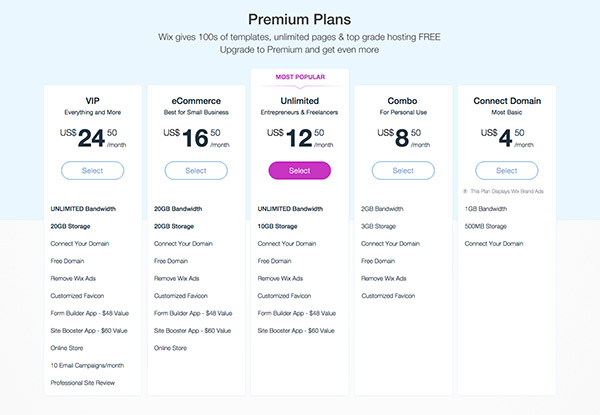
You can remove the ads, if wish to, by upgrading to a premium membership. It will grant you access to more useful features including a personal domain name to your website, advanced eCommerce platform where you can sell products with ease, Google Analytics integration that will help you track your site’s performance, more storage and bandwidth capacity depending on the Premium Plan, premium support, and more.
Bottom line, if you’re a small business owner or a freelancer who wants to have an attractive website but has no prior background to building one, then Wix is a good match for you.
How to Sign Up in Wix
Step 1. Go to WIX.

Step 2. Click on the “Start My Website” button.

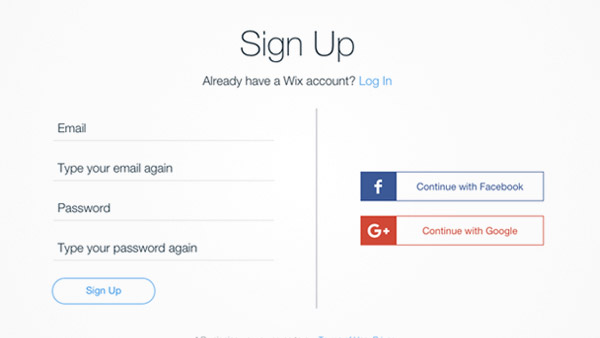
Step 3. You’ll then be navigated to a page where you can sign up for your Wix account in three ways – Filling the fields (your email & password), Facebook, and Google+.
How to Create Your Own Portfolio Website
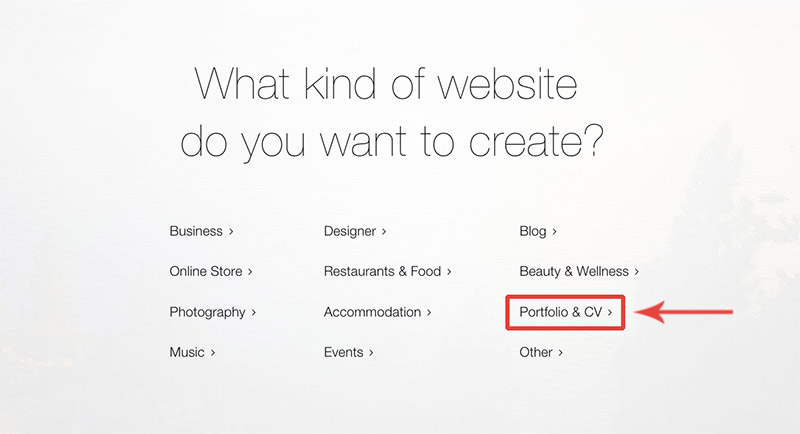
After signing up, you are then accompanied to the category selection where you can choose the kind of website you want to create. Wix’s collection covers almost every niche that you may want to build.
For this tutorial, we are going to create a simple single page portfolio website. Bear in mind that you can certainly create anything you want. It’s all up to you.
This tutorial’s purpose is to show you how to start from scratch and also get you more acquainted with the tools so that you can use them easily for your own website. Ready? Here we go.
Table of Contents:
- 1. Selecting a Template
- 2. Setting up a Template
- 3. Creating the Header
- 4. Creating the About strip
- 5. Creating the Portfolio strip
- 6. Creating the Contact strip
- 7. Changing Footer Design
- 8. Setting Page Anchors
- 9. Creating Page Links
- 10. Creating Navigation Bar
- 11. Setting Navigation Links to Elements
1. Select a Blank Template
Step 1. On the category selection, start by clicking “Portfolio & CV”.
Step 2. You’re then given the option to use Wix ADI or start with Wix Editor. For this tutorial, we’ll go for Wix Editor.
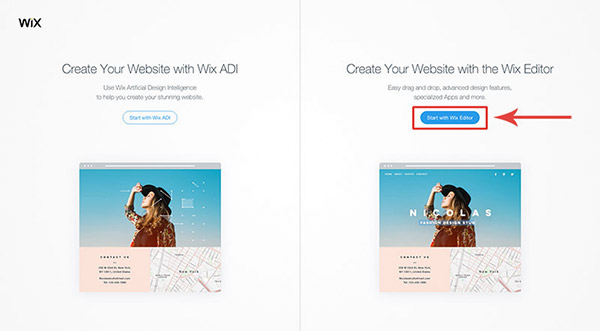
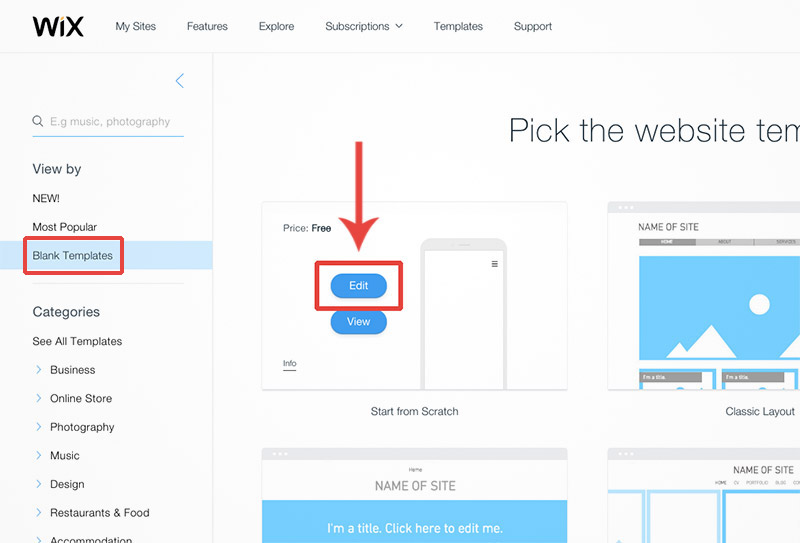
Step 3. You’ll then see a page of templates that were specifically created for portfolio-niche websites. You can use them if you wish to. But for now, we’ll be using a blank template. Click the “Blank Templates” on the left and then click ‘Edit’ on the ‘Start from Scratch’ template.

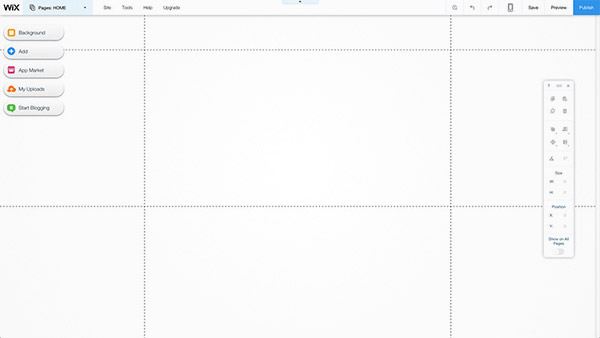
Step 4. Here you’ll see the blank template. From here on out you must save your progress constantly by clicking “Save” button on the top right corner. This is important to prevent any loss on your design.
2. Set up the blank page.
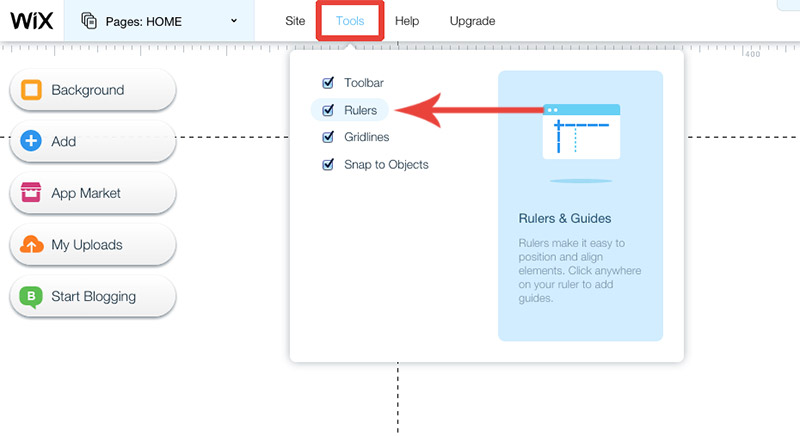
Step 1. Enable the ruler in Tools (red square) > Ruler (red arrow). This tool will help us to accurately place elements on the page.
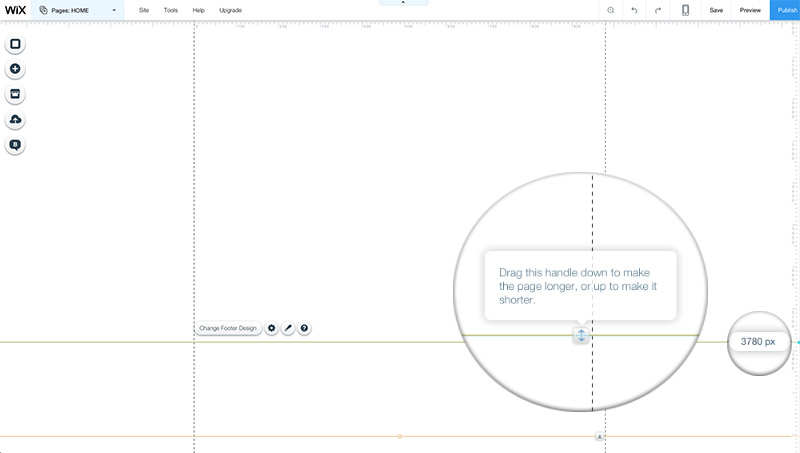
Step 2. Next, expand the height of the page by dragging down the footer line guide to 3780 px.
3. Let’s start working on your header.
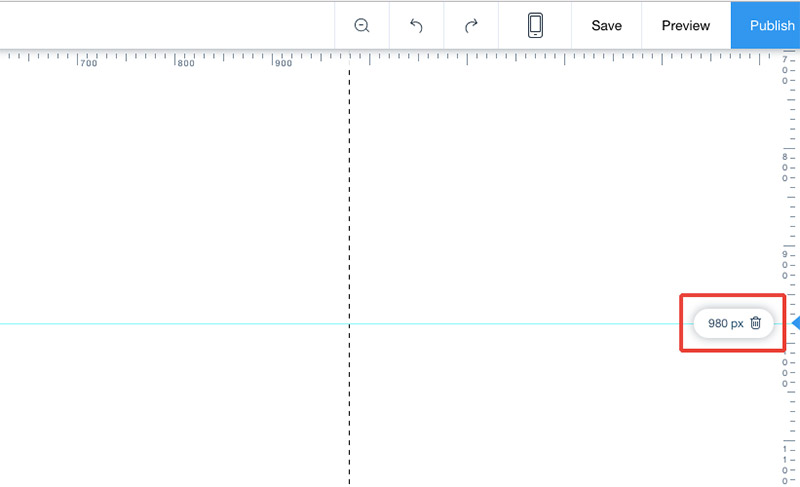
Step 1. Mark a horizontal guide on 980px. You can do this by clicking the ruler on the right.
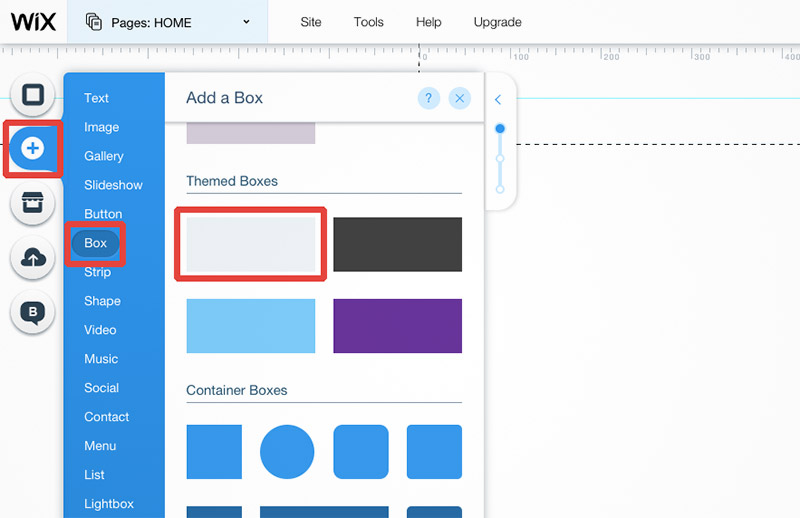
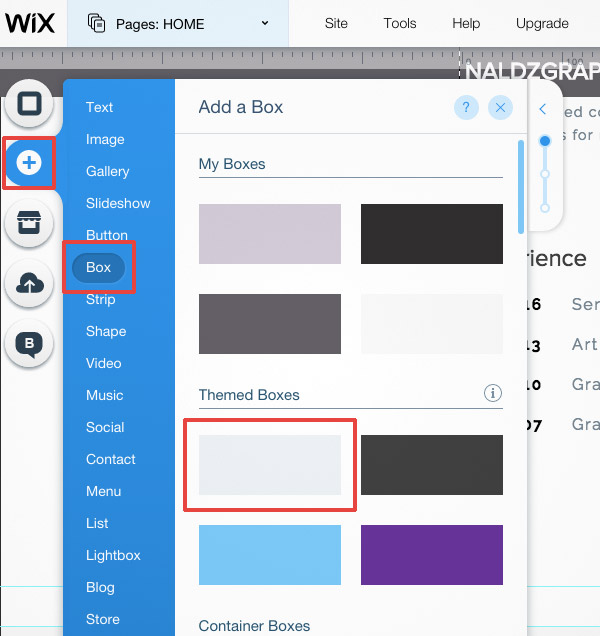
Step 2. Add a box by going to Add > Box > choose one from the theme box.
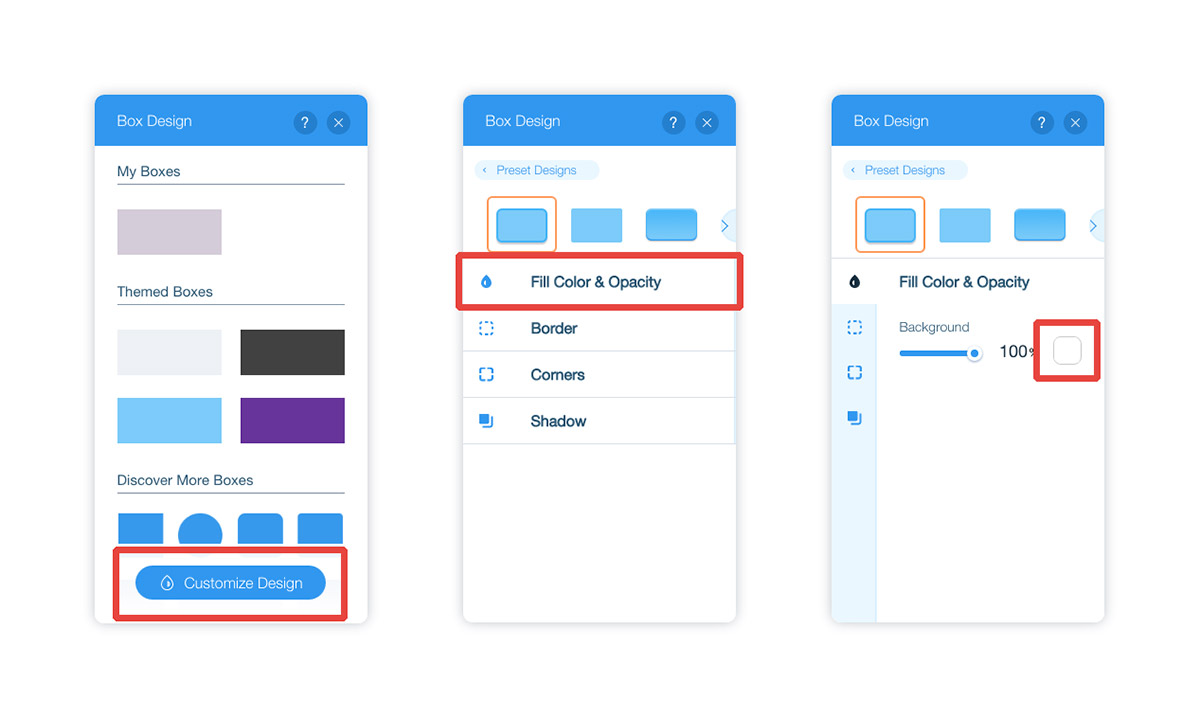
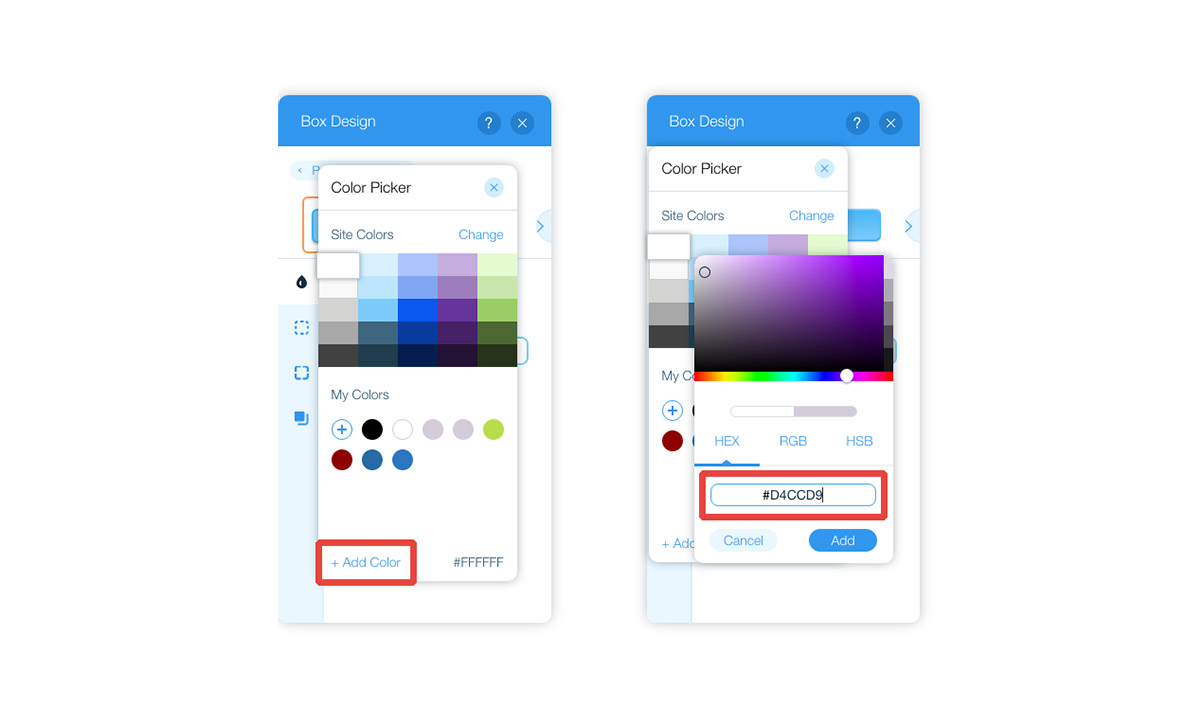
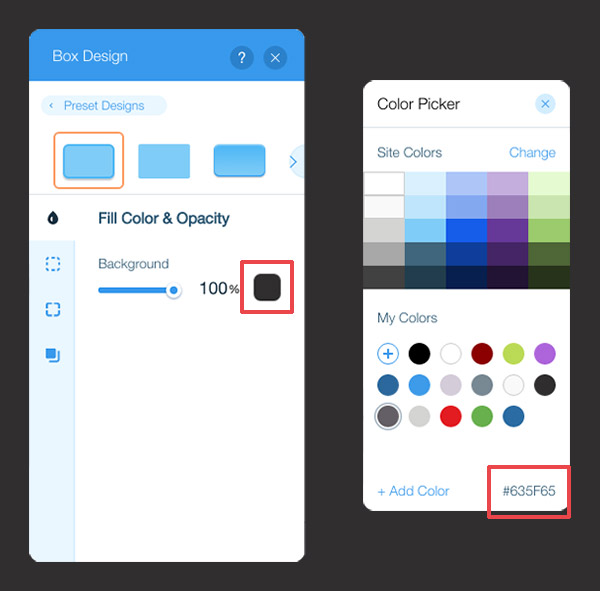
Step 3. Change the box color. Click “Change Design” > Customize Design > Fill Color & Opacity > Background Color Display > +Add Color > paste #D4CCD9 on field > Add.
Step 4. Expand the box from top left corner to bottom right corner in 980px. It would look somewhat like this:
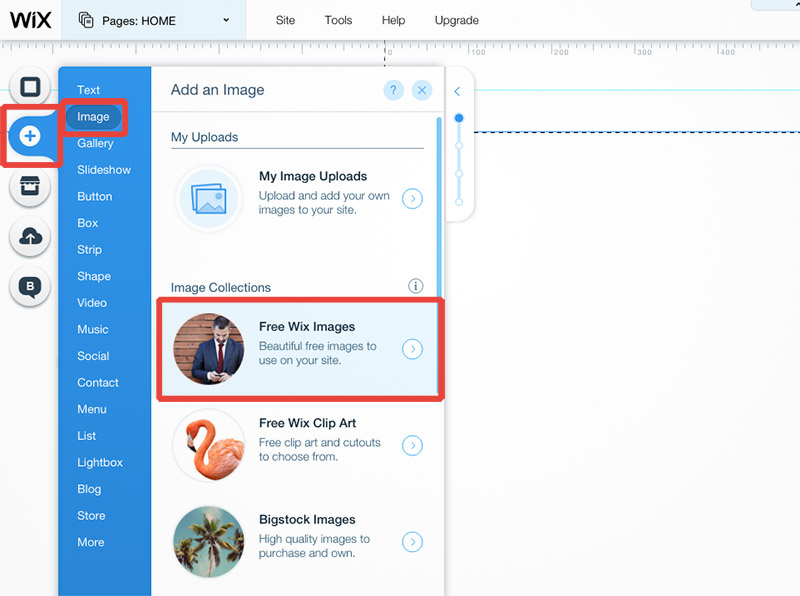
Step 5. Afterwards, we add an image from Wix’s free image stock. Click the “Add” button > Image > Free Wix Images.

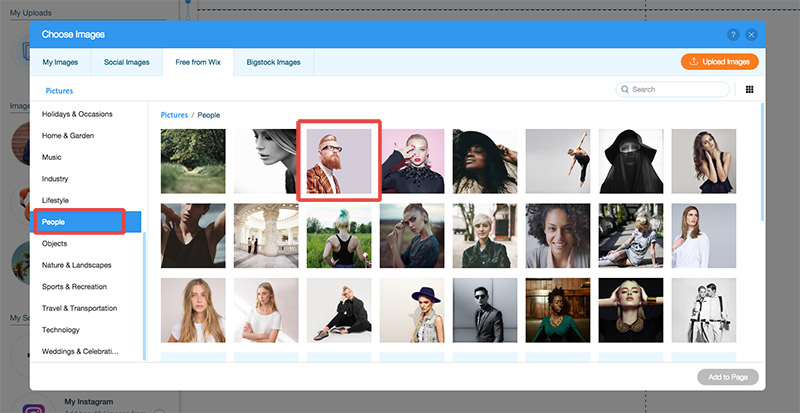
Step 6. A lightbox will then appear that displays a wide collection of free images on Wix. On its left side, select the “People” category > choose the photo titled “Man in Red Suit” > click “Add to Page” below.
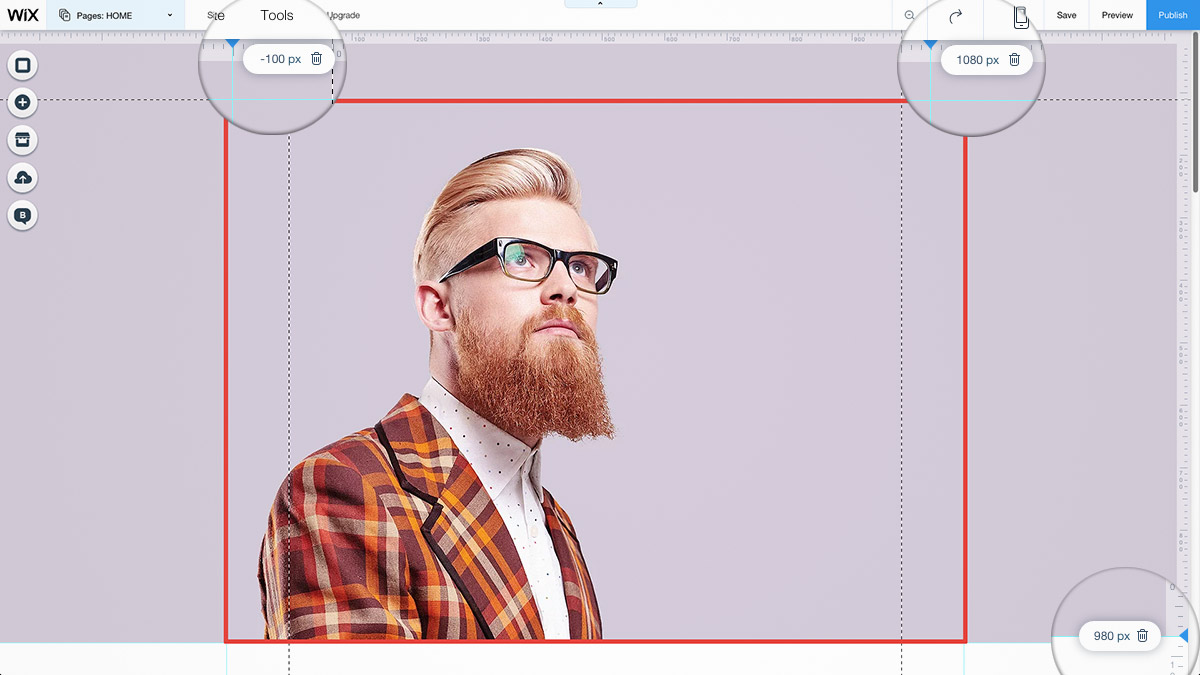
Step 7. Mark vertical guides on -100px and 1080px by double clicking the top ruler and typing the numbers for each guide.
Step 8. Next, expand the image horizontally from -100px to 1080px and vertically from header boarder to 980px. Here’s an illustration where the boarders are marked in red lines:
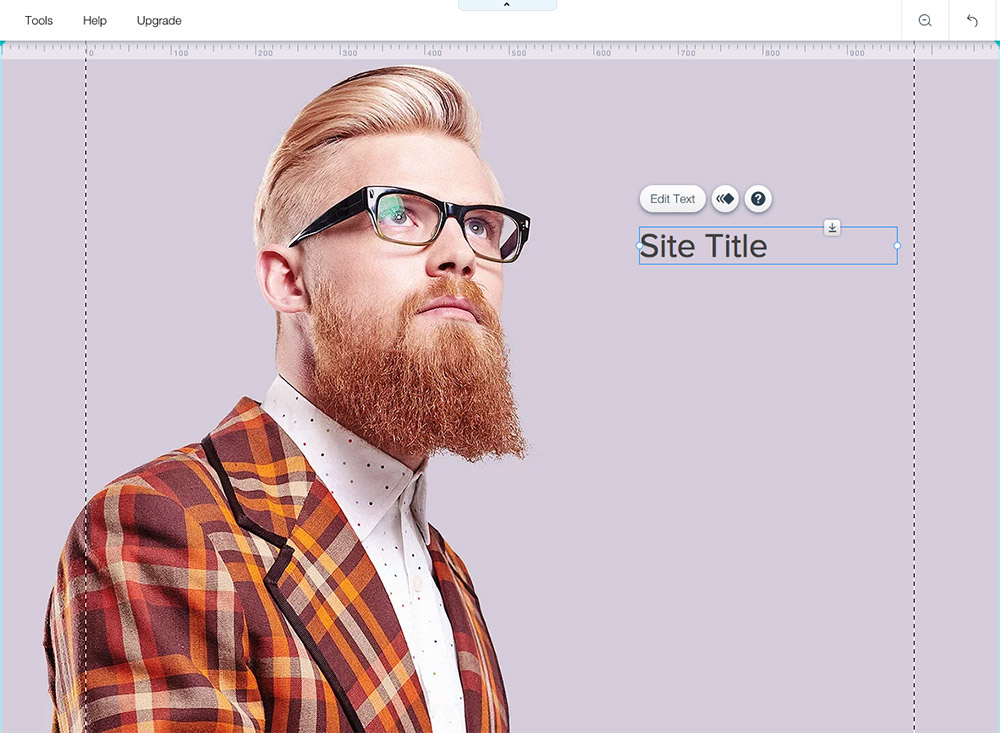
Step 9. Now we can add text box. Click “Add” button > Text > Site Title

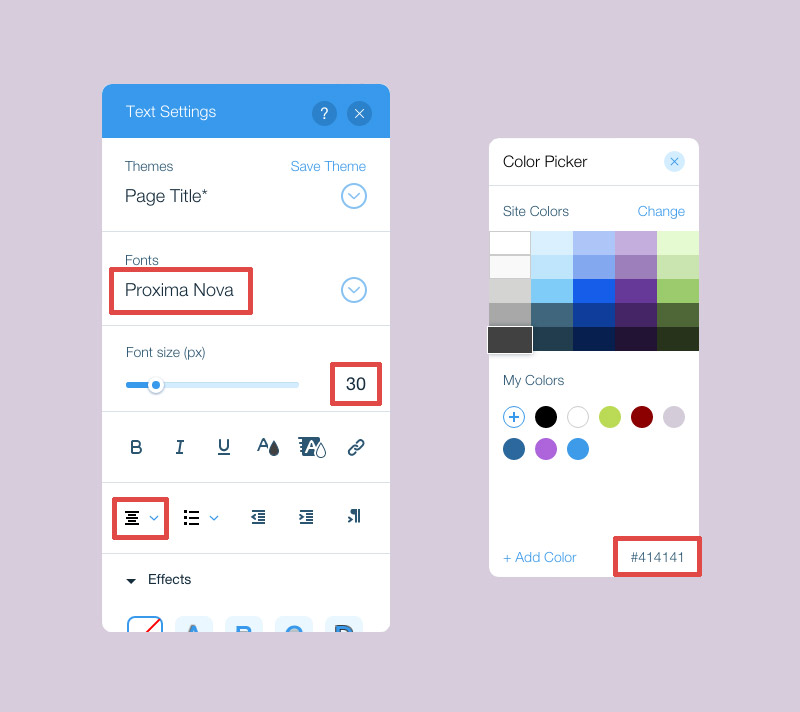
Step 10. Place the text box on the right side of the person as shown here:
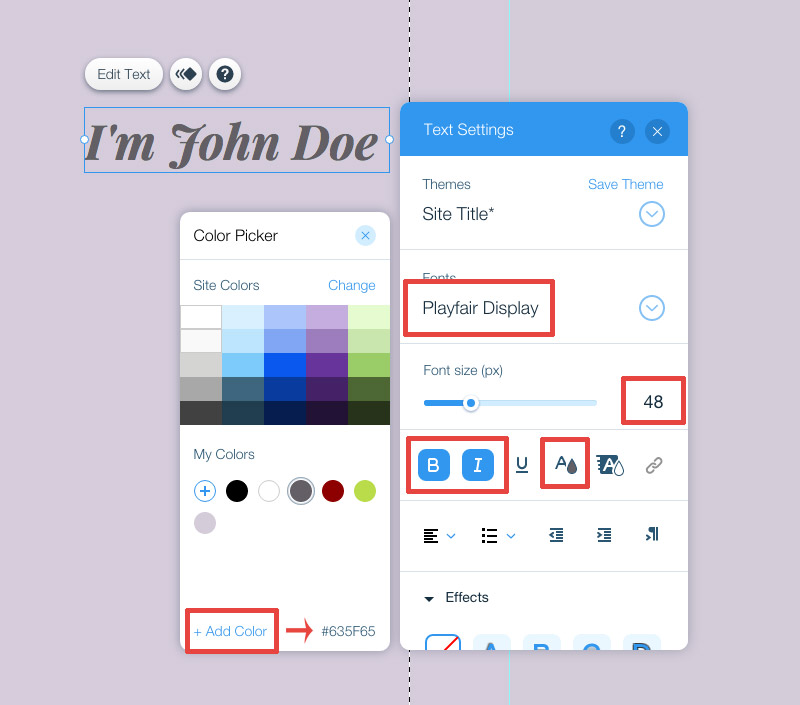
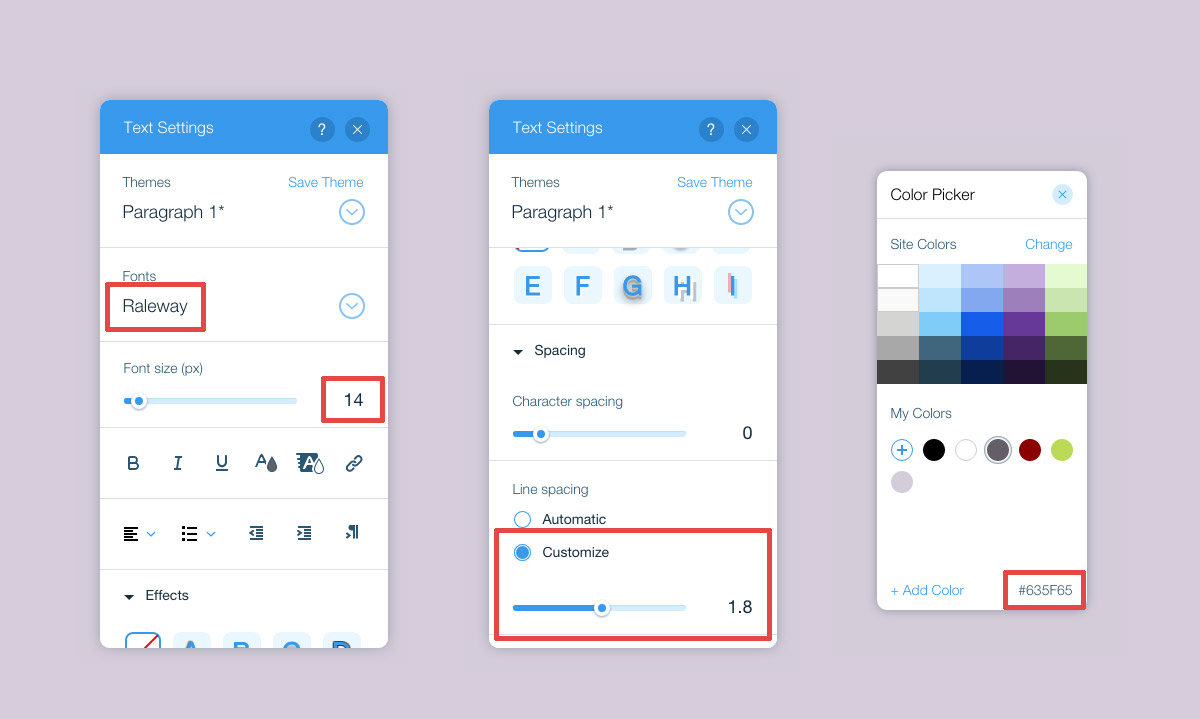
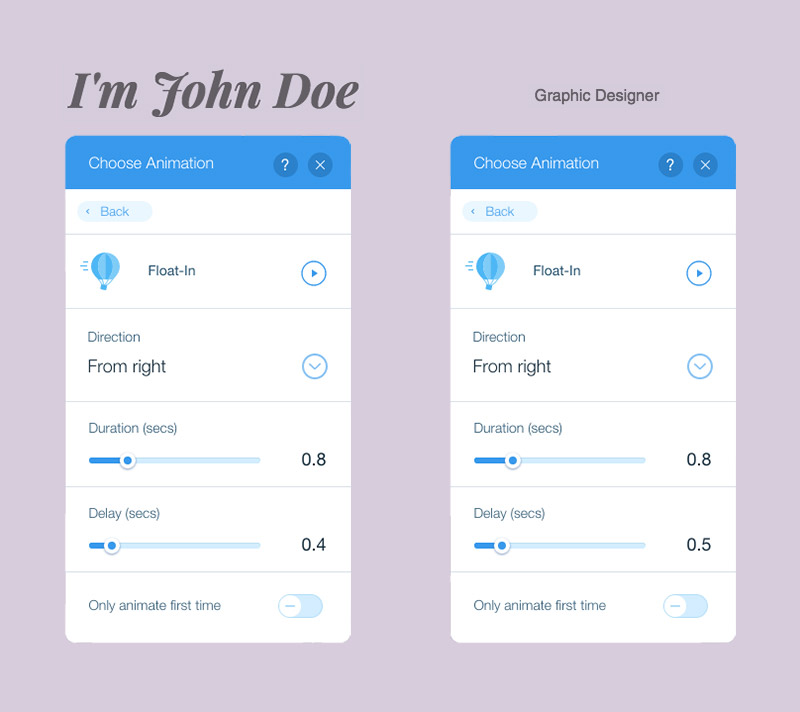
Step 11. Type “I’m John Doe” and edit the text style and color with these settings:
Step 12. Next, let’s put his job title by adding another text box
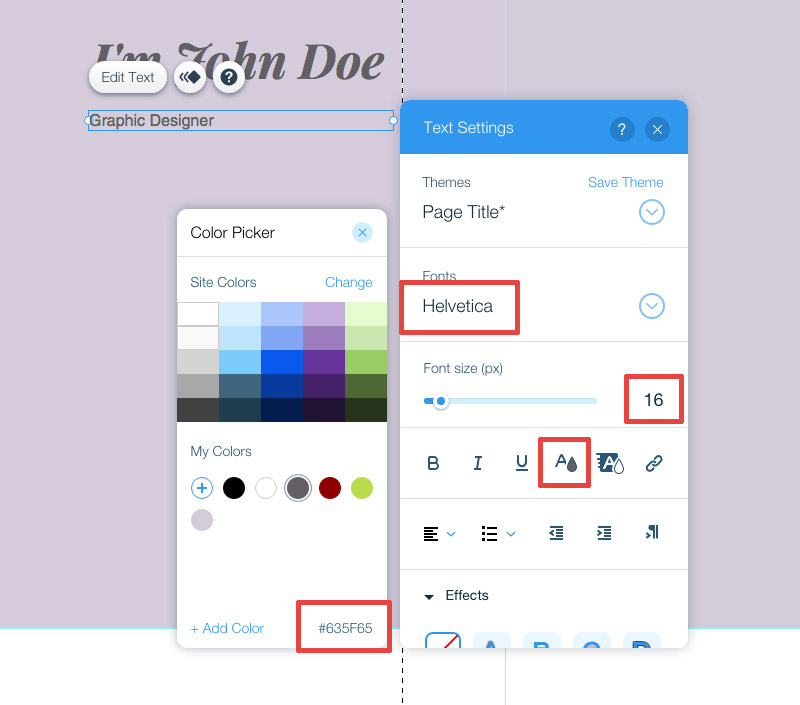
Step 13. Place the text box below the ‘I’m John Doe’ text box. Type “Graphic Designer” and change the color and style with these settings:
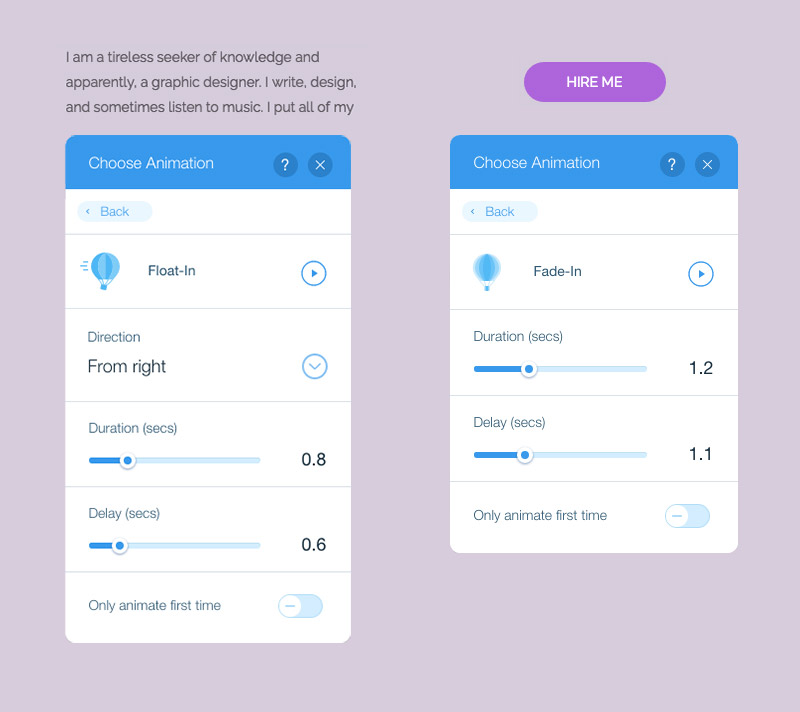
Step 14. Now let’s add some description below using a ‘Paragraph 1’ text box.

Step 15. Put in a brief description and customize the design with these settings:
Note: Remember to always save your progress.
Step 16. Next, let’s put a call-to-action button.
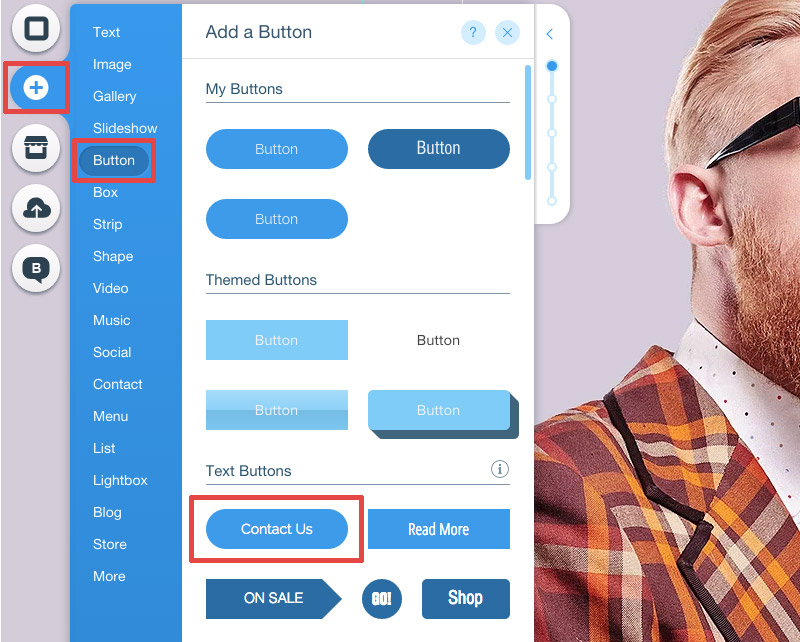
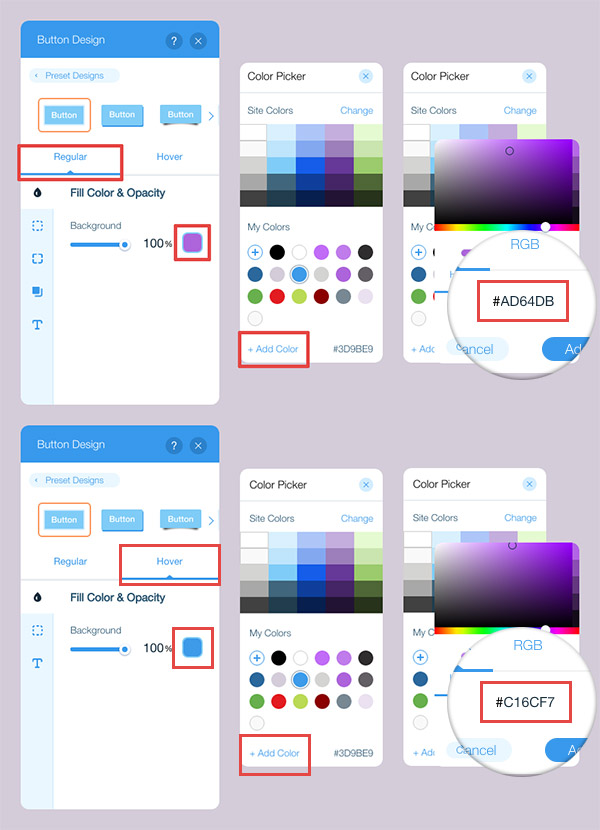
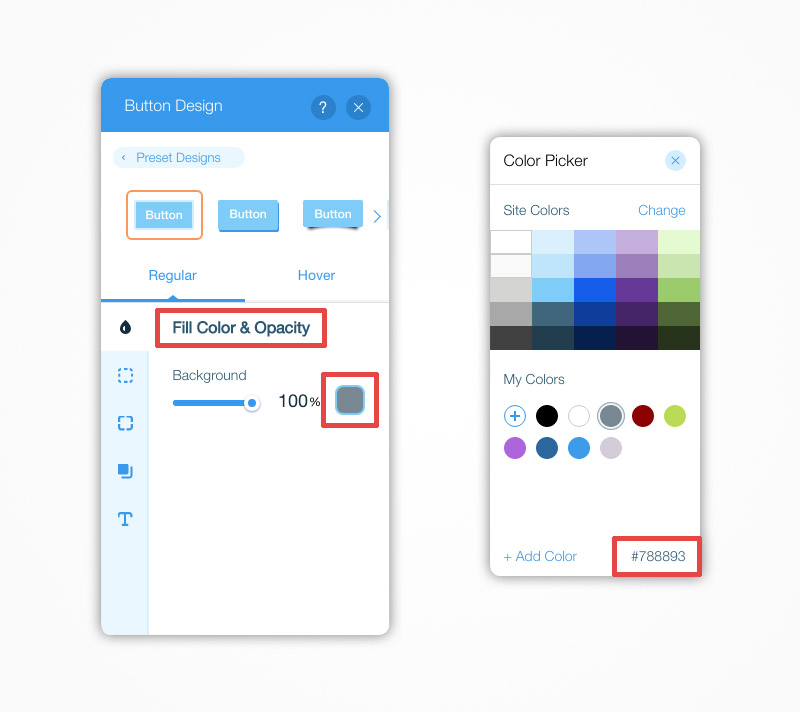
Step 17. Place the button below the description and change the text to “HIRE ME”. Then, customize the colors with these steps:
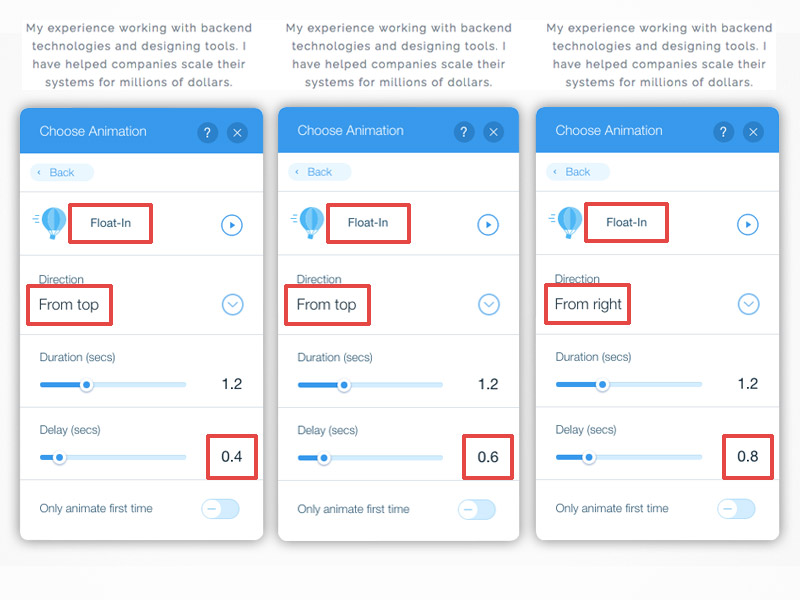
Step 18. Then, we’ll place animations on the text boxes and ‘Hire Me’ button by selecting the text box and clicking the ‘Animate’ button.
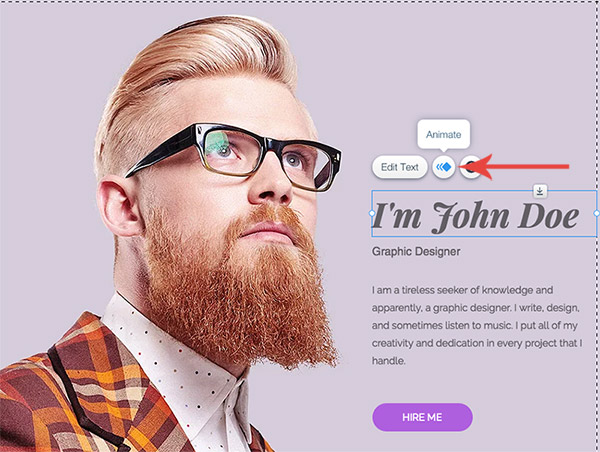
Step 19. Choose the ‘Float-In’ animation for the text boxes and ‘Fade-In’ for the Hire Me button. Customize each with these respective settings:
4. Now let’s make our About strip.
Step 1. First, Mark a horizontal guide on 1900px. Do this by clicking anywhere in the ruler on the right and typing in the number.
Step 2. Add another box by going to Add > Box > choose one from the theme box and expand it in full width and down to the 1900px line guide.
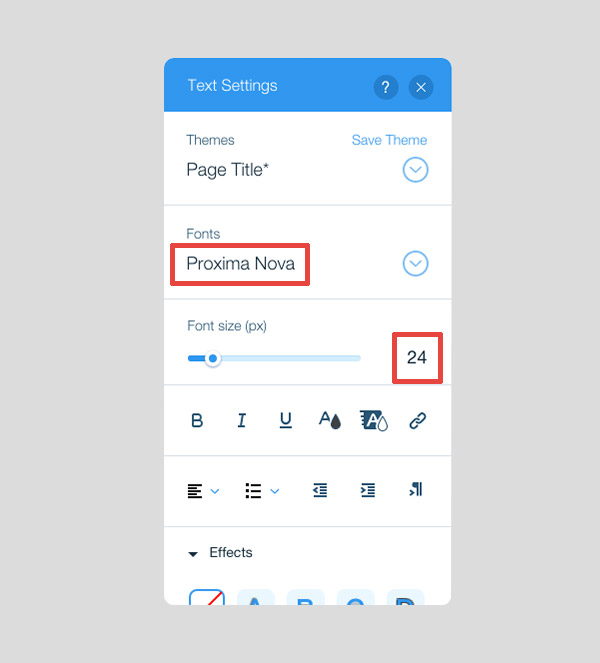
Step 3. Add a text box in Add > Text > Page Title. Change the text to “WHY YOU SHOULD HIRE ME” (all caps) and customize the settings:
Step 4. Next, We will add 3 icons. Do this by going to Add > Image > Free Wix Clip Art.
![]()
Step 5. In the pop-up window, search ‘Graph 3’ in the search box. Double click on the icon to add it to the page. Do this again and search ‘Graph 5’ and ‘Graph 6’.
![]()
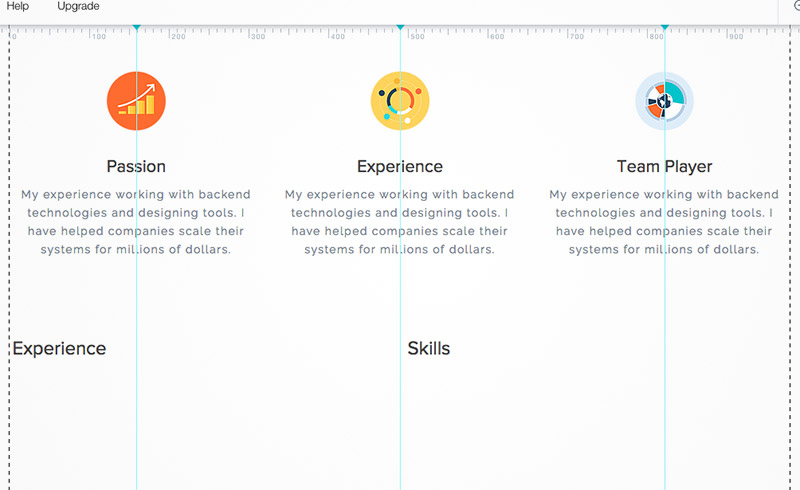
Step 6. Scale down each icon by 100×100 px and equally place them in a horizontal manner.
![]()
Tip: Use line guides by clicking on the ruler to make sure you have equal placements for elements.
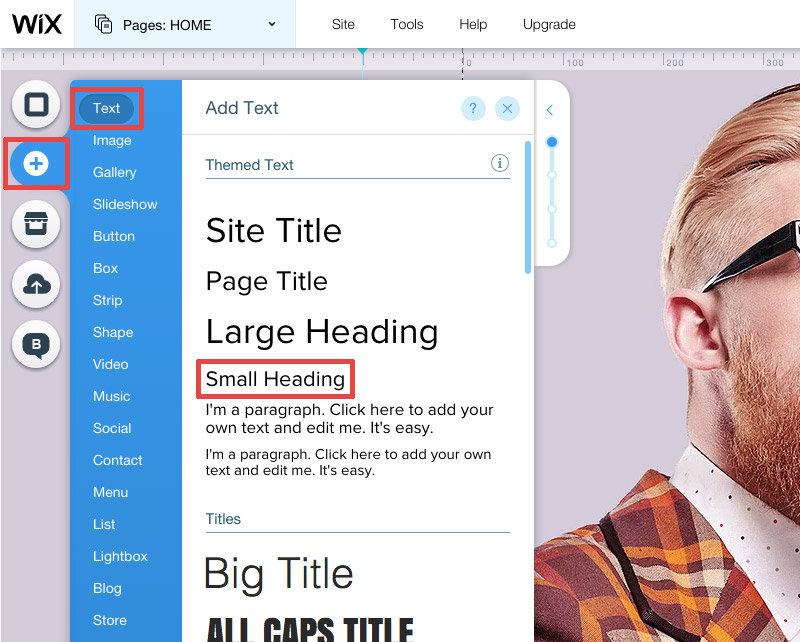
Step 7. Add ‘Small Heading’ text boxes (Add > Text > Small Heading) below each icon and enter your assets for your portfolio. Apply these settings for each text box:
![]()
Step 8. Then we add ‘Paragraph 1’ text boxes where you can show brief descriptions of your assets. Write down whatever you like.
![]()
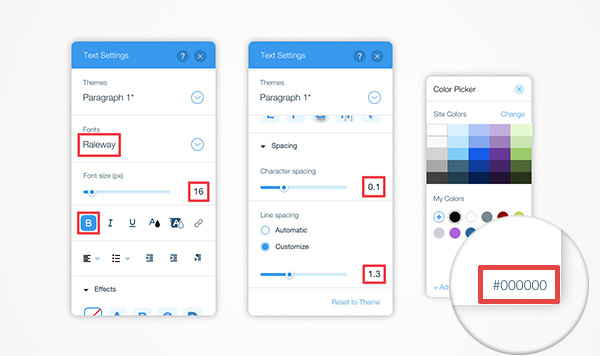
Step 9. Customize the text boxes with these settings:
![]()
Step 10. Next, we’ll put in some credentials. Add 2 ‘Page Title’ text boxes, label them “Experience” and “Skills”, and place them as such:
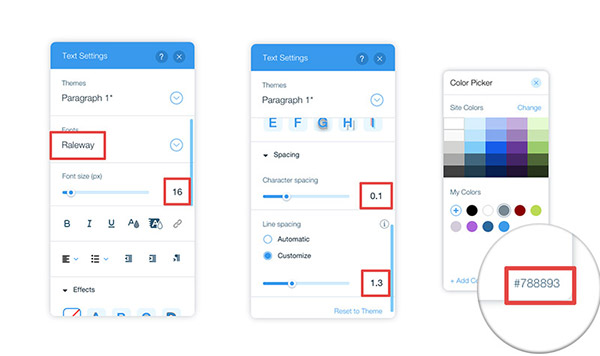
Step 11. Customize both text boxes with these settings:
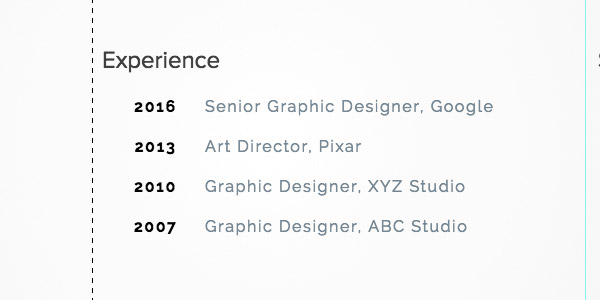
Step 12. In the ‘Experience’ section, we’ll put previous employments and their respective years. Add a ‘Paragraph 1’ text box that is scaled with Width: 45, Type in ‘2016’, ‘2013’, ‘2010’ and ‘2007’ with one space in between. Customize the font style with these:
Step 13. Then, Get another ‘Paragraph 1’ text box. Put your previous employment details, and customize font with these settings:
Step 14. Your ‘Experience’ section will look like this:
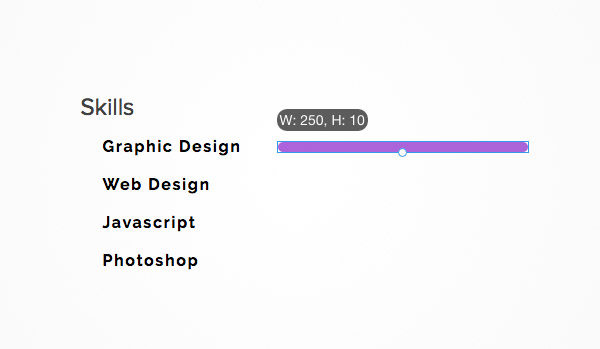
Step 15. Next, let’s put in your skills. Place another ‘Paragraph 1’ text box where you type your skills. Its customization setting is the same to the text box for years in the ‘Experience’ section. After which, we’ll put a bar that will display your mastery on every skill. To do this, add another button, pick the call-to-action button you created on the header. Delete the text, and scale it to W: 250, H: 10. It would look like this:
Step 16. Change its color to #788893.
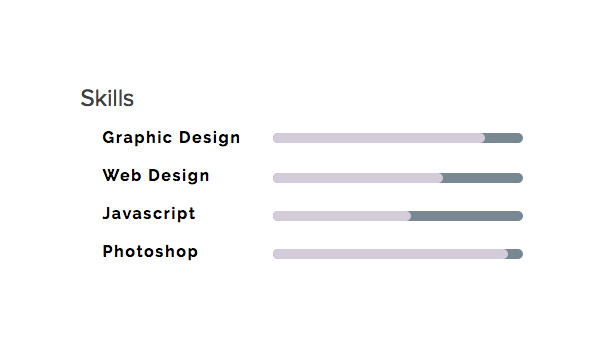
Step 17. Then, duplicate the bar by clicking the ‘Duplicate’ button on the tool bar or pressing CTRL+D (Command+D on mac). Make 4 bars and arrange them adjacent to the skills:

Step 18. Duplicate another 4 bars and change their color to #D4CCD9. Place each on top of every gray bar and scale them horizontally depending on your mastery on the skill:
Step 19. Now let’s add some animations for the whole ‘About’ strip.
Step 20. For the icons, we’ll use the ‘Float-In’ and ‘Fade-in’ animations with these respective settings:
![]()
Step 21. Add ‘Float-In’ animation on each description with these settings:
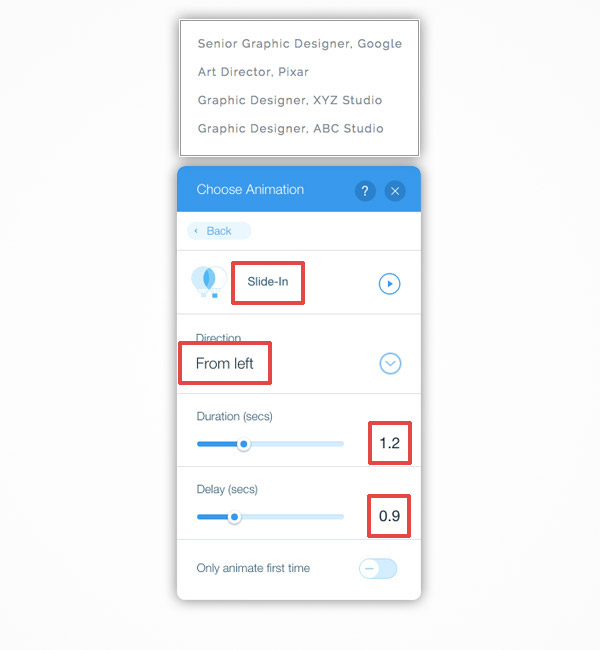
Step 22. Add ‘Slide-In’ animation to your previous employments:
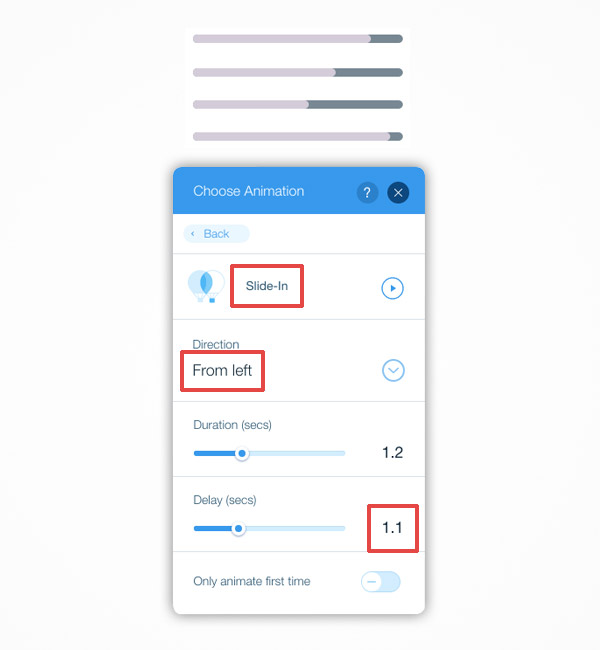
Step 23. Let’s also put ‘Slide-In’ animations to the 4 pink bars. Select all the pink bars (Hold Shift) and apply this animation setting:
5. Now we add our Portfolio strip.
Step 1. Similar to the above strips, we’ll add another box that will serve as our background. Change its color to #F9F9F9 and expand it to full screen width and height starting from 1900px to 2820px.
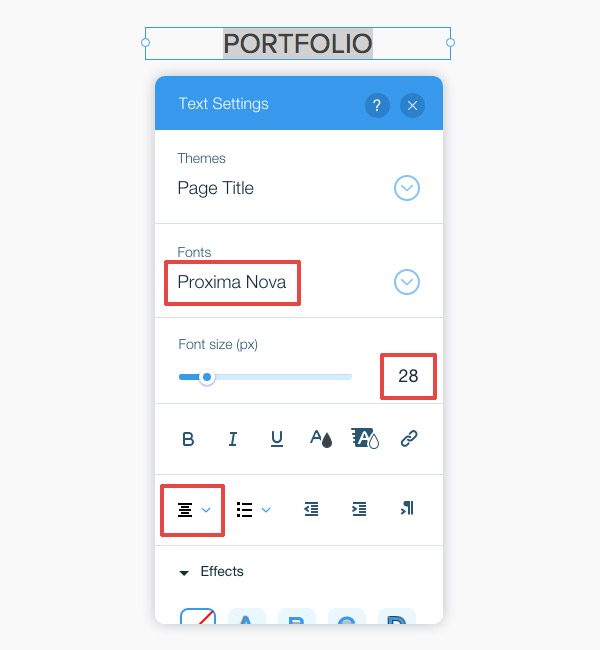
Step 2. Add a ‘Page Title’ text box, change text to ‘PORTFOLIO’ and apply this setting:
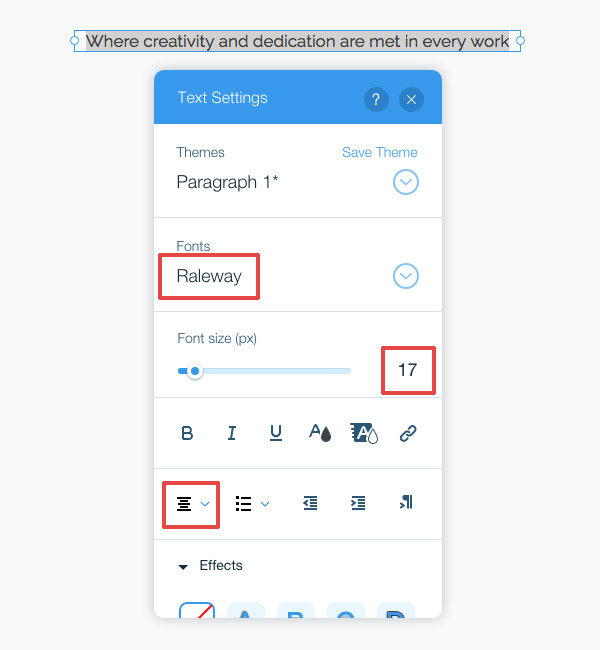
Step 3. Add a ‘Paragraph 1’ text box, type in ‘Where creativity and dedication are met in every work’ and apply this setting:
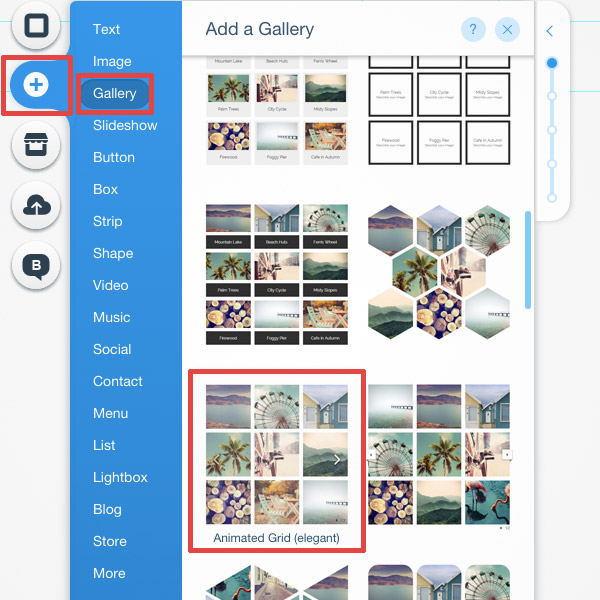
Step 4. Add a gallery by going to Add > Gallery > Choose ‘Animated Grid (elegant)’.
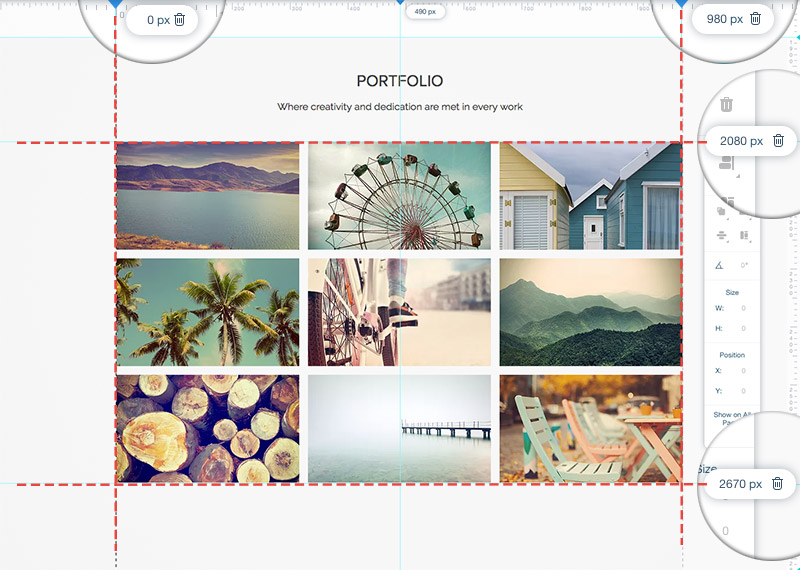
Step 5. Expand the grid: Width: 0px – 980px; Height: 2080px – 2670px.
Step 6. Change its layout spacing from 15 to 20.

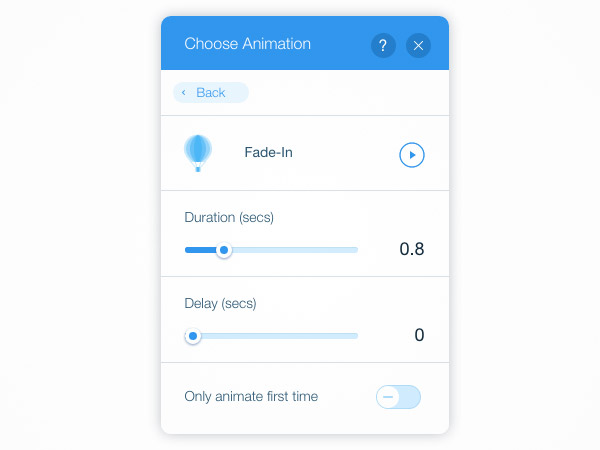
Step 7. Add ‘Fade-In’ animation with this setting:
6. Now it’s time for the Contact strip
Step 1. Add a box, change the color to #2F2E2E and expand in full-width and the height from 2820px to 3690px.
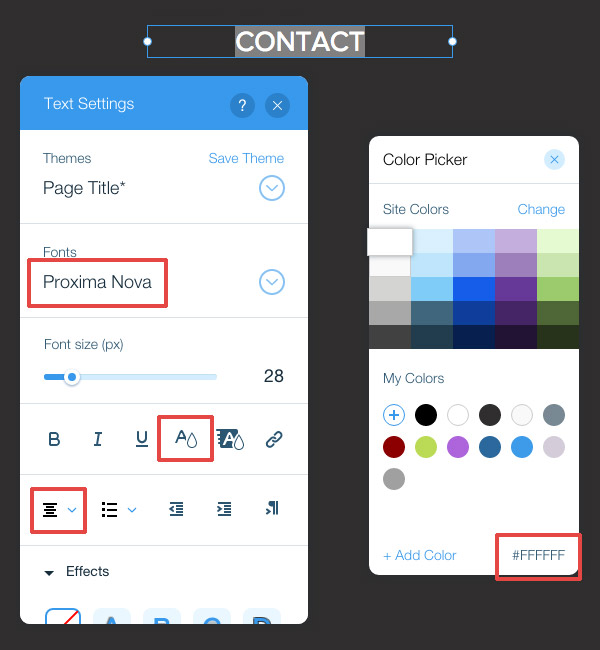
Step 2. Add a ‘Page Title’ text box, change text to ‘CONTACT’, and customize settings:
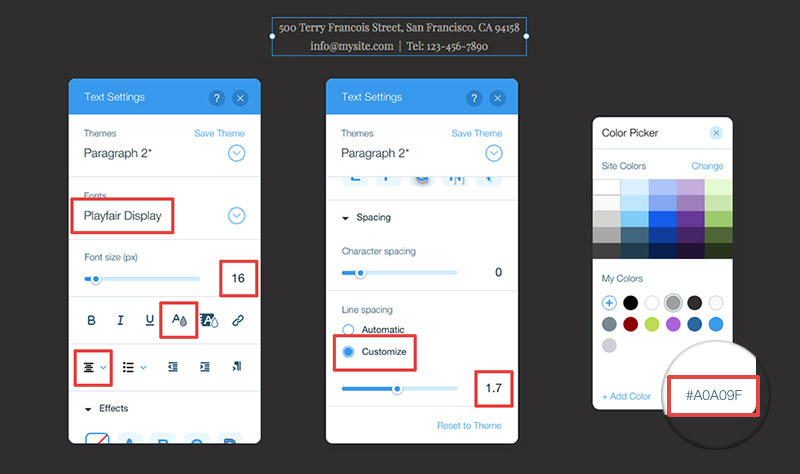
Step 3. Add ‘Paragraph 1’ text box, put any address as well as random email address and contact number. Follow this font setting:
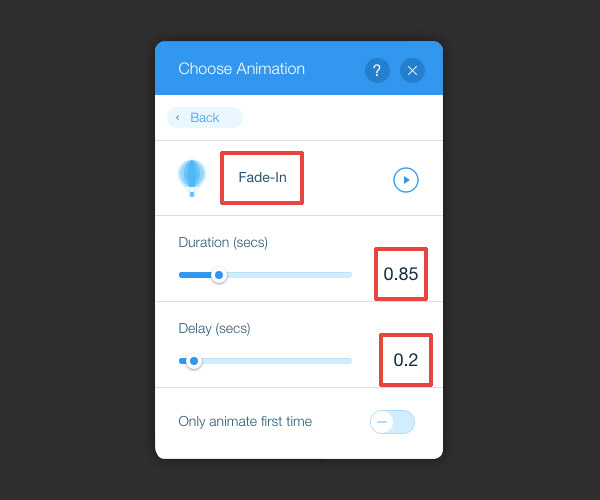
Step 4. Also add ‘Fade-in’ animation to the text with this setting:
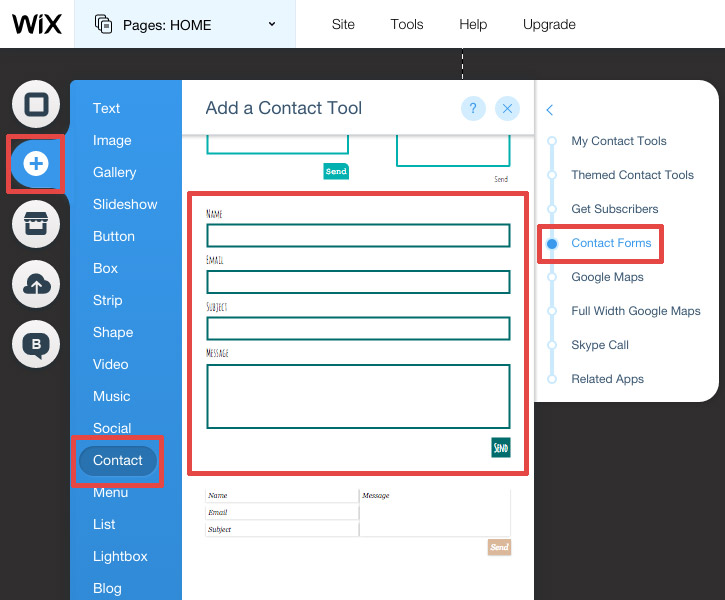
Step 5. Next, let’s add a contact form. Go to Add > Contact > Contact Forms. Then choose this:
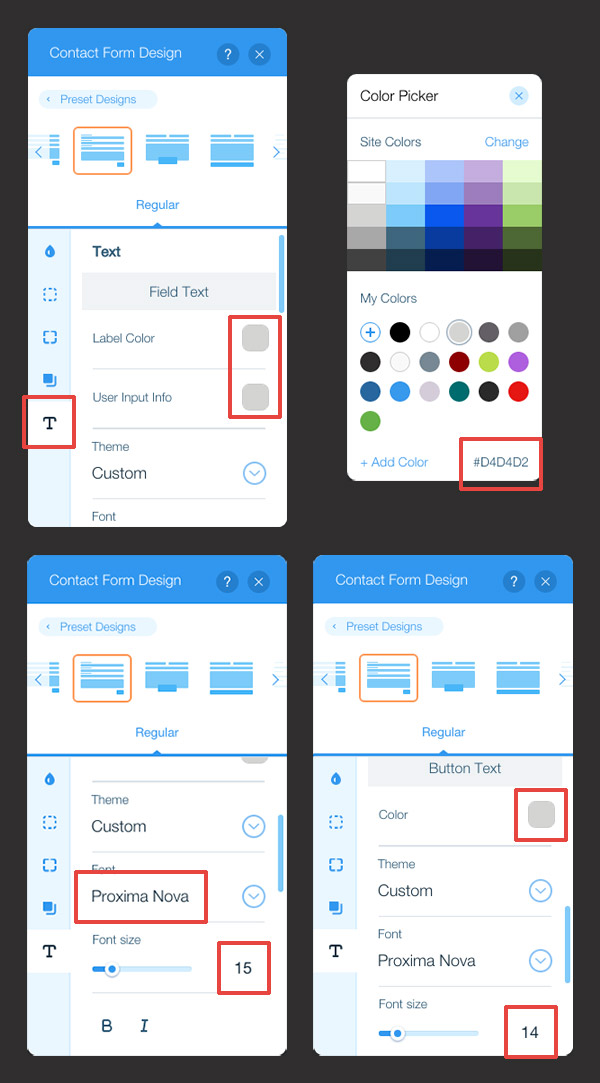
Step 6. Customize the contact form’s design with these settings:
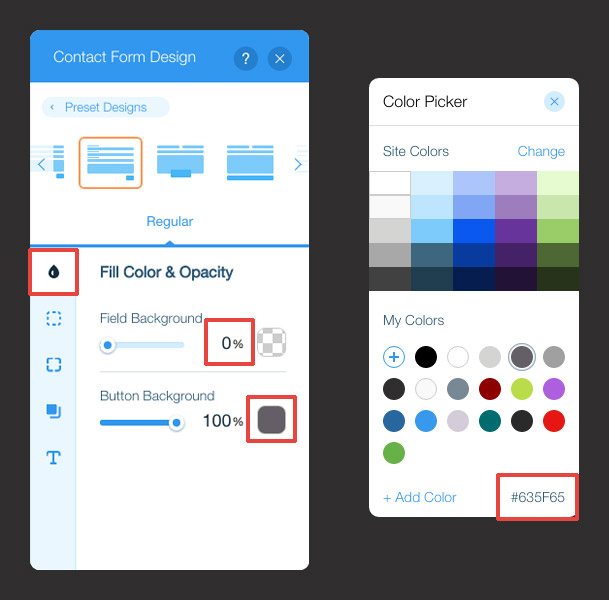

Step 7. All text colors are in #D4D4D2.
Step 8. Let’s also add social media icons below the contact form. Add > Social > Pick this icon set:
![]()
7. Change Footer Design
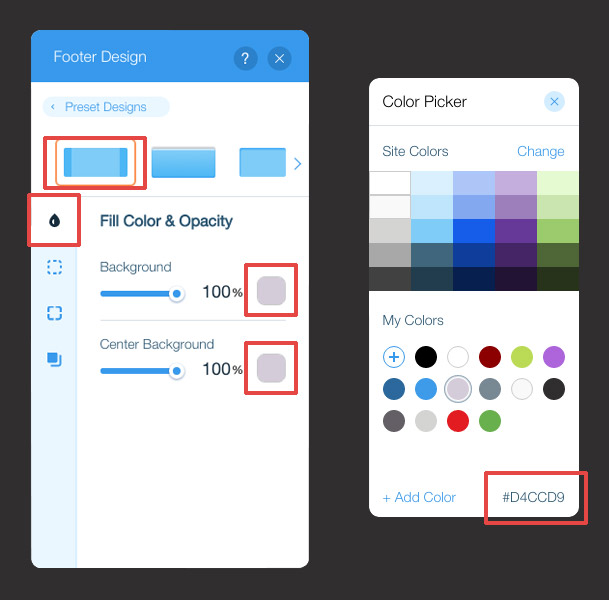
Step 1. Scale the Footer to Height: 45 and then select ‘Change Footer Design’. Click the ‘Customize Design’ and follow this setting:
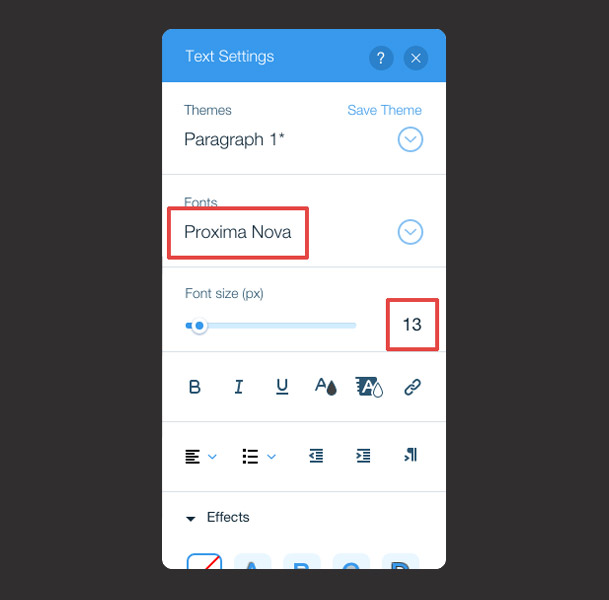
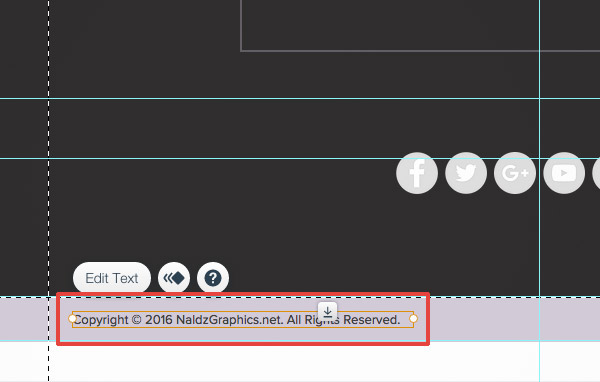
Step 2. Create a ‘Paragraph 1’ text box, scale the Width to 340px and paste this “Copyright © 2016 NaldzGraphics.net. All Rights Reserved.” Then, apply this setting:
Step 3. Then, drag the text box as close to the Footer as possible. A ‘Move to Footer’ button will appear, click it. Place the text box on the right side.
Step 4. Add an arrow icon by going to Add > Image > Free Wix Clip Art > Search: ‘scroll down arrow’ > Select the icon > Click ‘Add to Page’ button.
![]()
Step 5. Scale the arrow to Width: 25 Height: 20, rotate it to 180°, and place it in the middle of the Footer.
![]()
Step 6. Change the color of the arrow by clicking the ‘Image Filters’ button and selecting ‘Darken’.
![]()
8. Set Anchors
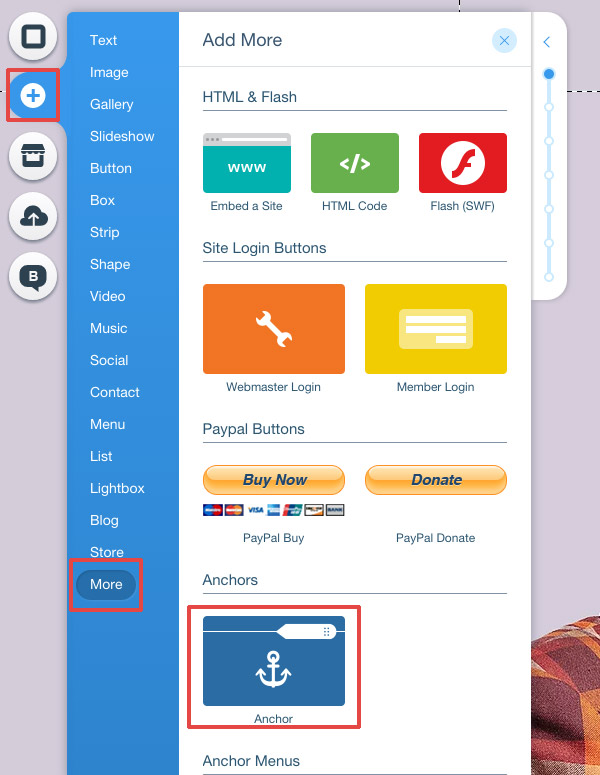
Step 1. Add your anchor by going to Add > More > Anchors.
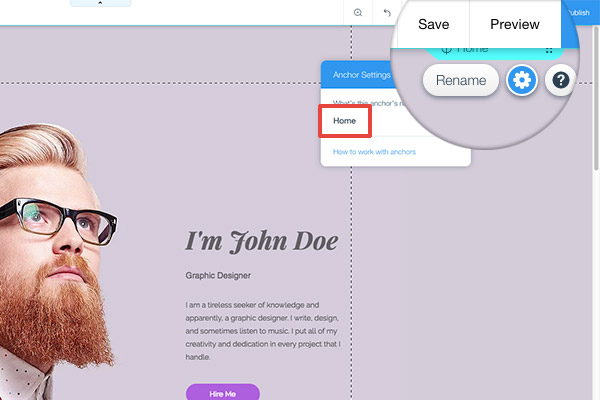
Step 2. Drag the first anchor to the top of the page and rename it “Home”. It would look like this:
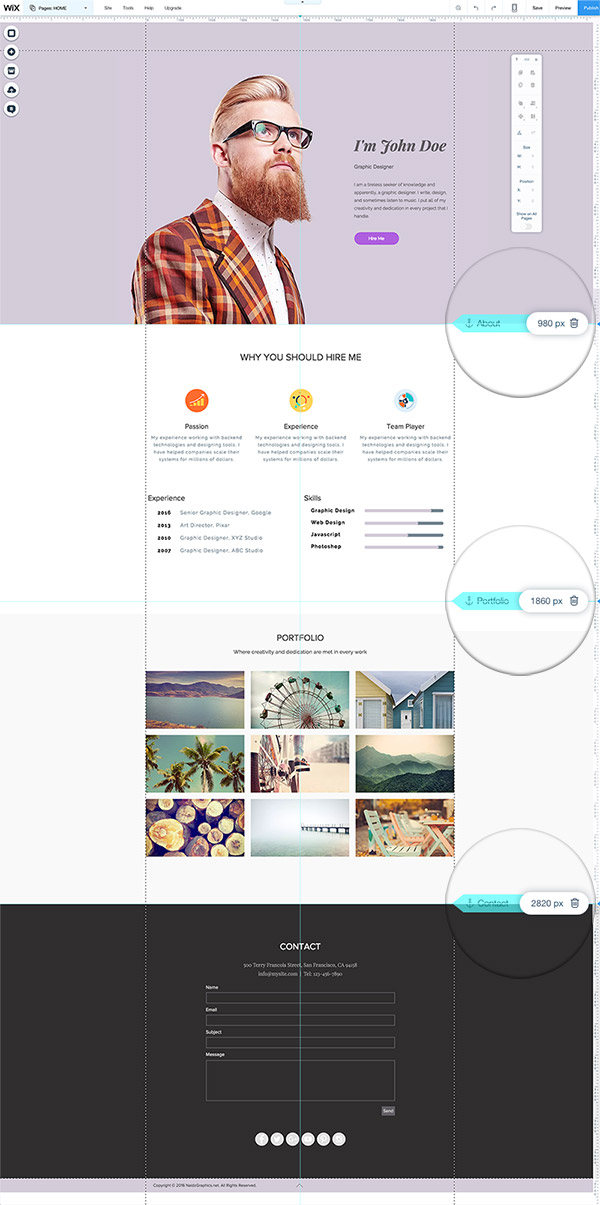
Step 3. Add 3 more anchors and place them in 980px (rename to “ABOUT”), 1860px (rename to “PORTFOLIO”), and 2820px (rename to “CONTACT”).
9. Next, we will add links that we’ll use later for our navigation bar.
Step 1. Click ‘Pages Menu’ (top right) > Add Page > Link.
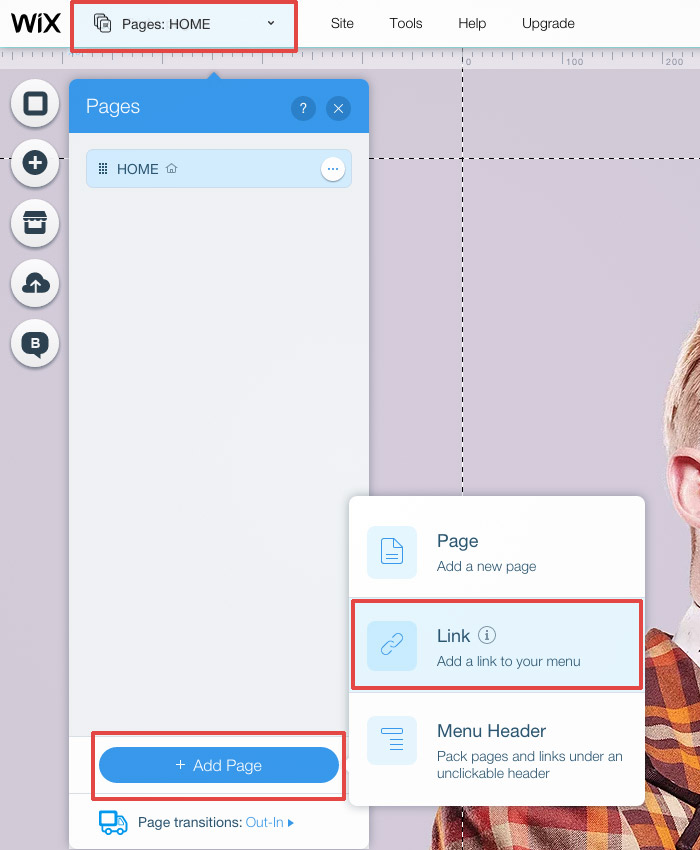
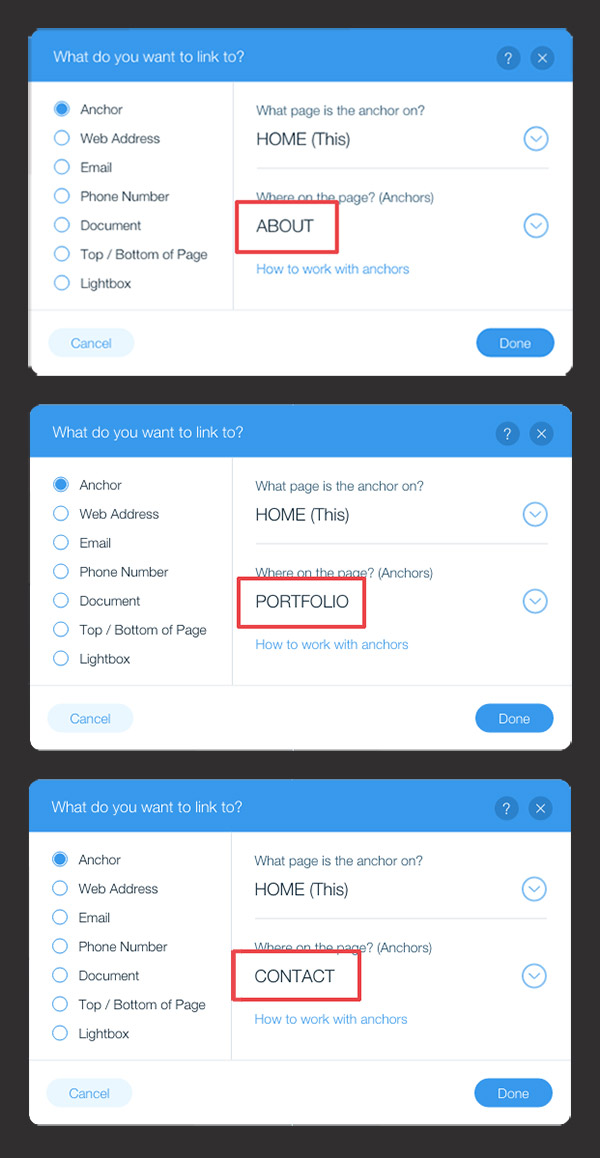
Step 2. On the pop-up window, change the anchor to ‘ABOUT’. Add 2 more of these for the ‘PORTFOLIO’ and ‘CONTACT’.
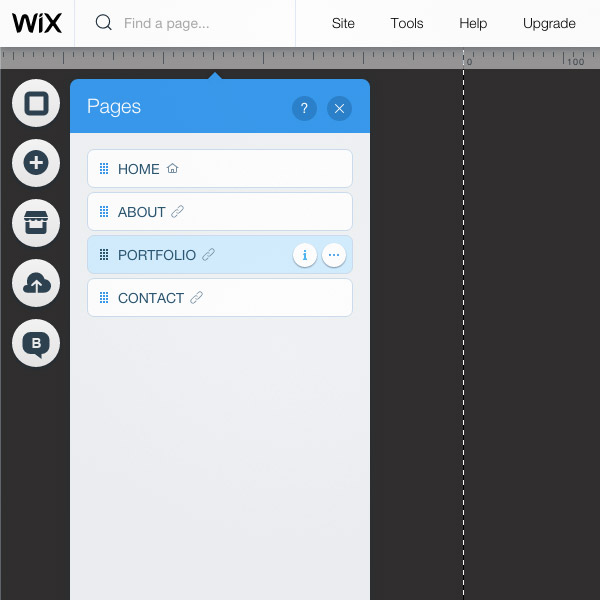
Step 3. After which, your Pages Menu will look like this:
10. Now we’re ready to create a Navigation Menu.
Step 1. First, go back to the top page. Then, add a new box, expand it to full-width and Height: 50, and apply these settings:
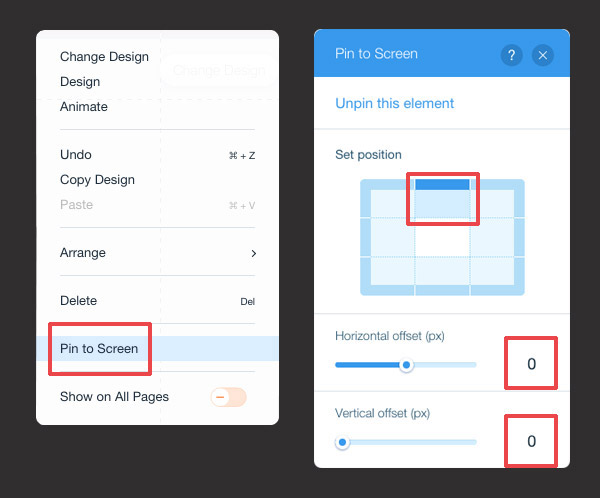
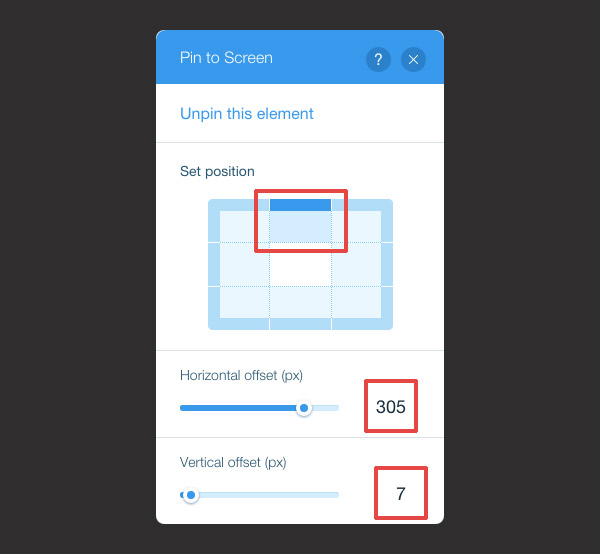
Step 2. Then, pin the bar so it will stay in the screen when the page is scrolled up or down. To do this, right click on the bar and then select ‘Pin to Screen’. Subsequently, pick the center top position and set the horizontal and vertical offset to 0.
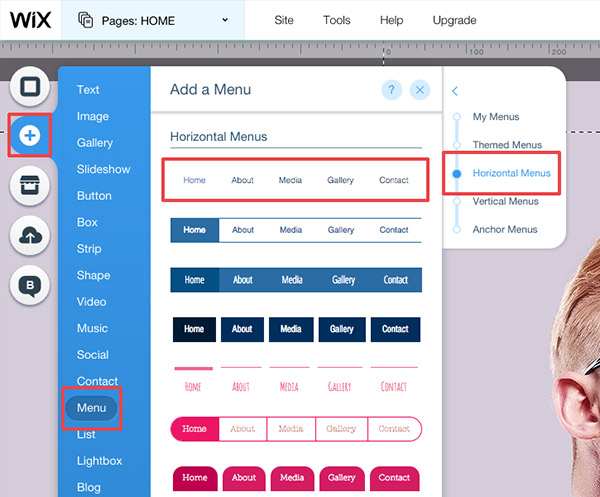
Step 3. Next, we add a menu design. Go to Add > Menu > Horizontal Menus > Pick this format design:
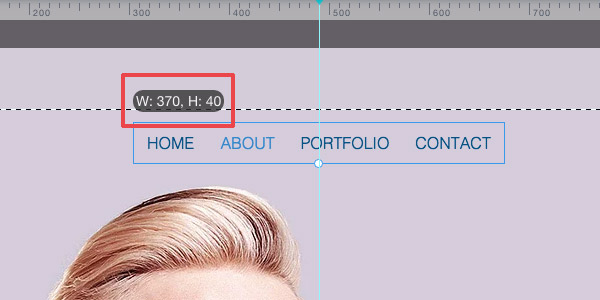
Step 4. Scale the menu to Width: 370 and Height: 40.
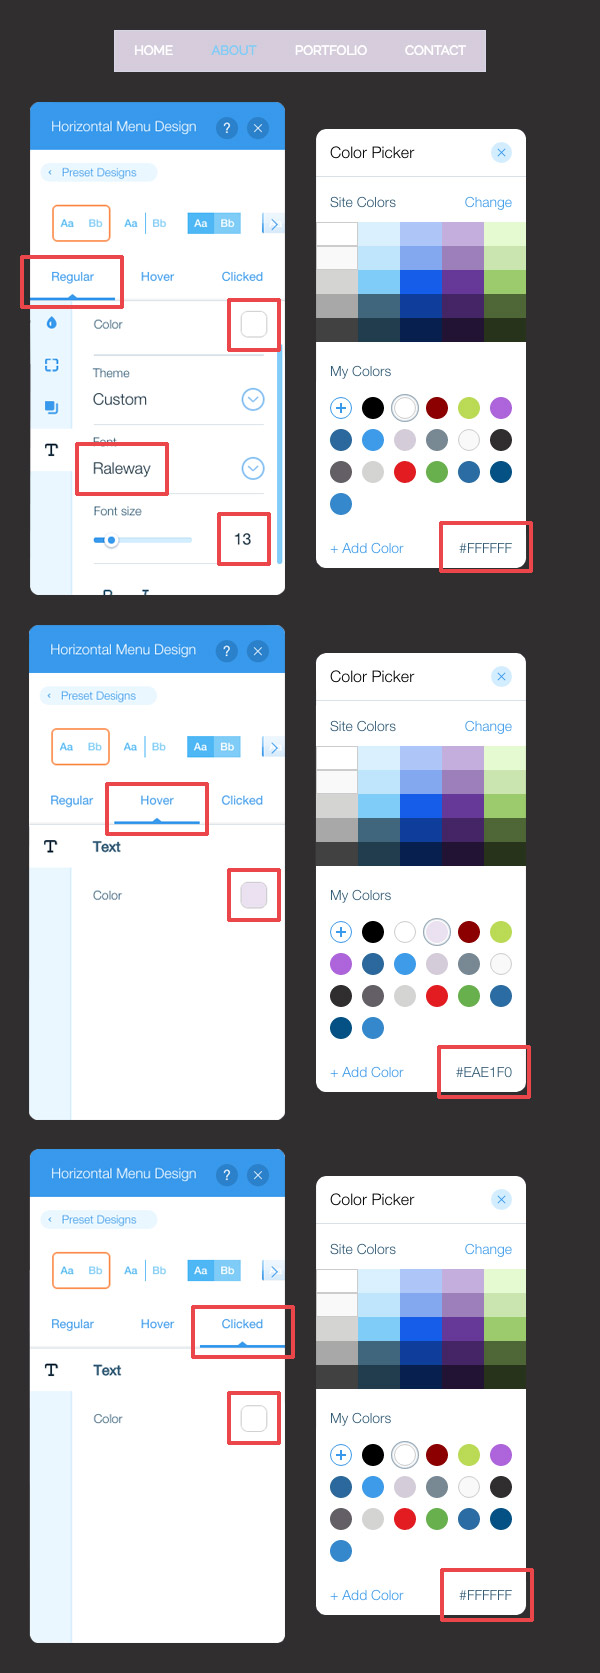
Step 5. Then, customize the design with these settings.
Step 6. Afterwards, pin the menu with this set up:
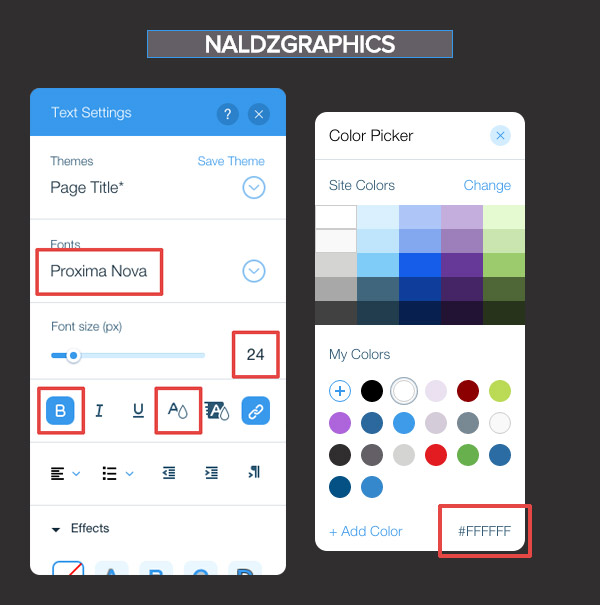
Step 7. Add a ‘Page Title’ text box, put in “NALDZGRAPHICS” and customize the font:
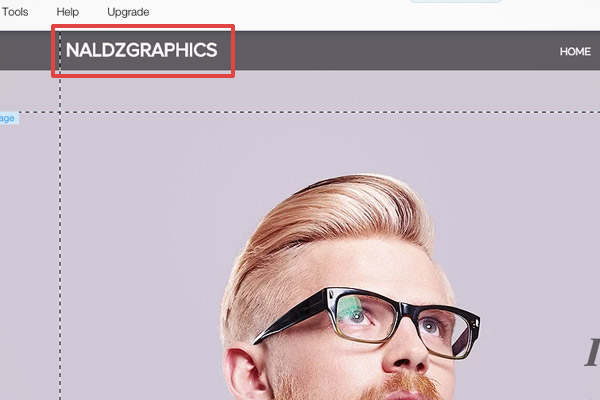
Step 8. Place the text box on the top right side of the Navigation Bar.
11. Finally, let’s put navigation links on a few elements.
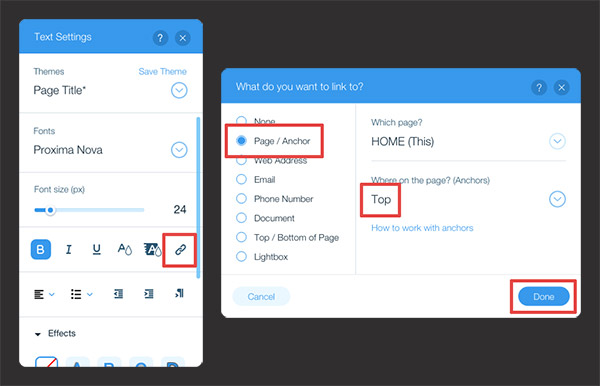
Step 1. Select the ‘NALDZGRAPHICS’ text box. Click the ‘Edit Text’ button then apply this setting:
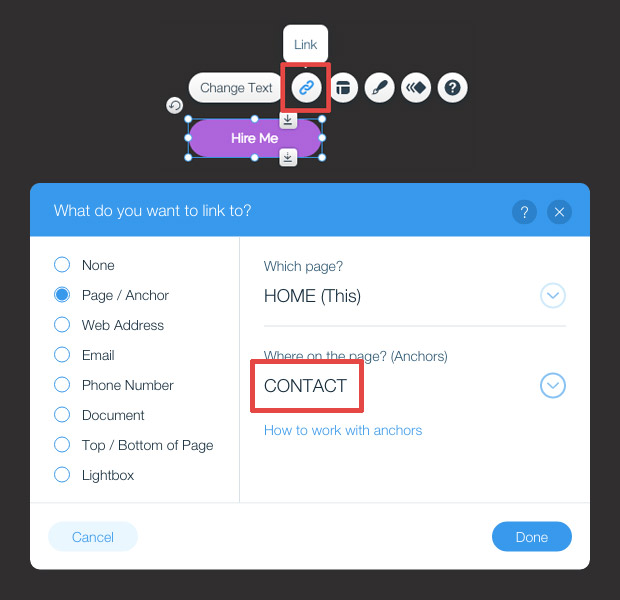
Step 2. Select the ‘HIRE ME’ button in the header strip. Click ‘Link’ button and apply this setting:
Step 3. Select the arrow icon in the footer. Again, Click the ‘Link’ button and apply this setting:
![]()
Conclusion
And that’s it, we’re done with our Minimal Portfolio Website! You can do some tweaks and changes in the design if you wish or preview the whole page to see how it looks. If you’re happy with the designs, you can click the ‘Publish’ button on the top right corner. We hope you got some ideas and techniques on how to use the tools and features on Wix in creating your website. You can use these new skills in building your very own website. Feel free to ask questions in the comment section should you need some help and clarifications.


