There are lots of free fonts around the web which you can download and use for free. The next thing to do after downloading the Free Fonts is how to add it to your computer. Here is a quick tutorial on How to Load a Font to your computer. Its very simple and easy. I find it very cool too if I have lots of different fonts to use and choose from. Let me share you where do I get the fonts I’m using.There are sites giving out free fonts like:

Dafont.com

1001freefonts.com
![]()
urbanfonts.com

fontstock.net

gmkfreefonts.com
You can check 50 Sites you can Download Free Fonts for more Fonts Freebies.
So after you download some free fonts on that sites heres how to upload it to your computer.
You must have Winrar we can continue.If you dont have Winrar you can download it HERE so you can Extract it the fonts that you have just download.
Heres how you will do it.
1. Right Click on the WinRAR ZIP then choose Extract Files.

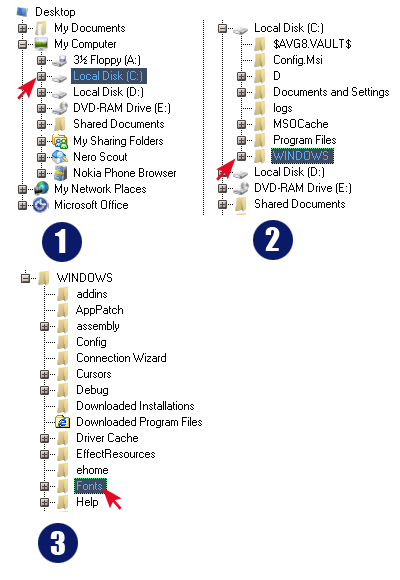
2.Once your on the Extraction Path and Options, click on the + sign of Local Disk(C:) then + sign of WINDOWS then choose the Fonts Folder and click OK

Now you can use the fonts on your MSWord,Photoshop,Corel,etc.
If your getting trouble on a font you load on the Fonts Folder or it doesn’t work,just go to C:\WINDOWS\Fonts and look for the name of the that font and Double click it..
If this post is helpful to you,Make sure to Subscribe my RSS feed


Cool!!! Awesome lesson man!! MORE!!
nice!!!!!!thanks it really helps!!!!!
marvelos man, coolest tip ever.
we need more tips , ur awesome man.
keep it up
5 stars very nice keep it up man very helpy
I rarely have to use windows, but I go into the Control Panel and open the Fonts button there. I put the fonts there and it works.
Most likely the same folder but the route different.
Thanks for this tutorial anyway. It’s clear and easy to follow.