Editing our own pictures is a fun things to do using Photoshop. Here is another very quick tutorial for beginners on editing your image. In this tutorial you will learn how to change eye color on a picture. It will take only 1-3 minutes to do it. Throughout this tutorial, you’ll be using Marquee Tool and Hue/Saturation. Here’s how do it.
Check out this tutorial and enhance your images. So lets start.
1. Open your picture. File>Open.

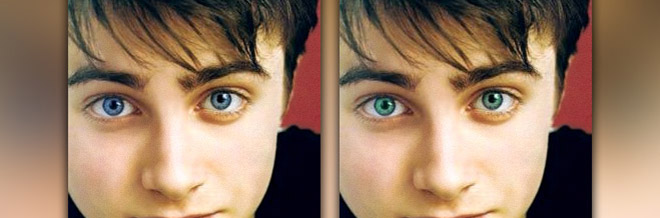
In my tutorial im gonna use Mr.Potter as our model picture.

2.Choose Elliptical Marquee Tool (M).

3.Select the Eye portion of the picture. Hold Shift while your selecting.

4.Now go to Image>Adjustments>Hue/Saturation or CTRL+U for shortcut command.Adjust Hue to -50.

5. After you adjust the Hue it will look something like this.

Well done!!!!now you learn how to change eye color…
If you like this post, please Subscribe to my RSS feed.


hahahah, cool way and a nice trick
now i can freak out my friends saying i have diff eye colors in all my photos :p
thanks again for a quality post
u rock
Fark.. Im going to do this right now! Its totaly cool.
Oh omg my favourite actor and my fav tutorial :d wew man than ku excelent work u are goinggg to rock.
I already gone through a blog about photoshop eye change tutorial but didnt got it clearly as i m new to photoshop … Thanks for telling it so briefly
Freakyyy, nice stuff dude, keep up the good work
wat version of photoshop u use?