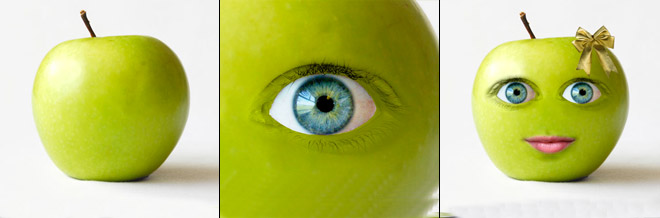
When it comes to photo manipulation, Photoshop is one of the best application that you can use. Talking about Photo Manipulation, Here is a quick tutorial where you can achieve to Create a Cute Green Apple by manipulating some photos. Throughout this tutorial, you will learn how to adjust an image to blend in a subject, and applying some basic Layers effect. Check out the preview on our tutorial for today.
Final Image Preview

But before we start, try to download first this stock images that we will use for this tutorial.
Apple Download Here
Eye Download Here
Lips Download Here
Ribbon Download Here
Step 1
Lets start by opening the Apple image in photoshop.

Step 2
Open the Eye image then select part of the Eye using Lasso Tool (L). After you select it, move it to our Apple image using Move Tool (V). Let’s name the Eye Image to Eye1. Place the Eye image on the left position in the apple.

Step 3
Lets adjust the Eye1 layer more brighter. Go to Image>Adjustments>Curves. In Curves, adjust the Output to 139 and Input to 59. After that go to Image>Adjustments>Levels. In Levels, Adjust the Input levels to 57,1.22 and 248. Erase the sides using Erase Tool (E) Our Eye1 layer now should be like on this below.

Step 4
On Layers Palette, Set the Eye1 Layer to Luminosity. Choose Erase Tool. Right Click then Set the Eraser Brush to 300, Master Diameter to 50 and Brush Opacity to 20%. Now Erase the unnecessary image on the side of the eye so that the linings on the Eye image will be removed and blend the eye to the Apple. Here’s what it look like after we set it up.

Step 5
Now duplicate the Eye1 layer by CTRL+J. Then Set the duplicate image back to Normal and name it to Eye2. Select the Eye2 layer on the layers palette then select the eye ball part on the Eye2 using Magnetic Lasso Tool(L). Now that its selected, go to Select>Inverse and press DELETE on your keyboard so that the outside of the eye ball will be deleted. Our image should now look like this.

Step 6
Lets Group the Eye1 and Eye2 by simply click on the Add Group just beside the Add New Layer on the Layers Palette. Lets name our Group folder into “Left Eye”. Now Shift+Click on Eye1 and Eye2 layer and drag it to our Left Eye Group Folder. Right click on the Left Eye Group Folder then choose Duplicate Group then name to Duplicate Group to “Right Eye”. Now Move the Right Group folder to the Right. After you Move the Right Group to the Right you will notice that the right side is so bright and dont blend in the Apple. Inside the Right Group Folder, Select Eye1 Layer. Choose Burn Tool (O) then Adjust the Range to Highlights and Exposure to 50% then start using Burn Tool on the Right Side of the Eye1 until it blends to the apple. Select the Eye2 then go to Edit>Transform>Flip Horizontal. Now our Eye2 which was the eye ball image will be reverse in horizontal.

Now we’re finish working on the Eye. Our Image will now Look like this.

Step 7
Now open the Lips image. Select the part of the Lips using Lasso Tool (L) then move it to our working document using Move Tool (V). Put the Lips Image below our Apple Image. Name the Lips image into “Lips1”

Step 8
Since the Apple Shadow is on the right side and the Lips shadow is on the left side, we will Rotate our Lips1 layer to horizontal. Go to Edit>Transform>Flip Horizontal. Lets adjust it same as we did on the eye. Set the Lips1 Layer to Luminosity.

Step 9
Choose Erase Tool. Right Click on our working document then Set the Eraser Brush to 300 and Master Diameter to
50. On the Upper Toolbar set the Brush Opacity to 20%. Now Erase the unnecessary image on the
side of the Lips so that the linings on the Eye image will be removed
and blend the eye to the Apple. Choose Burn Tool (O) and set the Range to Highlights and Exposure to 10%. then apply Burn Tool on the Right part of the Lips until it blends perfectly to the Apple’s color. You should shift to Erase Tool then Burn Tool again since on this part we are blending the color until it match. Once your happy on the blending it will look like this.

Step 10
Now Duplicate the Lips Layer. Shift+J to Duplicate. Name the Duplicate lips layer to Lips2. Set The Lips2 layer from Luminosity to Normal. Select Erase Tool (E) then Erase the outside of the Lips.Once your happy on the result it must look something similar to this one.

Step 11
And Now we are finish on the Lips. Here’s How it looks after we made her eye’s and her lips.

Step 12
Now Open the Ribbon Image. Select the Ribbon using Magnetic Lasso Tool. Move the Ribbon to our working document and simply name the layer to Ribbon. Again lets Scale it down so it will fit on the Apple=).

Step 13
Now for the last part, lets put a shadow on her Ribbon to make it more realistic. Duplicate the Ribbon Layer then select the original Ribbon layer and rename it to Shadow. Go to Image>Adjustments>Hue/Saturation then adjust the Lightness too -100 making it to pure black. Now go to Filter>Blur> Gaussian Blur and adjust the Radius to 60 Pixels. Move the the Shadow layer a little to the right and set the opacity to 80%. Put a text if you want=) On this tutorial i put some line “Do you still want a bite ? . . .”
Hope you like our tutorial for Today.Make sure to SUBSCRIBE NOW!!! to get updates on the Latest Tutorials.


Haha, cute Apple & nice tutorial 🙂
nice tutorial thank you..
Thanks Guys:)Im glad you like it:)
Cute, very cute indeed!
very nice tut:) thanks for share.
oh so cute thank u
Sry but my english is no good.
Eye is not true.
“Select the Eye2 then go to Edit>Transform>Flip Horizontal.”
i thing we can select all groupe, not just eye 2q because look finaly picture the eye ball are different
Love the green apple, nice tutorial 🙂
THanks guy=)
@Maria
Hi sweety,im not quite understand what you mean but if im not mistaken you pointing out the Step 6.
To select only the Eye2 on the Right Group you should open the Group First.
See this : http://tinyurl.com/aqttkz
Then Click on the Eye2 Layer inside the Right Eye Group. then Reverse it so it will be the same=)Hope this helps.
Funny and yet stunning. 🙂
Nice work.
ronald,i think u must reverse all group because look
in the eyes have little red, right?
in the left eye this red is from right and i think in the right eye this red must be in left…i cant explain better 🙂
@maria
All you need to do is Reverse the The Duplicate Group then inside the Reverse Right Group Reverse the Eye2 to Flip Horizontal=)hope its clear now=)goodluck
Excellent and very easy to follow tutorial. I liked the concept also! Well done
Ronald, but why you reverse and Eye2 again?
Now pupil in right eye and in left eye are different.
If u want i can sedn picture in skype.
My skype is mimeto_87_b.
@ Maria
it must be reverse.see the red part on the Left Eye?its on the left and if that will be duplicated and reverse the red part of the eye will be reverse to right that’s why we also need to reverse it so it will be the same when its already place on the right eye=)
Awesome!
this is not bad
but only mistake eyes maria is wright answer and
nice concept in this tut ok
Thanks for posting this tutorial! Easy enough to follow and very creative. Gave me some good ideas to try and apply this to other objects as well. Thanks again!
wow, that’s pretty creepy
Great tutorial on creating a green apple face, many of the techniques used here to create the apple face can be used to create other faces. Thanks for the great tutorial.
Ahh, the problem is that when you copy the left eye to the right side, its SUPER bright and doesn’t fit in so well – what did you do to fix this?
Cheers,
matt.
Dude, the apple looks like Zoe Deschanel. Thanks for the tutorial.
nice green apple! great tutorial at last.
Great tutorial
Thanks
Nice tutorial :). Cute apple 😉
thanks
Very Nice tutorial!
i’ve seen something like that on another photoshop tutorial site but this one is definitely better!
Great job!
very nice tutorial!!!! nice details and easy to understand.
grrr8 job!!
thanks!!
April 30th, 2009
very good!!!! nice details and easy to understand.
good job!!
thanks!!
That is really very nice. I tried that too! You can see those photo manupulation I did, by clicking my name.
I hope to those who want to use other people faces, they need permission first. Or else you can get sued!
thanks 🙂
Thanks a ton. I just completed this in under an hour for a class assignment in multimedia & design. It was really useful and will help me in the future with other photoshop projects. Thanks again!
well when i whent to push luminosity is was redish pinkish so i whent to hue saturation changed it and then when i had to to put the inside of the eye to regular it stayed red so that sucked and the tut moved around way to much for me to understand 🙁
Nice tutorial
thank you
AWESOME! came out great! [and imma newbie]
Its Awesome! Thank you 🙂 Its easy to follow and it turned out great and it was the first time i ever done something like this 😀
A good tutorial for rookies…
Wow, astig talaga ang mga pinoy!
Nice tutorial.
I was just wondering why the red veins of the eye aren’t in the same spot. I realize that the pupils need to be identical to reflect the light, but the outer edges should be symmetrical. The more I look at the image,the odder and more annoying the two eyes become.
If there any way to avoid..that.
I couldn’t figure out how to do that…. how to open the eye image….. i created a photoshop.com account, and I can’t make that apple!!!!!
It’s not a site, it’s a program which he made with. Adobe Photoshop.
Awesome man! I like the way you explain it.. Thanks for the great effort!
Nice tut indeed, looks a lot like the apple in the annoying orange series on youtube.
Eww. Creepy Apply. I won’t even think to bite. Thanks for the tut.
nice tut.. but I dont want bite 🙂
very nice tutorials…