Siri is one of the greatest technology inventions in our age. The technology that once could only be seen in sci-fi movie now becomes a reality. We can do things like send a massage, scheduling, phone call and much more using voice command; even we can communicate like the way we talk to a person with Siri. Isn’t that really cool?
So, this cool thing is really inspired us to make this tut. In this tut we are going to make the Siri icon. Just like our previous tutorials, we will make this icon as re-sizable as possible so you can adjust it to any size you want.
You need at least Photoshop CS3 to follow this tutorial, if you’re already have one then let’s get started.
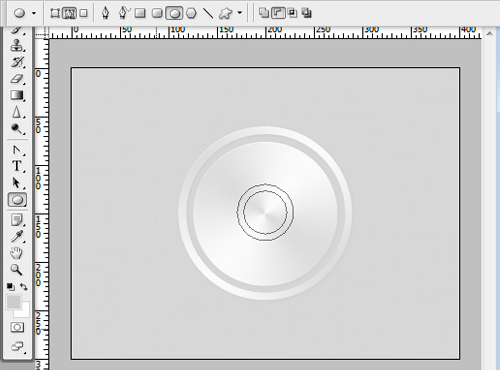
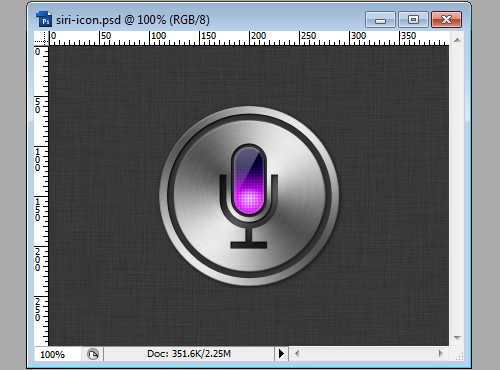
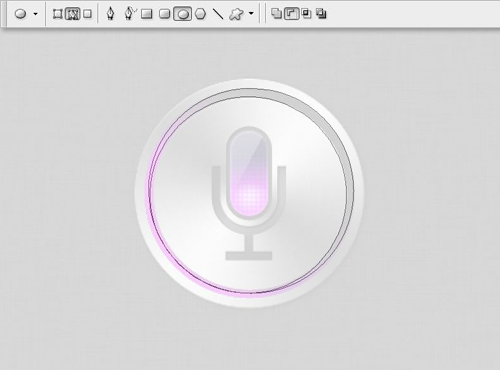
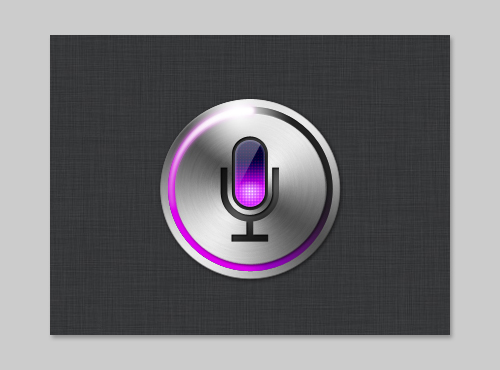
Final Result
![]()
Step 1
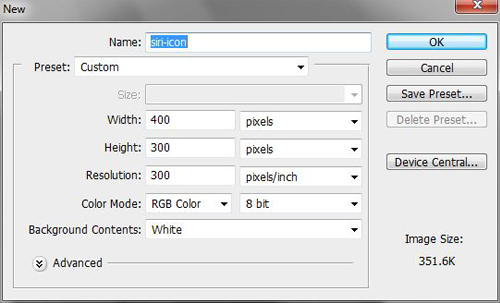
As we have done previously in previous tutorials, we need to create our project file first and in this tut we create a new file (Ctrl+ N) with dimension of 400x300px (300dpi).
Step 2
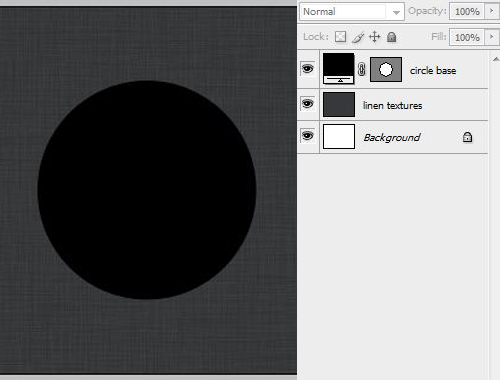
We need a linen texture for the background which we can download it here for free. After downloading it, place the texture in the project file.
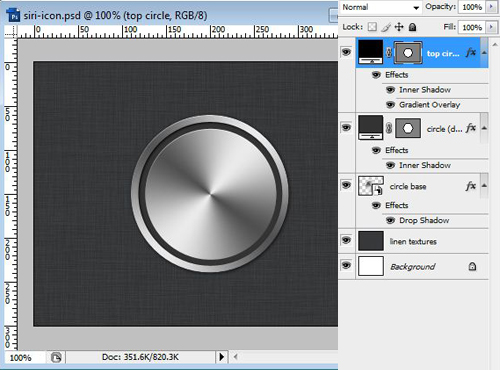
Next create a circle shape using Ellipse Tool (U) with diameter of 180px (more or less), name this shape “circle base”.
Step 3
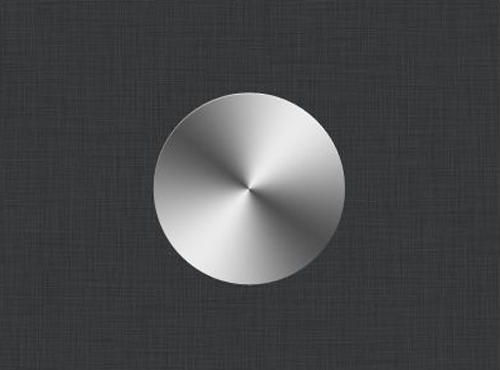
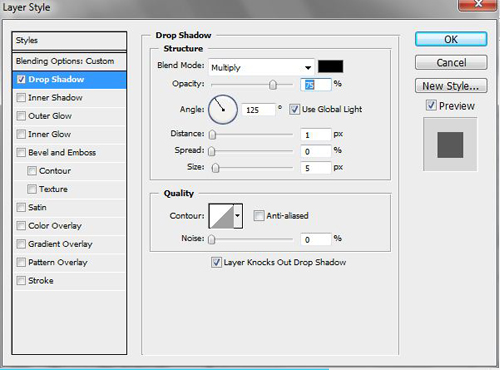
Now we add the circle some layer styles. These styles will make the circle looks like a metal.
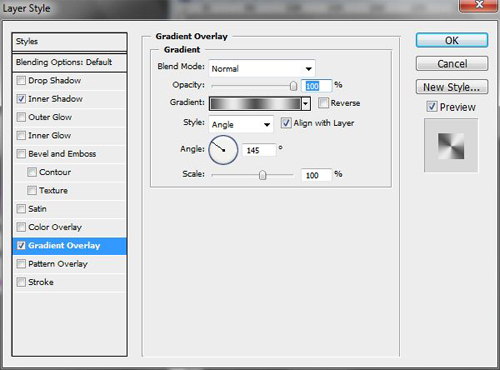
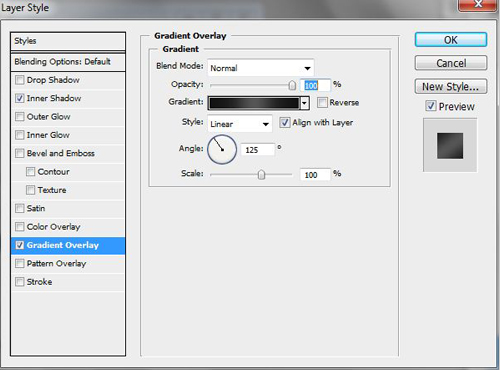
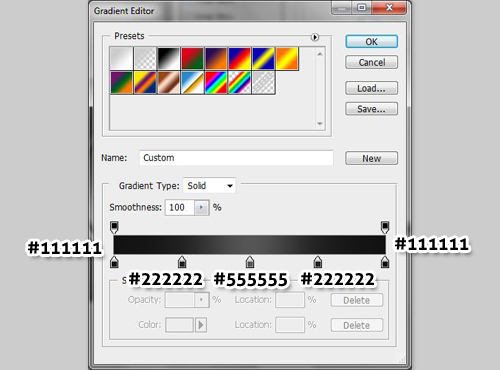
First, add a Gradient Overlay using Angle gradient style.

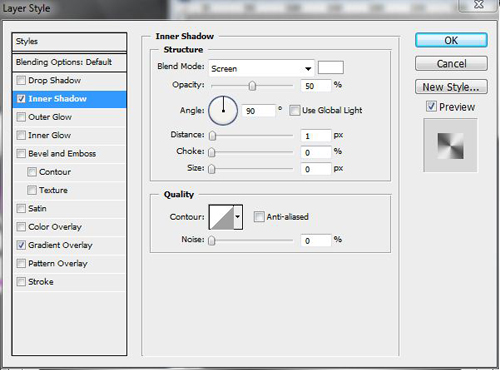
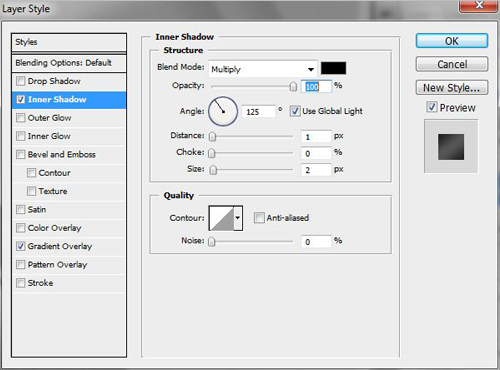
After that, add Inner Shadow style.
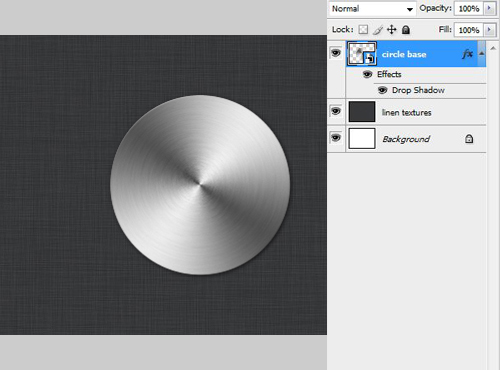
This is how the “circle base” is going to look like, after adding the styles above.
Step 4
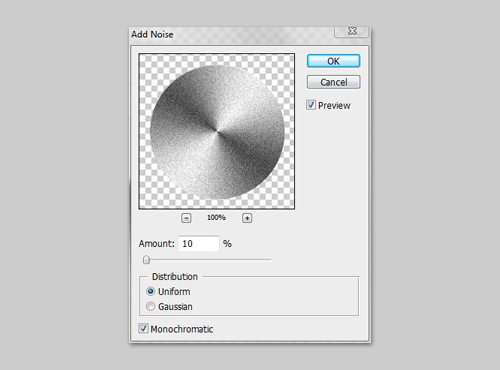
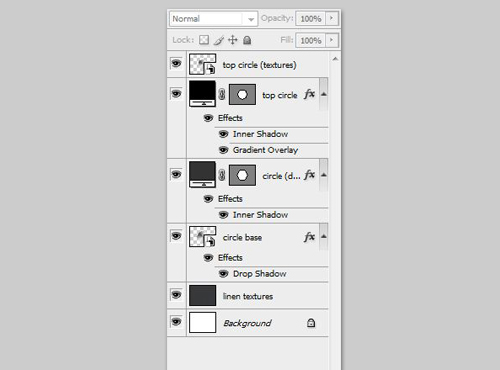
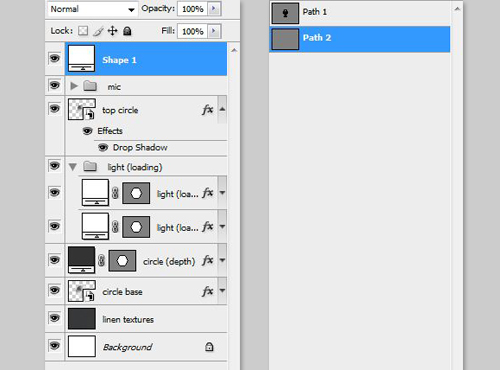
To make the circle base a bit more metal realistic, we will add some other details by copying the circle layer and convert it into Smart Object. Then, add these following layer Filters:
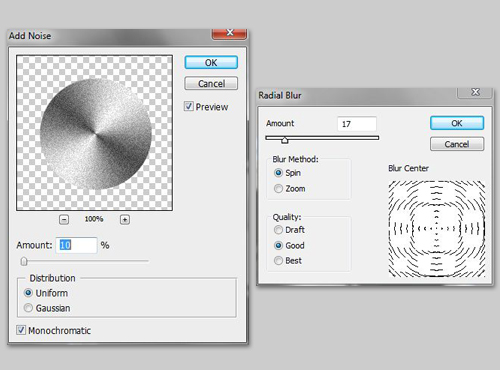
Step 4.1: Noise Filter
Go to Filter > Noise > Add Noise menu. Set the noise value to about 10%.
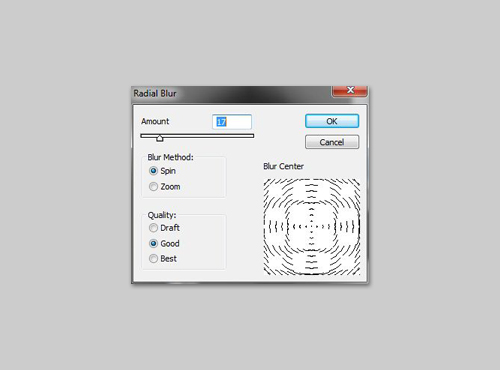
Step 4.2: Radial Blur
Go to Filter > Blur > Radial Blur menu. Set the blur value to about 17 with Good quality.
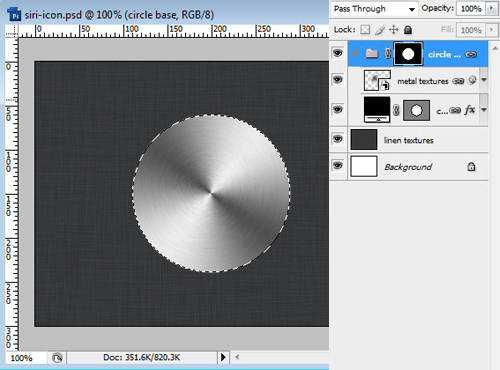
Step 4.3
Now select both circle and group (Ctrl/Cmd+G) them together, then create a circular selection by holding Ctrl/Cmd key and click one of the circle layer at the same time. After that, apply layer mask in the group.
Step 4.4
Convert this group into Smart Object and add Drop Shadow.
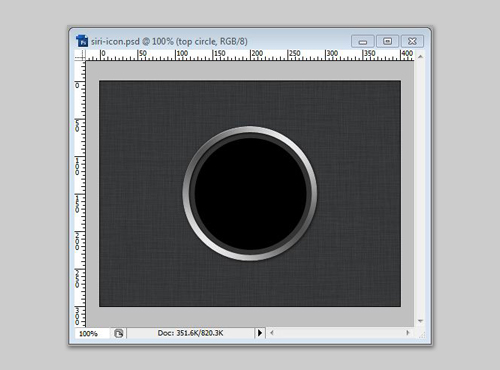
And this is the end result would look like.
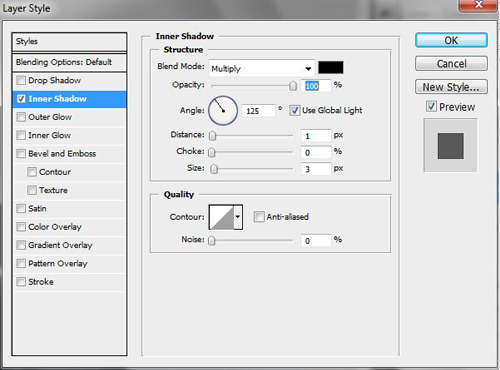
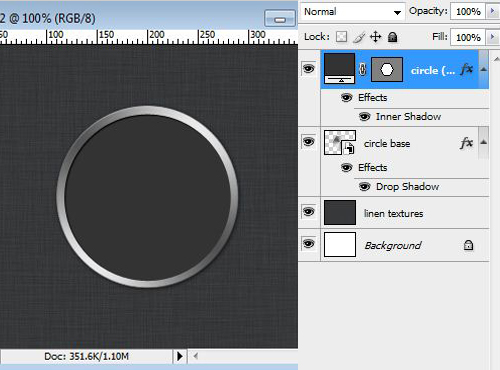
Step 5
In this step, create another circle shape that is slightly smaller than the first circle, we name this shape “circle (depth)” or name as you want. Then, add Inner Shadow on it.
Step 6
In this step we will create another circle shape (again) using Ellipse Tool (U), this circle is slightly smaller than the second one we have created before in Step 5, we name this layer circle (top) / top circle.
Step 6.1
Add some styles on this circle, like the first circle. So, in this step we repeat the same step we’ve done in Step 3-4.
And since the Gradient style that we are going to add to this circle is exactly the same as the first one, so we only do copy its style by right-click the “circle base” and select Copy Layer Styles then right-click the top circle layer and select Paste Layer Styles.
Step 6.2
Duplicate this “top circle” layer and convert it to Smart Object, by right-click on the layer and select Convert to Smart Object. We rename this layer “top circle (textures)”
Step 6.3
Then, go to menu Filter > Noise > Add Noise, give about 10% for the noise value. After that, go to menu Filter > Blur > Radial Blur, and slide to 17 for the Blur amount.
Step 6.4
(see no. 2) Select the two top circles, group (Cmd/Ctrl+G) them, hold Cmd/Ctrl key and click to one of the circle then apply layer mask on the group.
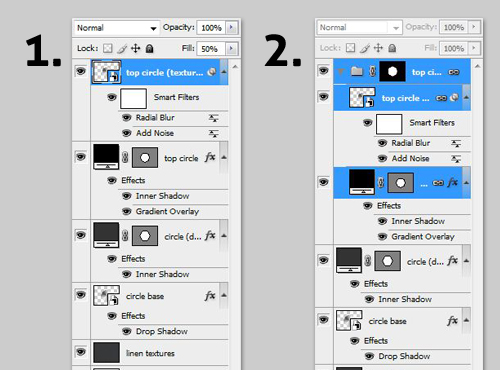
Step 6.5
Convert this group to Smart Object and add Drop Shadow on it.
This is it, let’s take a look the result for a while.

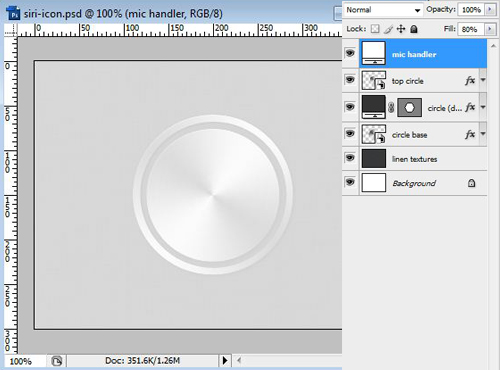
Step 7
From this step, we are going to make the Microphone.
Firstly, we create the mic handler, and since we want this icon to be resizable we will make this mic handler in custom Shape.
Add a rectangular shape in our project file and remove the vector mask from it. Set the layer Fill value 90%. This will help us to draw our microphone later. (See the screenshot below)
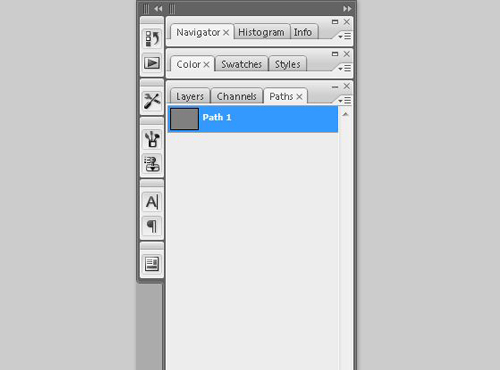
Step 7.1
Now go to Paths tab (this tab by default is in the right side of Channels tab), and create a new path layer, the same by creating a new layer in the Layers tab
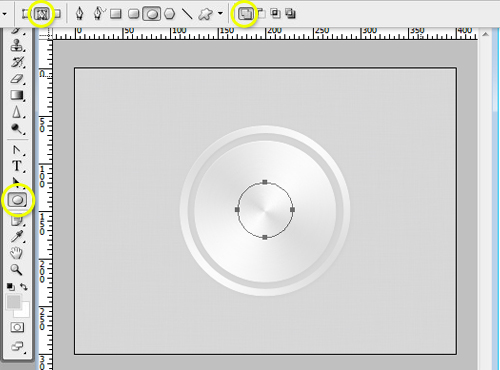
Step 8
Select Ellipse Tool (U) in the Toolbox, then change its mode to Paths & Add to path area (+) from the Tool Options Box (see the screenshot below).
Create a circle path with a diameter of about 60px.
Step 8.1
Now change the Ellipse Tool mode to Subtract to path area (-). Create another circle the is slightly smaller than the previous one (Est. 45px diameter). Align these circles path to be centered both vertically and horizontally.
Step 8.2
In this step, select Rectangle Tool (U) in the toolbox. Keep the mode to Path and Add to path area (+) in the Tool Options Box.
Then create four rectangular paths as seen on the following screenshot.
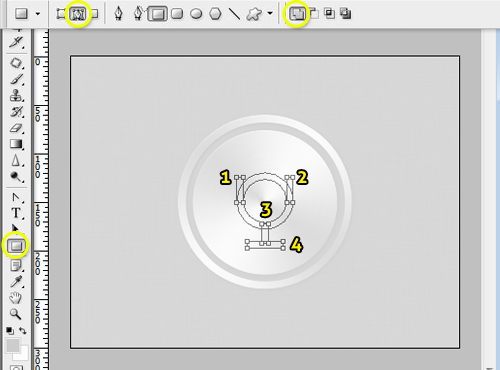
Step 8.3
Still with the Rectangle Tool (U), now change its mode to Subtract to path area (-).
Then create another rectangle shape, place it between the two (No. 1 & 2) rectangular shapes we’ve created before. (See the screenshot)
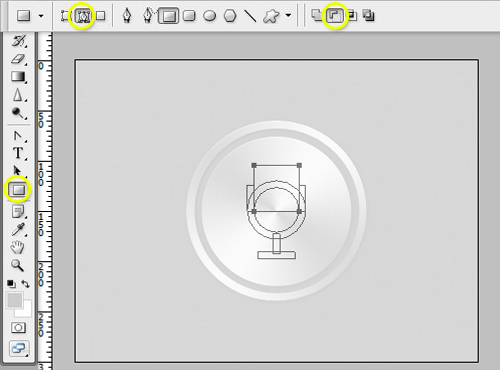
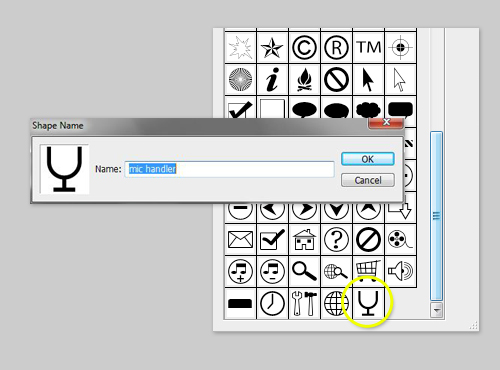
Step 8.4
We’ve done drawing our path, and then we make this path into a custom Shape, so that we can select it through Shape library.
Go to Edit > Define Custom Shape, name the shape to mic handler and click OK. After that, we go to Tool Options Box and
make sure you have selected Custom Shape Tool (U), in the Toolbox. Our custom shape should now be in the Shape Library.
Select our custom shape, and create one.
Step 9
It’s time to add some Layer styles on it. Start by adding Inner Shadow.
And Gradient Overlay
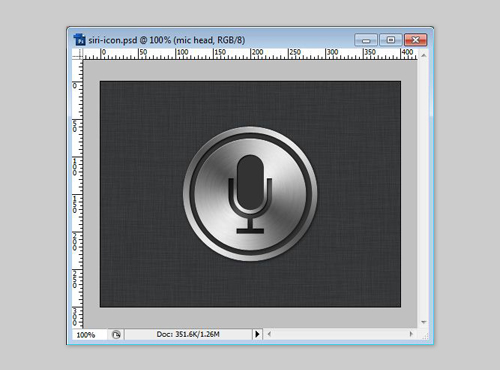
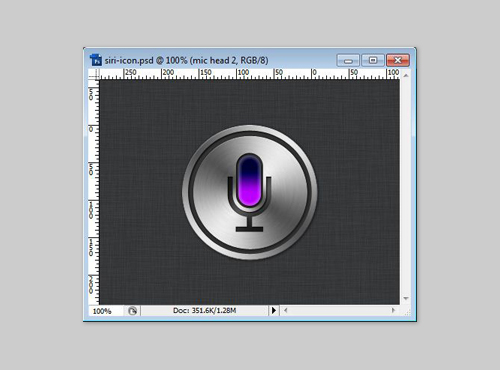
OK, now let’s take a look the result.
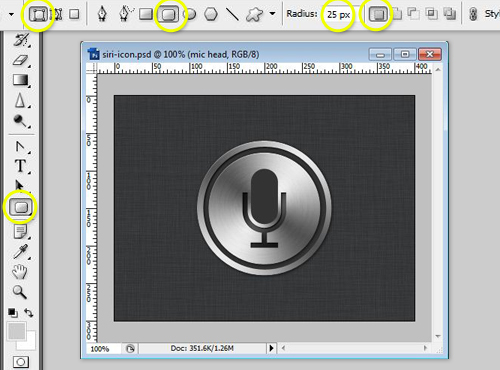
Step 10
After creating the handler now it’s time to make the head. Select Rounded Rectangle Tool (U) in the Toolbox, change its mode to Shape layers in the Tool Options Box, and set its radius to 25%.
Create one, and place it above the mic handler.
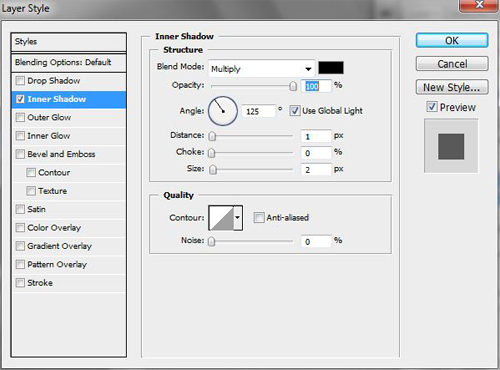
Then, we add Inner Shadow on it.
Step 10.1
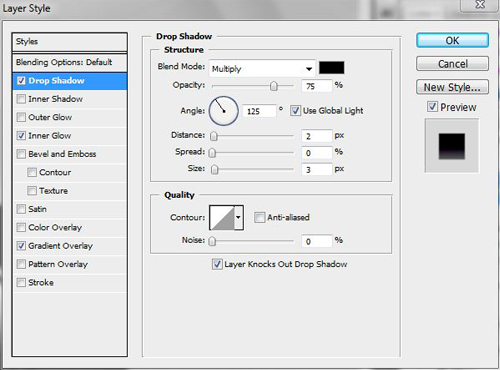
To add the details in the mic head, create another rounded with 25px rounded radius that is slightly smaller from the previous one.
Then let’s add some layer styles for the details.
Add Drop Shadow
And Inner Glow, change the Glow color to white (#FFFFFF) with 35% opacity.
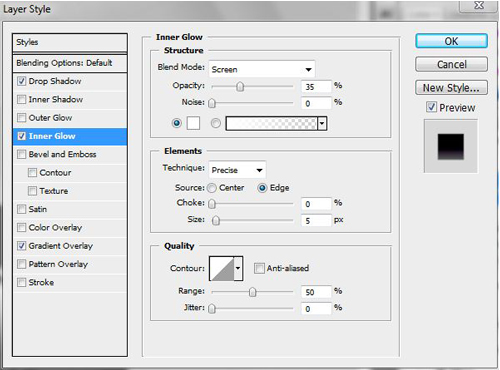
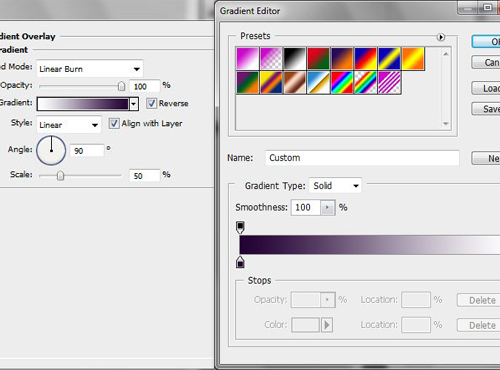
Then we add Gradient Overlay, with color gradation from #220033 to #FFFFFF.
Step 11
Next we will create a (sort of) dotted texture that we typically saw in a microphone.
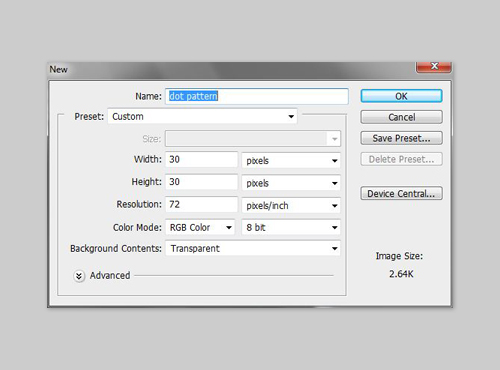
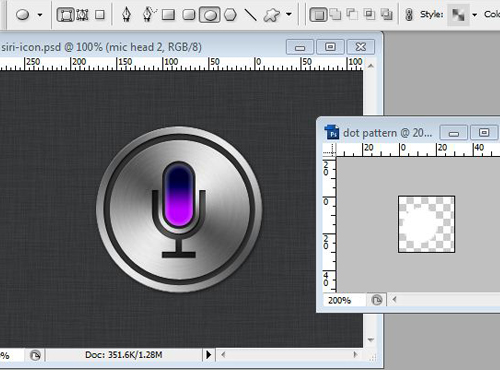
First create another new file (Cmd/Ctrl+N), with size of 30 by 30 px.
Step 11.1
Create a circle Shape layer in the new document, Fill with white color. Then go to Edit menu and select Define Pattern.
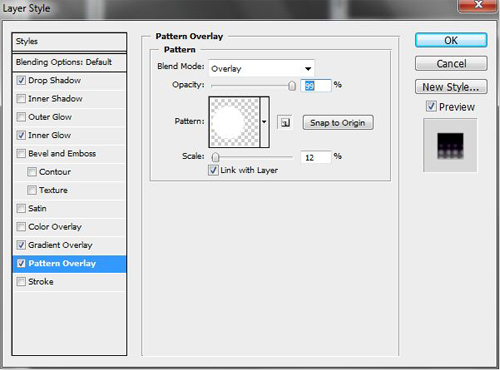
Step 12
Then add Pattern Overlay on it, now our new pattern should be included in pattern library. Scale the patter 12% and change the blend mode to Overlay.
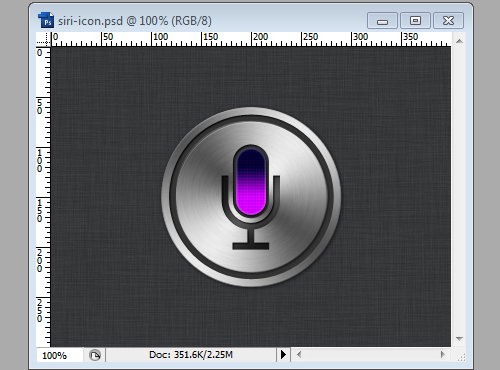
Let’s take a look the result for a while.
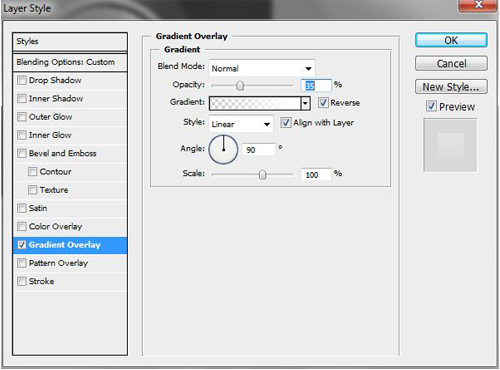
Step 13
Next, we will make a glowing effect on the mic head. Create a circle shape, place in the center (see the screenshot), and set the layer Fill value to 0%.
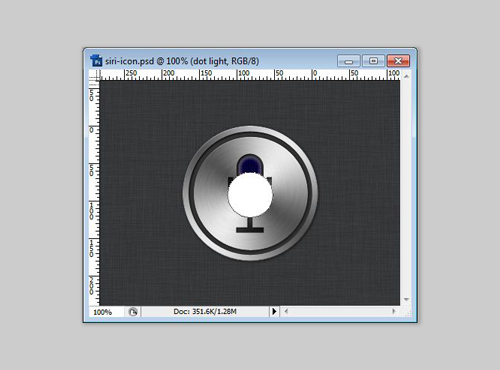
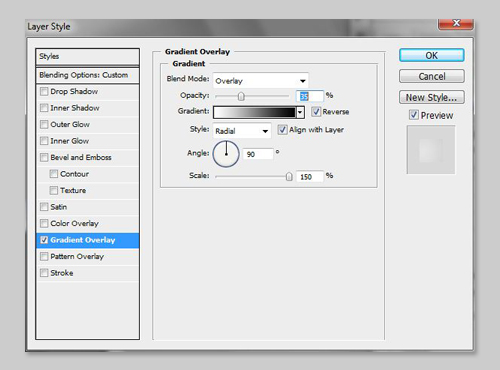
Add Radial Gradient Overlay with color gradation from #FFFFFF to transparent, then right-click this layer and select Create Clipping Mask.
Step 14
In this step we create the shine effect on the mic head. Well, most of Apple-made icon is always shining.
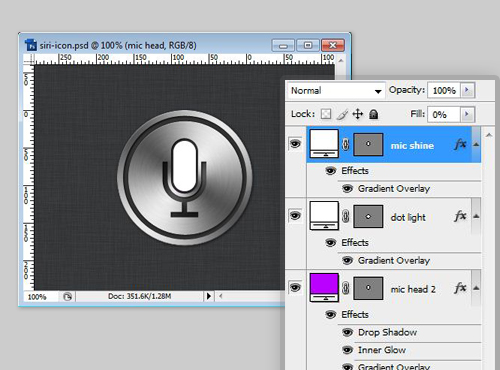
So create a white rounded rectangle (again), set 0% in its layer Fill.
Add Gradient Overlay from white (#FFFFFF) to transparent.
Step 14.1
Next, create a (sort of) parallelogram selection, on the layer and apply a layer masking on it.
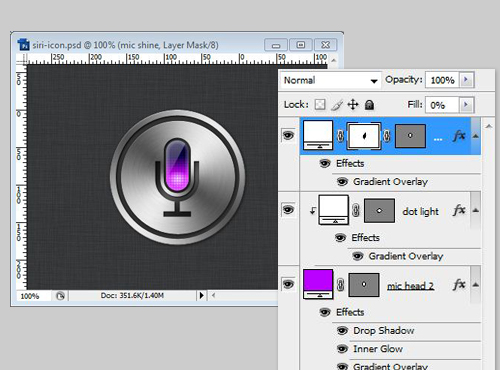
The final appearance of the shape should now look like this:
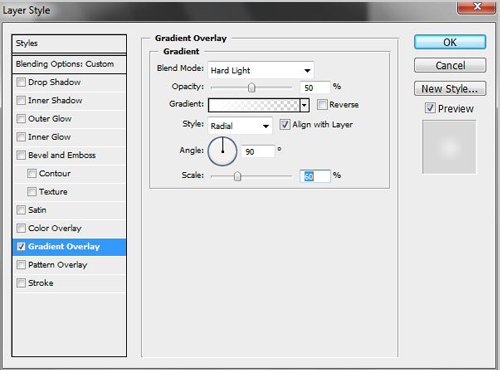
Step 15
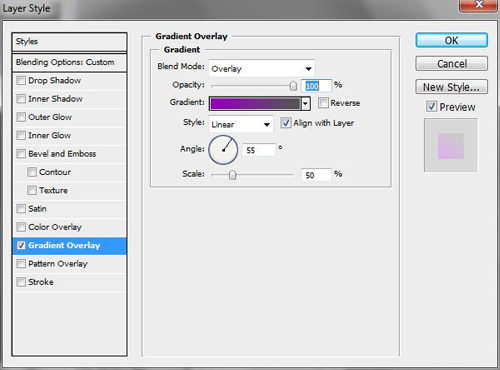
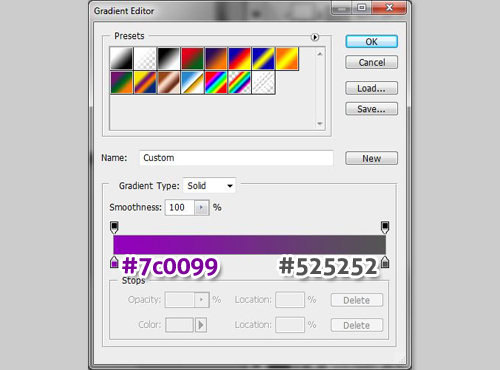
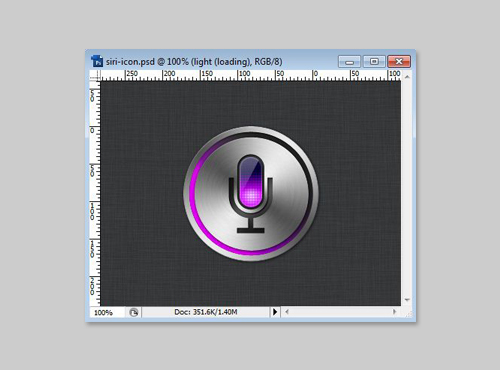
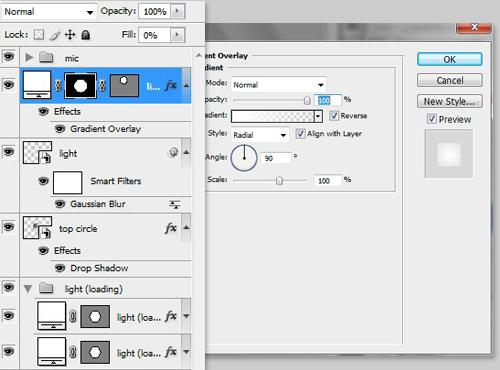
When Siri are processing your conversation. Siri turning on a spinning light that indicates the loading.
So, in this step we will create this light loading indicator effect.
First, create a circle shape layer using Ellipse Tool (U) this circle has the same size of circle depth layer.
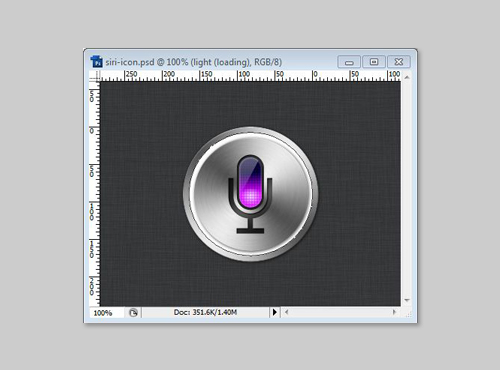
Next, add Gradient Overlay from #D73FDD to transparent.
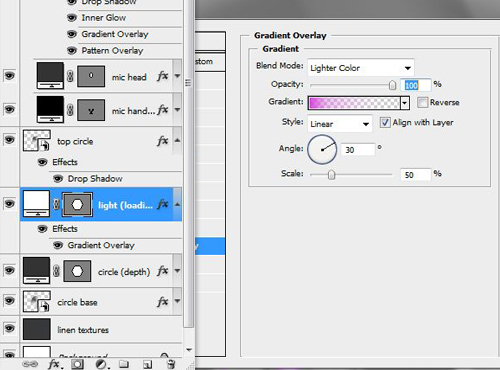
Duplicate this layer.
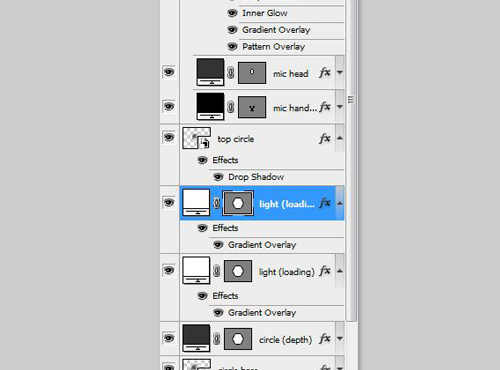
Then, adjust its gradient setting.
Now let’s see the result for a while.
Step 16
We are almost done here. But we need to add last detail on it. So, In this step we are going to create a bright sort of meteor-like light effect on this light-loading-indicator.
First, create a Rectangle shape, remove its vector mask then set its Fill value 80%. In the Paths tab, create a new path layer.
Step 16.1
Remember how to create a custom shape we’ve done in Step 8? We will do the same steps here.
Select Ellipse Tool (U) in the toolbox and in the Tool Options Box change its mode to Paths. Create a circle shape layer, which is slightly smaller than the depth circle layer.

Step 16.2
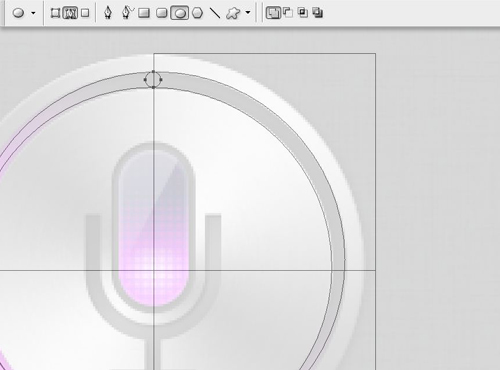
Now create another smaller circle path this time change the pat mode to Subtract from path area (-) then align it at the bottom left of the previous circle. (See the screenshot below)
Step 16.3
In this step, select Rectangle Tool (U), keep its mode to Subtract from path area (-) and create two rectangles as seen on the following screenshot. These rectangles will trim the circles half to the right and to the bottom.
Step 16.4
Now and again select Ellipse Tool (U) in the Toolbox, draw a circle path right between the two circles with Add to path area (+) mode.
Step 16.5
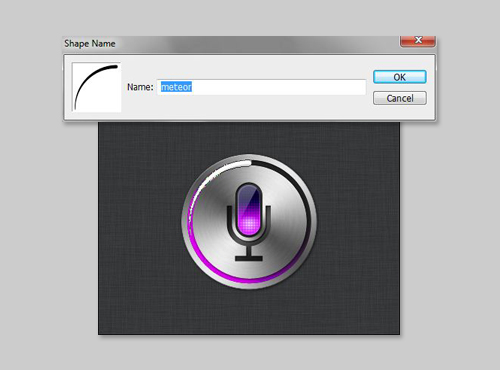
Go to Edit menu and select Define Custom Shape, let’s name it meteor, well, you can always name it that suit your style, this name is just optional.
Next, select Custom Shape Tool (U) in the toolbox and select our just made custom shape then draw it between the two circles.
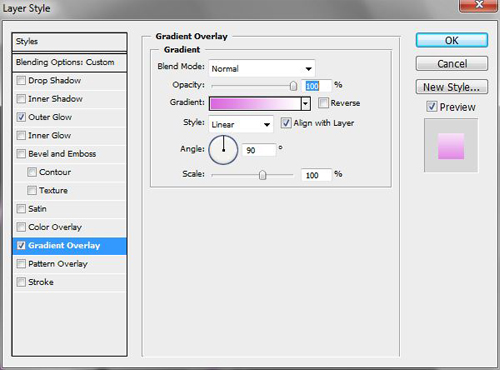
Step 17
Now let’s style this custom shape by adding Outer Glow, change glow color to #DA68DE
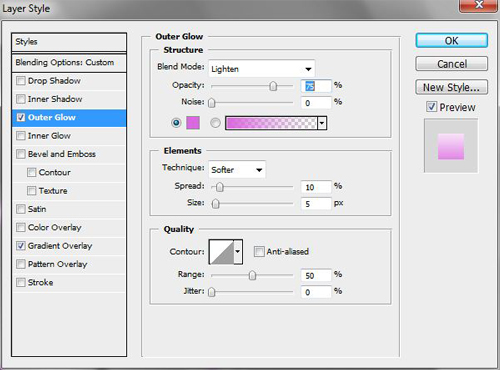
and Gradient Overlay with color gradation from #da68de to white.
Convert this layer to Smart Object and go to Filter > Blur menu, and then select Gaussian Blur.

Step 18
OK, that’s a long process you may take a break for while if you need to. But we haven’t yet done with the light effect.
In this step create a circle using Ellipse Tool (U) above our “meteor”.
Change the layer fill to 0% and add white-to-transparent Radial Gradient. After that right click the circle base layer to create a circle selection and apply Layer mask.
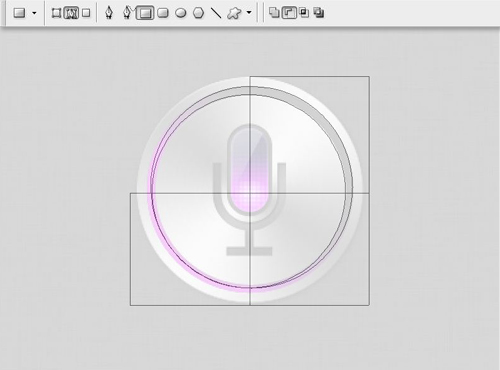
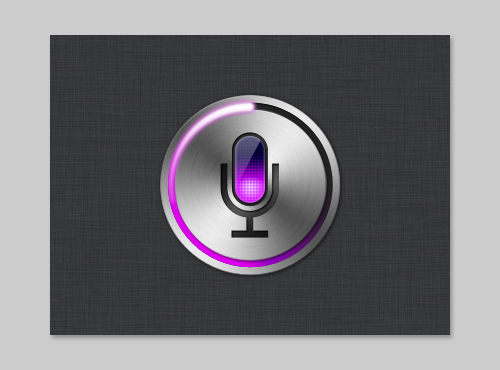
OK we have approached in the last step of our tutorial. The following is the final outcome of our Siri icon. Let’s take a look.
Step 19: Additional
And technically we have done creating our Siri icon. But here I’m going to add some additional layer and element.
First I add a rectangle shape full size of the file dimension above all the layers. Add radial gradient on it with Overlay blend mode and 35% opacity.
Place the icon slight to left and we write “How can I help you?” in the right side with drop shadow layer style.
This is it, the final outcome of our tutorial.
![]()
Download Source File
Summary
We have through a long process to make this icon, and in summary, we have learn some techniques from this tutorial like:
- Creating a quick custom shape.
- Creating a quick custom pattern.
- Creating metal-like & light effect.
- Etc.
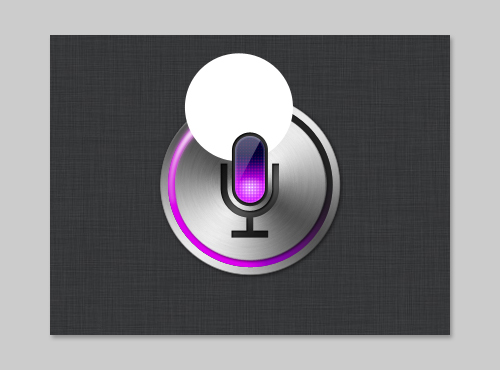
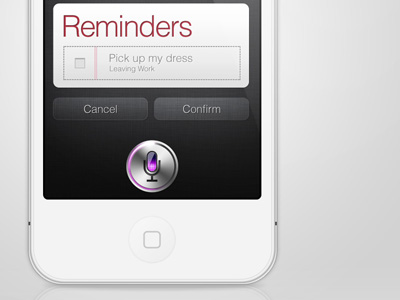
We won’t just stop here, as we are currently setting up the next tut to complement our icons and here is the sneak peek of our next tut:
Thank you for reading and Happy Holidays.


It’s simple to look at but a bit complicated to make. lol but thumbs up to this post!
Wow! Cool tutorial you have here brother
I’ve been a constant visitor of this site. It’s been amazing to learn from here 🙂
You must be very good in this field
Thank you for sharing this with us
You’re awesome man! Will be looking forward more posts from you.. 🙂
Nice post Thoriq keep it up
Nice post Thoriq keep it up
This tutorial is really great. Thumbs up for the person who did this.
Thanks…Nice tut 😀
awesome tut. Thanks for this!=]
how do you center the shapes? Can you please explain how did you get the mic icon circles to be centered? Exact dimensions also
wow, great work and thank you for sharing
Gee, little parts missing!! Looks good, but hard to get exact.
H0rse
nice
very nice…:(
thanks,very nice~