Hi there my loyal readers. Have you ever get mad at anyone? Have you got disappointed coz he’s handsome than you are? Well learn this tutorial and turn him to stone for the rest of his entire life:) Just Kidding. I prepare another tutorial for you guys. In this tutorial you will learn how to create a stone cursed man in Photoshop. Here is the final result of our tutorial that we will going to work on.
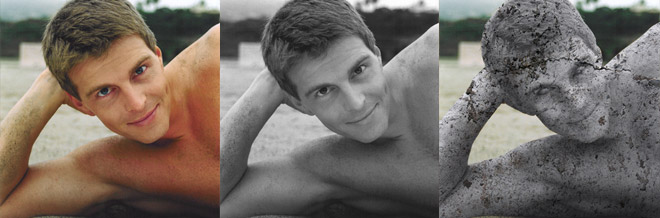
Final Result
This will be our final outcome once we’re done with our tutorial. Now let’s Start!

So to start our tutorial, We need to get a nice image and this this guy below is just perfect. You can download this stock photo HERE

Now after you download this image open this to photoshop. Name the layer of this guy to “Handsome“. Duplicate the “Handsome” layer by right click on the layer and choose Duplicate Layer or CTRL+J for shortcut command. Desaturate the Duplicate Layer. Go to Image>Adjustments>Desaturate. Name this duplicate layer to “HandsomeCopy” and close the “Handsome” layer for a while coz we will gonna use it later on.

On the “HandsomeCopy” Layer, Remove the background and the eyes using Polygonal Lasso Tool (L). Once your done the image will look like this.

This time we need a texture. We will use this concrete texture below. After opening it in photoshop, name the layer to “Texture“. Rotate it to 90° CCW. Go to Edit>Transfrom>Rotate 90° CCW.

This time hold CTRL+CLICK on the “HandsomeCopy” layer so that it will be in selection mode. Click the “Texture” Layer and inverse the selection. Go to Select> Inverse. Now press DELETE on your keyboard.

Now Set the “Texture” layer to Multiply. The image will now look like this.

Working on the eye. On the “Textures” layer, Select an area using Polygonal Lasso Tool (L). Try to select below the eye and once your done selecting press CTRL+J to duplicate the selected area. Same Process on the Right eye. Name the left duplicate to “Left Eye” and “Right Eye” for the right side.

Now move the “Left Eye” and the “Right Eye” layer below the “HandsomeCopy” Layer by click on the duplicate layer and dragging it below on the layers palette. Heres the position of the Layers.

Place the “Left Eye” and “Right Eye” Layer to the proper position Using Move Tool (V). See this image below.

To adjust the Lightness of the Right Eye and Left Eye Layer, go to Image>Adjustments> Hue/Saturation then adjust the Lightness to -30 so it will be a bit darker.

Choose Burn Tool (O). Set the range to Highlights and Exposure to 30%. Start Using burn tool on the sides of the eye.

Now click on the “HandsomeCopy” layer on the layers palette and lets adjust the levels of our image a little lighter. Go to Image> Adjustments>Levels. Use this setting below.

Heres our image now after we burn the sides of the eyes and adjusting the image level.

Working on the hair. We will use Curves to match it with the skin and to make it more lighter. Select the “HandsomeCopy” layer, Choose Polygonal Lasso Tool (L) and select the hair.

Go to Image>Adjustments>Curves. Use the setting below.

Now our image will look like this after we adjust the hair

Now to finish, Choose Burn Too (O) and try to apply some darker area on the nose and the eye a little. Open the “Handsome” layer to bring back the background. Now we’re done!!!!
I hope you learn something on this tutorial and let me hear your feedbacks.
If you like this post, please Subscribe to my RSS feed for more updates. It makes me happy too:)
Also if you like you can bookmark this and share it with the others:)thanks for your support.


Hi
Good written Tutorial.
Mine got bit darker, dunno why heh.
btw. Thx for help of the other tut.
greets
Wow it looks real!!!thanks for this tutorial.
thanks for the comments. Im glad you guys like it:)
Good Tutorial! It was chosen for the main page of Tutorials Room. Keep on the good work 🙂
Nice tutorial Ronald, very realistic result!
From all tutorials i’ve browsed i can say this is stunning…good work really
great tutorial.i never seen something like this.keep up the good work
that looks clean.specially the skin very realistic.
what an awesome tutorial.
My only beef with this tutorial is the texture on the hair. If it could be blended better with the different depths/layers of the hair, I think it would turn out much better.
The rest of it is awesome, especially the eyes.
Hi!
Nice tutorial!:) Tnx 🙂
February 5th, 2009 at 12:16 pm
Hi!
Nice tutorial!:) Tnx
Great Tutorial! It was easy, very well instructed, step-by-step tutorial. I had fun doing this. Just for fun, turn on/off your eyes layer and watch him blink!
If you need more stone textures for this type of work, we have a large variety on our DVD.
easy as pie, great tips.. hmm, gotta look for a victim now 😉
thanks for the tut 🙂
I’d like to try this!!!
This is real nice! Looks Realistic!
very excellent, Short and usefull tutorials…thank you so much keep posting,….